Dan from Oakland
Titanium
- Joined
- Sep 15, 2005
- Location
- Oakland, CA
Nice job! That's all that needs to be said.
Follow along with the video below to see how to install our site as a web app on your home screen.
Note: This feature may not be available in some browsers.
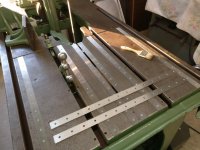
I found several sand inclusions in the vises. At least one of them was visible before machining. I also found two large voids in the base of one of the 4 vise halves I machined.
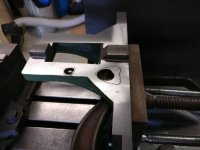
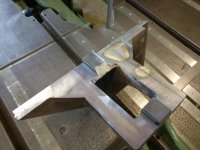
The larger of the two voids was at least 5/8" deep at two points, and was triangular shaped with the triangle legs being more than an inch in length. I did not feel that I could or should fill the larger void with brass, so I made some steel patches that I brazed in. The larger steel patch is 1/4" thick. After brazing and cooling (24 hours in a bucket of dry sand), I cleaned the vise half with a needle scaler (also does some stress relief), and machined the surface flat.
WOW!
Is it really that old?
I have one just like it as a spare.
Never thrown juice to it yet.
Did pirate the nearly new drive wheel off of it to swap to the newer saw that we run regularly tho.
I was guessing maybe the 50's, I hadn't considered it possibly being a war machine!
This one takes a 1" blade tho.
--------------------
Think Snow Eh!
Ox
I wouldn't put that much work into a bandsaw. If you're going to rebuild a machine, at least pick one that does more than saw material up.

D'arcy saw has them in a couple levels of performance. I think they are between $50 and $90. The poly I intend to use was $15 on Ebay.I bought flat belt from McMaster since I couldn't git it [at the time] from "Amada".
But it stretches pretty bad, and I just put a block of something up in there with a C-cramp and adjust as needed.
I have had to replace the replacement belt already I think too.
Whatever was on it when I bought it [back around 2000?] lasted me the better part of 20 yrs, not to mention however old it was at the time I bought it.
--------------------
Think Snow Eh!
Ox
Notice
This website or its third-party tools process personal data (e.g. browsing data or IP addresses) and use cookies or other identifiers, which are necessary for its functioning and required to achieve the purposes illustrated in the cookie policy. To learn more, please refer to the cookie policy. In case of sale of your personal information, you may opt out by sending us an email via our Contact Us page. To find out more about the categories of personal information collected and the purposes for which such information will be used, please refer to our privacy policy. You accept the use of cookies or other identifiers by closing or dismissing this notice, by scrolling this page, by clicking a link or button or by continuing to browse otherwise.