What's new
What's new

303 Stainless-- Help with order of operations / flatness

rokstarr999

Aluminum
Joined
Feb 7, 2014
Location
Sonoma County, USA
303 SST / Part Blank is 1" thick x 3 x 13.

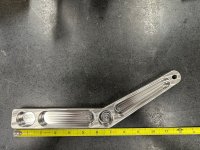
I rotated the part program approx. 30 deg to fit the part into a smaller blank as seen in the 3rd photo. Part finishes at .750" thick and is 1.375" at it's widest point. I used 2 Kurt vises and first op'ed on parallels. I machined all features leaving .230" on the bottom and then cut soft jaws for my second op flipping the part 180 deg / right to left. Second op was just taking off the .230" and radius the outside edge.

I have more than an acceptable amount of hours on this part and it finished with a bow in it. I measured the thickness all around the perimeter of the part and I'm within .002" so I'm assuming the part warped when I took the back off. I'm not sure what I should change or do different to get this thing to come out flat other than maybe not using vices. Clamp the stock down to the deck, machine all features and then slot the profile.

Thanks for looking


Arm1.jpgArm2.jpgArm3.jpg
 
In my shop when we deal with 303ss quite often and when we get a part that bows we tend to lightly stress relieve in a heat treat oven. I unfortunately dont know the parameters and settings. But you might wanna consider putting it in an oven to see if you get it flat. The material wants to bow because of the stresses contained in the metal itself.
 
It mostly warped because you took off most of the thickness from one side.

This material was likely coldrolled. Coldrolled stock has way more stress in it because when they roll it to thickness, it squishes the material in a way that the "outer skins" are under tension/stress. The amount differs depending on how deep you go.

So you took off "all" of the stress from one side (aside from the small amount from the first op), and there's nothing stopping the other side from pulling inward, causing bow.

You need to take material off pretty much equally.

Most likely if you milled your first side with 1/8" off, then you'll find that the part has a small bow when you unclamp the first op. If you can manage to hammer it down into your softjaws to sit flat and take the 1/8" off the back, you'll end up with a decently flat part (within reason, I'm thinking within .010" or so; just an educated guess)

But if you can manage it, I would take 1/16 off both sides to start, then mill your profile, taking off another 1/16", then flip and mill off the last 1/16". If you can manage that, anyway. Trying to make a hockey stick shaped part 3" wide with only 1/16" skin to hold onto wouldn't really work. If your first op only milled your profile down halfway, and then you matched your outer profile for the rest of the thickness in your softjaws for the 2nd op, you'll be even better, flatness-wise.
 
I don't do any milling like this, we do round stuff but lots of stainless and lots of stress relieving. My usual stress relieving cycle is to put stock after roughing in a cold oven, heat to 1000°F hold for at least 30min then shut the oven off and let the parts cool slowly overnight in the oven, often times if there is enough mass in there the parts are still to hot to handle the next morning. At that point though we just leave the oven door open until cool enough to hold.
 
My heat treat book says to heat to 1650f (900c) for 75 minutes for a 1" thick section then water quench in order to stress relieve 303ss.

Not sure if that actually works though, I've never stress relieved 300 series stainless before.

Like others have also said, flip, cut, flip, cut... Most proven way to get a flat ish part.
 
.002 bow is not bad at all for parts like these. Roughing compleatly and then finishing in multiple setups is the only way i can think of reducing it more than that.
 
I measured the thickness all around the perimeter of the part and I'm within .002" so I'm assuming the part warped when I took the back off. I'm not sure what I should change or do different to get this thing to come out flat other than maybe not using vices. Clamp the stock down to the deck, machine all features and then slot the profile.

Thanks for looking
.002 // is not bad even for a flat part this long. Have you checked tops of parallels to see if they are on the same plane? It sounds like you are assuming the part is bowed. That is a pretty safe assumption but you should check it. If it's bowed take a skin cut on each face to remove the surface skin stress. Don't tap the part down for these passes, or the profile pass. Check flatness after the profile pass and if bowed take several facing cuts, only tapping down on the last pass after flatness has been established.
 
I think the OP is saying the part thickness is within .002", not that it is flat within .002". I don't see that he gave a figure for how bowed it is.

Regards.

Mike
If you put the part on a surface plate and push one end down flat to the table you have at least a .02" gap at the other end. I haven't checked it with a feeler gauge. I really appreciate all the input. I'm finding as a machinist holding flatness is often times the most challenging aspect of the job. Or trying to anticipate what may happen and ordering your operations accordingly. I think my first mistake was assuming 303 SST is somewhat stable and didn't carry a lot of stress in the material. This particular part is somewhat awkward in geometry compared to what I'm used to machining. I didn't really know what to do different, but now I have some good ideas so thanks everyone for the tips.
 
If you put the part on a surface plate and push one end down flat to the table you have at least a .02" gap at the other end.
Instead of that, lay it down on the surface plate concave side down. Then see how thick of a feeler gage you can get between the part and the surface plate. That gives you a better measure of flatness.

Regards.

Mike
 
Instead of that, lay it down on the surface plate concave side down. Then see how thick of a feeler gage you can get between the part and the surface plate. That gives you a better measure of flatness.

Regards.

Mike
Or run a test indicator over the top. If you push down on one corner you often amplify the bow.
 
I agree with the above posts. Pushing down on one end and measuring how far off the surface plate the other end is isn't the proper way to measure flatness.

I just quickly drew up a rough sketch. If the part was 10" long and you pushed down at one end and got a .020" gap, the actual measurement you'd see with a feeler under or indicator over the top of the part would be closer to .005"

That is assuming a circular bend in a single axis. it could be a little more or less than that, depending on how even the bend is, etc.

I'd say only .005" is pretty good for how you processed it.

I would also suggest to you that if you did the same part with 1" thick 1018 and ran it the same way, you'd have a lot more bow than you have now.
 
The OP is quite lucky to get excellent, to the point answer's with no nonsense. This is the kind of thread that is what PM was designed for.


Back
Top