What's new
What's new

Advice on how to make a part for K.O. Lee T&C Grinder

jbacc

Hot Rolled
Joined
May 5, 2009
Location
New Jersey
Good Morning, All,

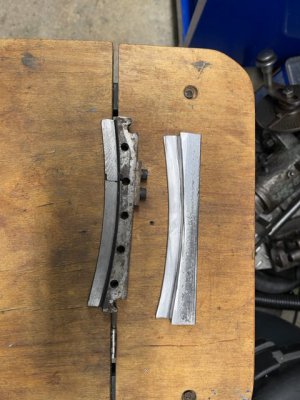
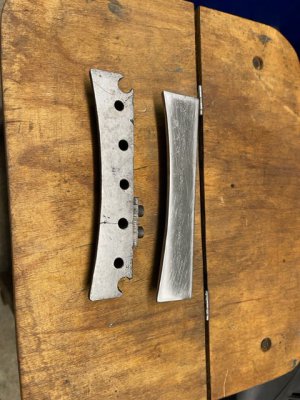
I am moving forward cleaning and repairing my recently acquired K.O., Lee B960 T&C Grinder. I came a cross a part that locks the swivel table down that is cracked and was some what repaired. Adise from it being cracked some of the holes for the table locks are also cracked so I am considering making a new part.

My challenge is how to make the curved/radius cut on the part? I can't seem to duplicate it using my rotary table. I even tried a boring bar in a boring head on my mill and again, I could not duplicate the radius. I have lathes, band saws (vertical & horizontal) a Bridgeport Mill and a K&T horizontal mill but for the life of me, I can't figure out how to duplicate the radius with what I have.

I apologize in advance if this should be a no brainer but I am stumped and appreciate any assistance, comments, guidance that any of you are willing to share.

Thank you,

Joe
 

Attachments

  • image0.jpeg
    image0.jpeg
    135.5 KB · Views: 44
  • image1.jpeg
    image1.jpeg
    82 KB · Views: 44
  • image2.jpeg
    image2.jpeg
    85.6 KB · Views: 44
you need to figure the radius, looks like it will be a big circle. If you have cad should be able to get pretty close
 
you need to figure the radius, looks like it will be a big circle. If you have cad should be able to get pretty close
Thanks, Bob, I don't have CAD nor the skills to use it if I did. Even after identifying the radius, how would you go about cutting it on manual machines? The outside radius I can cut on the bandsaw but the step which is also has the same radius is what has me puzzled.

Thanks again,

Joe
 
You can get good approximation to the radius from the cord (look up the cord of a circle for a better explanation)

As to cutting on a manual, you can try a step approximation, or a large rotary table, or find a friendly cnc owner in your locale and just ask him to cut the curve for you. It's a bit of a slog from here else I'd offer to do it myself.
 
Old Skool. You lay out your part, blue it, and scribe the radius. Then you just move the mill to cut away 1/2 the scribed line. Some tips: Use a sharp end mill so you don't roll a burr on the top surface. Don't try to move both axis at once. Move the axis that moves the cutter away from the scribed line first, say .050 at a time. Then use the other axis to bring the cutter to the line. Measure the mating part to get your radius/diameter for your layout.
 
On a manual machine I would just step it out with the readouts if you have them. You can do it with the dials too but it's a lot bigger pain in the you know what. The cut to the line method would also probably work fine with a little hand dressing, the radius is probably all clearance.
 
You can measure the table swing and get the radius of About 16" but knowing that will be of little use.
Notch it out the brake line of the old part and arc welding may be the best choice. then flat grind the sides and die grinder the inside flush.

Another way take a piece of 3/4 x 1 x 7 , transfer and make the holes, scribe the outside arc off he old part, and then eyball the inside arc to a line, Inside just has to miss +- a 64th would be ok.
 
Last edited:
I appreciate those of you who took the time to respond to my request for help so very much. Considering what the part actually does and knowing that my options were somewhat limited, I decided to hack a new part. Yes, it's a hack job but the resulting part is exponentially better than the one it's replacing. I still have to drill the tapered holes and the two mounting holes.

I band sawed the part from a piece of mystery plate material I had. After laying out the cut lines, I took an angle and bench grinder to the part. Certainly not proud of it but heck, if I drill the holes properly, it will work just as well as the original.

Now, the next challenge and question if I may, what size tapered reamer for a pin that is .254 on the small end and .290 on the large end?

Thanks again for the help.

Joe

Attachments​

  • image0 (1).jpeg
    image0 (1).jpeg
    69.9 KB · Views: 1
  • image2 (1).jpeg
 
That's called "git-r-dun." As long as it works and doesn't damage/wear anything else during operation, nothing wrong with that. Tapered reamer should be a #5.
 
That's called "git-r-dun." As long as it works and doesn't damage/wear anything else during operation, nothing wrong with that. Tapered reamer should be a #5.
Thanks much, you're too kind and I appreciate it. #5 tapered reamer it is....

Joe
 
I kind of missed the party here. I have mounted a piece of flat bar to the rotary table extended outward far enough to cut a desired radius on such a part like this. It's really easy to determine the radius, just measure from the pivot point on the table out to the edge where the clamp goes, and you have it.
Those pins are just straight, not tapered. All it does is hold the clamp in place, so it doesn't flop around. No need for a taper pin. This is what I remember from my KO Lee T & C grinder I had.
Hi Ken,

Thanks for your input, your insight on clamping a flat bar to the rotary table would have been a big help to me. As I mentioned in a previous post, I wound up hacking a part using a band saw, angle grinder and bench grinder. Not my best work but it functions and considering the part it replaced was broken in two, the replacement is exponentially better.

As far as the pins, they are in fact tapered. With the help of several forum members including Michiganbuck, I ground an existing reamer I had into a tapered reamer. No measuring, just trial and error until I got a good fit. I attached a couple of photos of the finished part installed on the grinder.

I can't say it enough, thank you to all who took the time to offer their advice, I am so very grateful.

Joe
 

Attachments

  • image0 (2).jpeg
    image0 (2).jpeg
    129 KB · Views: 17
  • image1 (2).jpeg
    image1 (2).jpeg
    107.6 KB · Views: 17
  • image2 (2).jpeg
    image2 (2).jpeg
    114.2 KB · Views: 17
clamping a flat bar to the rotary table
If you have a really big radius, and the bar and part would need support because it hangs out too far over the edge of the rotary table, you can locate a dowel directly on the vertical milling machine table, and pivot the long flat bar on the dowel, letting the table support the bar and part against gravity. If you CAREFULLY AVOID climb milling, you can rotate the flat bar by hand (lever) taking the part into the cutter, no rotary table needed. If you inadvertently climb mill, you are probably looking at a ripped up and/or thrown part and a broken cutter.
Before I get safety flak from the audience, users of lever-operated manual mills, such as the Nichols, are intimately familiar with avoiding climb milling and the consequences of messing up. You have to understand what you are doing, and it is not rocket science.
If the idea of manually powering the (1 degree of freedom) guided part into the cutter freaks you out, you can improvise a simple screw feed to power the feed motion. The flat bar is pivoting, so the screw nut and thrust bracket need to pivot also. You do not need a worm and worm wheel when cutting a short section of large radius. You should still avoid climb milling with a lash-up like this.
 
All possible options. Lot of work for one part though. If you've got a DRO and a decent sized cutter it's a quick job with no extra material needed. You can even use a boring head set at a larger diameter so that it takes less "scallops" for the same cusp height. But anyways, job's dunzo.
 
Nice looking part...you might put the center hole and the bevel on the angle stop that doesn't have one(just for looks).
Sometimes you remove just one, swing the table for a needed job, and then come back to touch that stop to find your straight table spot.
Sometimes one stop is for a straight/square (90*) end and the other for an end mill dish with using a V block for square, and a tilt fixture for tooth clearance.
 
Last edited:
Nice looking part...you might put the center hole and the bevel on the angle stop that doesn't have one(just for looks).
Sometimes you remove just one, swing the table for a needed job, and then come back to touch that stop to find your straight table spot.
Thanks again for all your help.

Joe
 
Joe,
Sorry I left you hanging on that part reproduction. Could have pulled one from my 2- K.O. Lees and ground a perfect match on my Weinig Profile grinder but unfortunately nature decided to gift me with 2 Wisdom tooth issues on Christmas eve and its been just a bit exciting around here this week. :willy_nilly: Finally got the surgery out of the way this morning. Check back with in a day or two!!
Johnny
 
Hi Johnny, so sorry to hear about your wisdom teeth issues. I'm wincing just thinking about it....
The timing could not have been worse not that there is ever a good time it.

In the grand scheme, my issue is/was insignificant. With the help of some very gracious people on this forum, I was able to hack up a part which is part of the fun of owning old machinery. The part turned out good and it is totally functional.

Thanks for checking in, but most important, you take care of yourself and get well.

Happy New Year!

Joe
 
I have cut all kinds of large radius features like sfriedberg described. Not to large emil long lever and a snug pivot. Usually a four flute not over 1/2". Rough it out the quickest way then just light cuts ,the longer the lever the smoother the cut and the tighter you can make the pivot. Scrap pile tooling is all you need!

I have smaller pivots made out of scrap hex pieces. A lot quicker than screwing with the rotary table.


Back
Top