What's new
What's new

Bridgeport Clone Reconditioning

jtcrowder49

Plastic
Joined
Aug 8, 2022
I’ll start by saying thanks to the cool folks here. After posting about a clone in the antique forum, much thought and encouragement. It’s here at the house and it needs some TLC.

I hope this is the correct place. It seems to be even after reading the forum/sub rules. Please educate me if not.

I’ll keep the details short for tonight, but I plan to update this post tomorrow when I’m fully alert. There is so much more information!

After finally getting this thing home, I realized it’s one of the uglier machines I’ve seen. Don’t get me wrong, I am beaming with pride over my first mill but I decided it’s appearance needs to change to meet my pride. (At least halfway!)

After a couple hours of YT vids and forum searches I decided it best to skip the “quick paint job” I had in mind and just do the thing right. Seems like it will be easier to paint in parts anyway.

I started tearing into the machine, carefully sorting parts and pieces as I went along. I spent about 7 hours on it so far and the pics below will show you what I have uncovered! Some good, some (I think) less than desirable. Since it’s my first mill, I think it’s still a great purchase. More details to come tomorrow, please feel free to comment on what you see as well. I plan to post updates each day I complete a milestone. Better pics coming too! I just had to get this thing in front of you guys tonight!


Hi all,

You can see my previous post just above this. I'm finally making the long version. Let's get started.

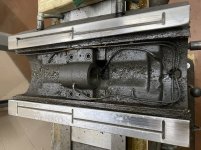
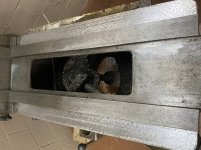
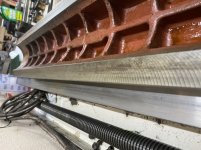
As you guys will be able to see from the photos, I have finally started with the tear down of the machine. I pretty much have it down as far as it can go without a an engine lift or similar. So many feelings about this. Ive been through regret and pride multiple times. Tear down was pretty much uneventful. Everything came apart easy enough so I think I might be the first person to actually get this far into this thing. It is absolutely covered in 30 years worth of shop dust. As you can see from the photos, there are some less than desirable wear items, but honestly, I would have never seen them even if I knew to look there. I wasn't going to disassemble this machine in the old environment. It's mine now, so it is what it is. Nevertheless, I would appreciate honest opinions. It seems to be mostly worn at the saddle. Y axis seems to have more scraping remaining than the X axis. I havent been able to get the underside of the table cleaned yet to look at it.

I did run a dial indicator across the table in both directions before disassembly. End to End along the X axis was about .007 variance across the table. Y was about .004. My main hobby is remote control aircraft so I was pleased with this. I have never been that accurate doing anything in that hobby but I also have never had a tool with this amount of resolution. So, we will see how it goes.

Backlash seems to be about 22 thou on the Y axis and 28 thou on the X axis. I have ordered some replacement nuts for both X and Y. Looking forward to their arrival on Monday along with some other odds and ends that were missing. (Handles and such).

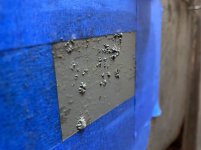
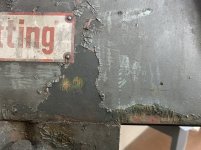
As far as the paint job goes, I stopped in SWP and picked up some paint stripper and a gallon of primer. I will probably go the enamel route since I plan to upgrade to a better machine if I stick with it. I was even able to do a test with the stipper today when I got home. I've attached some pics. Look how this this green layer is between the outer latex layer and the red layer under it. What is this? I thought bondo? The entire machine is this way, which has me thinking against taking a wire wheel to it. (You can see I already tested it)

I've got plans this weekend to take the saddle and smaller pieces outside to power wash them, strip the paint, and apply primer. More pics will come in the next update. I will leave you with a couple questions.

Question from earlier: What is this layer between the paints?
I looked into having the saddle re-scraped, but it appears that the table must also be sent with the saddle. Same with the knee. Is this true? If so, I don't think it's worth my time for such a cheap machine.

I only paid $2500 for it. Year model 1988. As asked, I am located in Alabama.
 

Attachments

  • 7DEB06FE-F8D8-4DB8-8B09-4210F6E3DC5E.jpeg
    7DEB06FE-F8D8-4DB8-8B09-4210F6E3DC5E.jpeg
    317.4 KB · Views: 84
  • 1920F6D5-29F1-4BF1-938E-F77EFCF04098.jpeg
    1920F6D5-29F1-4BF1-938E-F77EFCF04098.jpeg
    422.9 KB · Views: 84
  • DB79400F-B363-4C26-A209-54B46F9593C8.jpeg
    DB79400F-B363-4C26-A209-54B46F9593C8.jpeg
    393 KB · Views: 85
  • 5D77BDA7-F0F6-4056-BE27-18F4F3C210B9.jpeg
    5D77BDA7-F0F6-4056-BE27-18F4F3C210B9.jpeg
    210.4 KB · Views: 47
  • C8851A12-4A12-485A-AA89-63119D776FC8.jpeg
    C8851A12-4A12-485A-AA89-63119D776FC8.jpeg
    259.2 KB · Views: 46
  • 32A11FC7-0682-4D6A-9098-C2DE57FC6E6E.jpeg
    32A11FC7-0682-4D6A-9098-C2DE57FC6E6E.jpeg
    239 KB · Views: 47
  • F3D1A690-9480-4C2B-8F9C-A74C952694A7.jpeg
    F3D1A690-9480-4C2B-8F9C-A74C952694A7.jpeg
    411.2 KB · Views: 46
  • A2B7D6A4-7DAB-435F-8E8D-5C6AE452703E.jpeg
    A2B7D6A4-7DAB-435F-8E8D-5C6AE452703E.jpeg
    325.7 KB · Views: 46
  • 879AAA38-23AE-4BE5-BD60-1A57DD151AA9.jpeg
    879AAA38-23AE-4BE5-BD60-1A57DD151AA9.jpeg
    340.7 KB · Views: 46
  • A741D141-A358-445C-B585-0638ECB36F3A.jpeg
    A741D141-A358-445C-B585-0638ECB36F3A.jpeg
    421.8 KB · Views: 47
Last edited:
I suggest you change the title to "Bridgeport Mill Rebuild" before you fall foul of the "Meaningless Title Rule"
John, his title seems fine, if he is actually going to do the work as defined by the Sticky at the top of the page titled acceptable content. This is not the rebuilding forum but reconditioning forum. I dont know why you think his title is meaningless? Feel free to PM me if you want to explain your concerns, but for me I dont see any yet.

Charles
Moderator
 
Top of the knee looks good. That's one of the area's that tends to be the most worn on these. I think a good cleaning will do well. What does the underside of the table look like?
 
MB you better put on your glasses. The top of the knee and saddle look bad to me. 95% of scraping is gone on the saddle top and the top of the knee is scratched pretty bad. He says he is sending more pictures, so I'll wait for them to make some suggestions. JT where are you from???
 
Caution to handwheel numbers, don't wire brush them.
Very carefully with a small fine file just take bugs just down to the original manufactured height/surface. Then with fine emery paper backed with stiff card paper- or perhaps a .015 shim sand just to brighten up (if you wish to make them bright). That keeps the numbers and lines sharp-edged and crisp like new.
 
I tell folks cleaning a machine is like washing dishes in the sink. Hot water works better then cold. I mix 20 to 1 and industrial soap in a bucket of super hot water and a brush and some rages. Wear rubber gloves. Then on the stubborn stuff use some lacguer thinner and a putty knife. The table looks worn in the middle. Take a micrometer and mic the table top to the bottom. The 4 corners should be the same and in the middle it will be lower...lets see how much. Then if you have some 3/4" dowel pins lay them against the dovetails and mic them if you have a big micrometer or a height gage up against the pins on one side and reaching over with a dial indicator. I suspect it will be around .002" worn. Lets be a detective and see how bad things are. Oh do you own a granite surface plate? Big enough to set the clean, stoned table on?
 
As an amateur rebuilder who has rescraped some machines I wouldn’t even think about painting at this stage. Sure, I‘d clean it up, refresh the lube system, take some test cuts to see about spindle bearing condition etc, but painting? Heck no.

I’d also do the test cuts before committing to a rescrape. See if the machine will do what you need.

Rescraping a mill this size is not difficult, just time consuming. In my area, definitely not cost effective to have it done by a pro shop. Better, just to find a better condition mill if you’re not willing to scrape it yourself.
 
MB you better put on your glasses. The top of the knee and saddle look bad to me. 95% of scraping is gone on the saddle top and the top of the knee is scratched pretty bad. He says he is sending more pictures, so I'll wait for them to make some suggestions. JT where are you from???
I wasn't talking about the saddle, I was talking about the knee. It's not great, but I've used worse machines that only had flaking left on the last 3" of the top of the knee that could still make good parts, so from an evaluation standpoint I think it could go back to work after a good cleaning and gib adjustment.

Once the OP has an idea how repeatable it is and if he wants to do a full refit and start scraping, I'm just saying he could be starting with a lot worse.
 
Look how this this green layer is between the outer latex layer and the red layer under it. What is this? I thought bondo?

Question from earlier: What is this layer between the paints?
I looked into having the saddle re-scraped, but it appears that the table must also be sent with the saddle. Same with the knee. Is this true? If so, I don't think it's worth my time for such a cheap machine.
Cannot say I've seen latex paint from the mfr (yet), so my guess would be the green is the original factory color. If the paint stripper is not lifting the green color, leave it alone and paint over it. Beyond that just give it a good cleaning, put it back together and use it.
 
The top of the knee and everything else looks bad to me. He can use it that way for years as a hobbyist or a professional, but if he wants to make it better....he has some things he can do. All he has to do is ask and I will try to help here or on the phone.
 
QT luckey7 : {I wouldn’t even think about painting at this stage. )
Some older machines are so full of casting filler that it can be better to sand them. but you want to wear a good mask dealing with old paint.
 
Hi All,

It's been a few days since my last post and I have been a busy one. I've also been sad, angry, proud, happy, and irritated but that's what happens when you take on something new and exciting you've never done before.

I elected to go and rent the pallet jack again to move the machine out of the shop and I am glad I did. Put it on the edge of the driveway and (gently) power washed as many sins away as possible. It took about 4-5 hours of a cleaning cycle before I was happy. The base was FULL of coolant and metal shavings/scrap. Vacuuming that stuff out to keep it from getting into nature was a real chore. After I got the thing as clean as I could I took after sanding it from the turret down with 80 grit to smooth it out and give the primer something which to bond.

I borrowed a detail paint sprayer from a friend of mine and after a quick test thinning the primer I was off to the races. Honestly, I am really happy how the base and knee turned out. It looks 1000% times better than it did when I brought it home. Also, the smell is completely gone.

Moving forward:

I have to decide what I want to do with the Ram and the head. Of course, I want to get the same primer on them. My first attempt with the primer was on the ram and there is plenty of roping in the paint. I hate it, but I did it to myself in the process of learning. I'll probably hold off on this until I get it assembled and use it some. I just cant wait any longer!

I've decided at this point I probably will not spend the time on a base coat like I had thought. The primer looks good enough to me and its already been coated in that twice.

I've moved the machine back into the corner of the shop since I need to return the pallet jack tomorrow.

Next on my to-do list is clean up and maybe paint some of the saddle. Also the journals/supports for the bearings that are front facing will get the same treatment.

After that I am hoping for a quick assembly. I have a few parts that have arrived. These were either missing or I decided to replace them since the machine is already disassembled.

X and Y table nuts.
All handles/gear selectors on the head
Lubrication One Shot style pump and 4mm aluminum lube line.
Felt wipers for all axis (these were completely gone and I am sure this is why the table is scored in some places)
Table locks.
 

Attachments

  • 9863CAB7-20D8-4C22-8CC7-9BED0B20B8AB.jpeg
    9863CAB7-20D8-4C22-8CC7-9BED0B20B8AB.jpeg
    299.1 KB · Views: 22
Dear JTCrowder,

since I think you are a new member here, you might not be aware of the depth of knowledge and hands-on experience represented by some of the people here (not me!) who have been replying to your posts. Between them they have fixed hundreds of machines like yours, and have a few centuries of collective wisdom.

I tend to agree with Lucky7, that paint is the very last step. It pays to first get a bit of experience with the machine, to find out what works correctly and what is broken or problematic. Otherwise you may find yourself taking it apart again to fix something that would have been obvious if you had gotten even a few hours of operating time before the teardown.

As a kid I built and flew RC airplanes -- that's what first got me interested in building stuff myself. Then I got interested in electronics, and then in woodworking and eventually in metalworking. I find making things in metal very rewarding, in part because of the precision that's required. It is much less forgiving than most other materials, because it moves much less. So 0.007" of motion (like you saw in the X-motion of the table) might not sound like a lot, but if two metal parts differ in size by that amount, it can be a big deal.

Keeping this in mind, since you now have the machine apart, it's a great opportunity to do some basic geometry checks. For example in post #7 Richard King, who is one of those experts, suggested some simple measurements you can do, to assess the condition. Again in post #11, he repeated his offer to help. I recommend that you do the checks that he has suggested. If you don't have the measuring tools that are needed (micrometers, dial indicators or test indicators, dowel pins) you can get them easily at pretty low cost. They will be needed going forward anyway. If you don't understand what's being asked, then request clarification.

There might be some simple steps you could easily take that will greatly improve the usability of the machine (for example, square cutting some of the worn way surfaces with a carbide scraper, or scraping new oil pockets in those surfaces). But that's premature, some measurements are needed. If an expert like Rich were at your place with a few simple tools and an hour or two of time, he could probably tell you exactly what was or was not needed to get the machine to operate well at any desired level of precision. You can take advantage of that knowledge very easily, provided that you don't ignore what they have asked or suggested.

Cheers,
Bruce
 
Last edited:
Hi All,

Sorry for the long wait between posts. I have been working on the mill but some life events caused a delay. That being said, I think maybe I should give some background and update.

Firstly, let me say thank you to the members here who have posted and offered wonderful information. I have read every word and I appreciate the time you took to write to me in detail. I hope no one feels ignored. If I may, please let me explain why I have worked this project in the order you have read above. I'll spare you the detailed write up of the emotional roller coaster working through the project. The short version is 3 reasons. 1) This thing was stinking up the house. 30 years of machining dust/muck and a base filled with coolant. I didn't realize this until it was in the house and in the corner of the shop. With limited means of conveyance for something so large, time was not really on my side. I made attempts to clean it up by hand but it became clear rather quickly that the pressure washer was going to be the necessary approach. Thus, the accelerated "paint before operation". I had rented a narrow pallet jack and was looking to return it on time. 2) If the machine was in such poor condition I wouldn't be able to run out and acquire another in any "short" amount of time. Since I would be owning it for some significant amount if it was a good or bad purchase, it just made sense for me to paint it. I knew I wouldn't be happy with its previous state so I paint it while it was being pressure washed outside. 3) I needed to understand as much as possible about the function of the machine. The best way I have found is to be hands on with some direction from the manual and YouTube. This proved to be wonderful in my opinion, and I know so much more than I did before.

All that said, I am not ignorant enough to say my approach wasn't a mistake. I put myself on a time constraint for a major project and when that happens I tend to make mistakes and my judgement might be foggy at times. In hindsight, I wish I had done 3-6 hours of operation with the machine as others suggested. I made multiple orders to spare parts houses replacing wear items as I found them. Some made substantial differences, others are waiting to be seen. Frustrating and irritating process. Overall, I'm happy with the experience I gained and the rebuild has come to it's end.

So, where do I stand today? As of last night, I have a fully assembled machine. The ways are clean and move smoothly through, what I estimate to be, 70-80% of the travel. The one shot lube system now works properly. Most of the cranks, and levers have been replaced or freed up. The only thing that was not re-installed was the DRO. It needs some work on the inner ribbon cable to get it back right. As such, the glass scales are not installed yet either. I'll make a decision on this later.

What's next? I finally feel comfortable running power to this thing. I'm looking at about 100ft run on a 220v line. This will probably happen this week or next. In the mean time, I will create a new thread for some questions I have on the motor wiring.

Until then, If the offer from some of the more experienced members for help evaluating the condition of the machine still exists, I'd love to get in contact. My limited experience tells me this will be plenty for what I plan to do, but I would absolutely love to know what it's limits are.

I'll be happy to report back if there are any more developments, until then, here are some photos of the current state and a list of everything I have replaced.

Replaced items:
All crank switches on head
Quill feed wheel
Lubrication lines
One-shot style pump
Y axis table locks
X feed nut
Y feed nut
X axis bearings
Y axis bearings
Felt Sweepers
Lubrication compression fittings/ferrules

Cleaned:
Cleaned X Lead Screw
Cleaned Y lead Screw
Cleaned Knee-Z Lead Screw
Cleaned and Greased Knee Bevel Gears
Cleaned and oiled ways and gibs on X&Y
Cleaned all coolant from base
Cleaned all lubricant manifolds

Obviously, de-greased and painted most of the machine.
 

Attachments

  • FDAE66C7-5B01-4BD8-9E0E-31A522407886.jpeg
    FDAE66C7-5B01-4BD8-9E0E-31A522407886.jpeg
    317.3 KB · Views: 11


Back
Top