What's new
What's new

camel back drill press

Dundeeshopnut:

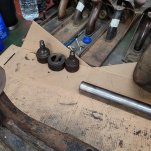
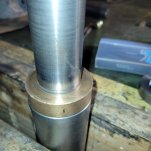
On the camelback drills I have seen/worked on, the ball thrust bearing was used at the bottom end of the quill to take the thrust load from drilling. The spindle, at the top of the quill usually has a set of thrust washers and adjusting nuts. At the top of the mainframe, the crown gear is usually seated on a thrust shim (washer). On really old drills, this would have been bronze, and on newer (if you could call ca 1917 newer), the thrust shim under the crown gear is reinforced phenolic. The thrust shim under the crown gear on my Cincinnati-Bickford camelback drill (1917 or thereabouts) is maybe 1/8-3/16" thick phenolic. On the Barnes camelback drill (1885-87), the thrust shim is bronze.

When I got my Cincinnati Bickford camelback drill, a good 25-30 years back, the ball thrust bearing at the lower end of the quill was pretty much as you describe. Whether someone let things get loose so some of the balls were lost, or whether due to wear in the thrust washer on the top end of the quill, the ball thrust bearing at the business end of the quill was shot. I took things apart, miked the journals and called Kaman Bearing (now Kaman Industrial Technologies or something like it). They matched me up with two INA ball thrust bearings. I replaced the bottom thrust bearing, and got rid of the thrust washers on the top of the quill in favor of a ball thrust bearing. There was enough space on the journal and adjusting nut/thread on the spindle to let me make that change. The new INA ball thrust bearings are enclosed with sheet metal shields, so the balls are captive. The move to get rid of the thrust washer on the top end of the quill made a world of difference as it let me put a little preload on both thrust bearings. With the original setup, having a thrust washer/thrust collar and adjusting nuts, there had to be some free play. I have not had to touch anything on that C-B drill in ages, just lube her up and put the belts back on (I take the leather flat belts off the pulleys when not in use) , dog down the job to the table and go to work.

The little Barnes camelback drill, old as it is, has bronze thrust washers. That little drill apparently had light use over the past nearly 140 years and is a nice, tight machine. I did not have to adjust the thrust collars on the spindle/quill. Still in good adjustment when I checked and powered that little drill up a few months ago.
 
Yep, mine is as you describe with a loose ball thrust on the bottom and phenolic on top. The OP stated no balls of any kind and showed the pic of that thick bronze "thrust bearing" that presumably came off the bottom. Your improvement of balls at both ends of the spindle sounds like a "top shelf" improvement for a machine that has been "used a bit'.
 
Interestingly, Champion Blower & Forge touted their blacksmith's wall (or post) drills as having ball bearings. In actuality, the only ball bearings on those drills were the spindle thrust bearing. All else used plain cast iron bearings.

As I recall, the cost of the two INA ball thrust bearings was not too much. I probably could not have bought a chunk of bronze cored round to make new thrust washers for the price I paid for the two ball thrust bearings.

When I first got my C-B camelback drill and had it under power, I discovered that there was excessive end play in the thrust bearing/thrust washer on the spindle/quill.
As I looked further, I discovered the bottom ball thrust bearing was the culprit. Using the drill as it was had the thrust being taken by the race plates of the former ball thrust bearing. Raising the spindle, I saw quite a bit of free play. I digress a bit here. At about that same point in time, we were having some major headaches with some newer hydro turbines. These were relatively new units, being of the vertical Kaplan type. The design used a lot of weldments that had been machined to form the barrel as well as wicket gate control ring. This ring was made in two 180 degree segments, making a ring maybe 8 feet in diameter from steel plate. The ring had a tapered male cone section, and it rode on a stationary ring with a matching female cone. Loose steel bearing balls were placed in the annular space between the two cones. There was a takeup adjustment to reduce the play of the wicket gate control ring. Problem was that when the wicket gate control ring was moved by its hydraulic cylinder (known as a 'servo'), the ring bound and then jumped, making precise control of the turbines difficult. Getting the turbines synchronized to the buss (and into the grid) was really a problem with that lack of smooth movement of the wicket gate ring. Taking things apart, we found we had multiple problems.

The location of those hydro turbines was wet with water that seeped thru construction joints in the surrounding concrete. This water, with whatever leached out of the concrete, got into those wicket gate ring bearings. It washed out the lubricating grease, and the result was the bearings were pitted and black in color. The lands on the ring and stationary cone were also pitted and corroded. To add to the mix, when we spoke with the turbine builder, they explained the design was based on the idea that the hardened steel balls would cold-work a groove into the softer steel plate of the gate ring and stationary cone. This groove would work-harden and make a smooth running surface for the balls. In actuality, aside from the corrosion issues, the balls tended to form a deeper groove in a localized arc where the ring spent most of its time.

We polished the ring and cone with flap wheels on air die grinders, and dumped in a load of larger sized bearing balls and socked up on the adjustments. This worked OK for a short time, then the problem returned. The truth was the turbine builder had cheaped out in their design. I had taken exception at the onset of our going to contract for those turbines, with the use of large machined plate steel weldments instead of iron or semi-steel castings. Older hydro units would have been built with castings. In addition, older units would have used bronze bearing pads for the gate ring to run on. As I said a few times over in meetings and in memoranda: "This is nothing but an old-time overgrown bicycle bearing". Champion and Buffalo used a very similar design with adjustable hardened cones for their forge blower bearings. I've rebuilt a few of those forge blowers, and always go to a larger diameter bearing ball. For that application, it's a fix that works just fine and has given me years of good service.

Years later, the turbines were overhauled in a 'Life Extension' program. I was retired by then, but the word reached me that the gate rings got bronze bearing pads. Unfortunately, the rest of that overhaul and upgrade went very badly, and where we had kept those units running and putting power into the grid, the units are more unreliable and down more often than running.

On my C-B camelback drill, when I inspected the race plates on the ball thrust bearing, I saw the races were too damaged for re-use. The surfaces of the grooves were rough, with metal spalled off. Rather than mess around with loose balls and hoping they would form a better groove, I went for new ball thrust bearings.

I found that Kaman Bearing (as they were called back then) had a great sales staff. We used them to provide bearings for all sorts of plant equipment. In my other work on our tourist railroad, Kaman came thru for us in matching up really old ball bearings of large size. I've ordered Timken roller bearings from them for my old BMW motorcycle wheel hubs. Kaman's sales people had no problem in matching up INA ball thrust bearings for my C-B drill. As I recall, they even set me up with two slightly different bearing bores. The bottom bearing, which takes the spindle thrust, was ordered with a slightly tighter bore. The top bearing, which needed to move axially for thrust adjustment, was ordered with a slightly looser fit in its bore. As Dundeeshopnut notes, it is a 'top shelf" repair.
 
Joe,
I finally got some clean up done and had a chance to get some measurements. Firstly I would like to apologize if my methodology is elementary and lacks a machinists thought process. I thoroughly enjoy learning and often will realize how unconventional some of my original methodologies were looking back. I installed the crown gear from the bottom so as to demonstrate a thought I had in reference possibly centering the crown gear in the babbitt housing should a babbitt pour be attempted. I would like thoughts on this as the gear could be clamped in place and babbitt rite or equivalent placed around the bottom at the gear to dam things up. Photo A9 is .0001 dial and is showing deflection. Before measuring I moved the quill all the way to the left and zeroed the dial. I then moved it to the right in an attempt to demonstrate the difference. I was able to use a magnetic base clamped to the quill when measuring the top of the housing where the thrust washer rode. Measurements were taken with a .0005 indicator as that seemed to adapt to the task easier than anything else I had on hand. If facing the press A10 would be the 9:00 position, A11 the 6:00 and A12 the 3:00.
 

Attachments

  • A9.jpg
    A9.jpg
    191.2 KB · Views: 20
  • A10.jpg
    A10.jpg
    195.5 KB · Views: 18
  • A11.jpg
    A11.jpg
    203.4 KB · Views: 18
  • A12.jpg
    A12.jpg
    167.4 KB · Views: 19
  • A13.jpg
    A13.jpg
    269.2 KB · Views: 20
Joe,
I finally got some clean up done and had a chance to get some measurements. Firstly I would like to apologize if my methodology is elementary and lacks a machinists thought process. I thoroughly enjoy learning and often will realize how unconventional some of my original methodologies were looking back. I installed the crown gear from the bottom so as to demonstrate a thought I had in reference possibly centering the crown gear in the babbitt housing should a babbitt pour be attempted. I would like thoughts on this as the gear could be clamped in place and babbitt rite or equivalent placed around the bottom at the gear to dam things up. Photo A9 is .0001 dial and is showing deflection. Before measuring I moved the quill all the way to the left and zeroed the dial. I then moved it to the right in an attempt to demonstrate the difference. I was able to use a magnetic base clamped to the quill when measuring the top of the housing where the thrust washer rode. Measurements were taken with a .0005 indicator as that seemed to adapt to the task easier than anything else I had on hand. If facing the press A10 would be the 9:00 position, A11 the 6:00 and A12 the 3:00.
Apologies. I realized I got a little crazy with my zeros. That should be .001 dial indicator. For some reason i could not edit the original.
 
While I appreciate you effort, I'm thinking your are making a mountain out of a molehill here. This is a antique drill spindle not a CNC mill quill. Any slop in the bearing can easily be felt by yanking it back and forth and feeling for movement. As far as the face being flat and true, a small square held tight to the protruding spindle and resting on the face, checked at every 90 degrees will quickly tell you the story.
 
While I appreciate you effort, I'm thinking your are making a mountain out of a molehill here. This is a antique drill spindle not a CNC mill quill. Any slop in the bearing can easily be felt by yanking it back and forth and feeling for movement. As far as the face being flat and true, a small square held tight to the protruding spindle and resting on the face, checked at every 90 degrees will quickly tell you the story.
You are probably right Dundee. I tend to overthink things. Question for you guys who have a press similar to mine. Should the hand wheel return the quill? I have seen some used this way but I'm unsure on this one.
 

Attachments

  • 7.jpg
    7.jpg
    55.3 KB · Views: 6
Todda323

The handwheel works a worm geared feed. This is used for fine downfeed, such when counterboring to a required depth, countersinking, or similar operations where a very small amount of downfeed with positive control is needed. The worm should be disengaged to raise the quill, as this is normally a rapid operation and done using the handlever on the RH side of the drill press, above the worm/handwheel feed, or with the 'tee handle' on the LH side of the drill press.

Dundeeshopnut is correct about making a mountain out of a molehill. Back 'in the day' when these drill presses were in common use, dial indicators of the type you are using, were almost an unknown thing. Machinists used a pointer on a surface gauge to check runout, or had some small indicator relying on lever-action rather than a geared movement with hairsprings and works similar to those of a pocketwatch.

To address your concerns about the crown gear and the apparent lack of parallel between its bottom hub face and the top bearing in the mainframe: I'd use Dundeeshopnut's method with the squares to get an idea of where the high side or high spot was located. Another method is to simply slide the crown gear down on the spindle without any thrust shim, and shine a light to see where the gap is and where the tight side is. I'd hit the high spots with a bastard cut file, and keep working with the file until I had the bottom face of the gear hub bedding solidly against the top bearing/mainframe casting. Once I had re-established the face of the upper bearing as square to the spindle, I'd clean up the surface with finer files. I'd also take a deburring tool or 3-corner scraper (which is what machinists used for ages to break corners and do deburring) and 'break the corner' on the mouth of the babbitted top bearing. You do not need 100 % bearing contact with the gear hub's end surface. Some work with files will get you a reasonable flat surface, but the key thing here is getting that surface back into square with the centerline of the spindle.
Your dial indicators are great, but given the type machine tool and the wear in the bearings, using modern dial indicators can be akin to what is known as 'chasing your tail' or 'picking fly shit out of the pepper'.

When you have the top of the upper bearing squared with the spindle, install the crown gear and top shaft with the bevel pinion. Pack temporary "C" shims around the spindle to shim the crown gear up into proper engagement with the bevel pinion. The "C" shims are shims which are like large washers with two parallel saw cuts from the outer circumference to the hole. This resembles the letter "C", and lets you slide shims on and off the spindle without taking the top shaft out to remove the crown gear. When you have good depth of engagement and good tooth contact, mike your temporary shims. Make a single thrust shim out of bearing bronze, bored to a running fit on the spindle (maybe 0.002" clearance), and faced to required thickness. The two faces of this thrust shim have to be parallel. Miking the shim after a trial facing cut will tell you is the shim is parallel or not. You can put a sheet of abrasive paper on a flat surface (such as the table of a milling machine or a table saw, assuming it has a cast iron table machined flat). Rub the shim in a 'figure 8' pattern on the abrasive paper and mike it to check for parallel if you need to tweak it a couple of thousandths for parallel or thickness. Some coarse emery cloth and a little light oil work well for this, and you can finish with 600 grit silicon-carbide paper. Break the corners on the thrust shim with small chamfers to be sure the gear is not initially riding on a burr.
 
Thanks for the pointers guys. I will give it a try here this week probably. I did have a question about this piece. Since I am still cleaning things up and inspecting them. I found a pretty decent amount of play in these babbitt bearings with the shaft. I'd guess about 1/16. Any suggestions? Re babbitt or bronze sleeve?
 

Attachments

  • A14.jpg
    A14.jpg
    53.7 KB · Views: 15
Todda323

I am glad you appreciate the information we post in response to your queries. If I see things right in your picture in your latest post, the casting with the babbitted bearings takes the lower cone pulley shaft. Regarding going to bronze bushings: While I would not be 100 % certain of it, I am pretty close to that in saying that the iron casting was most likely never line-bored prior to babbiting the bearings in it. The holes in the casting were formed by dry sand cores. The casting likely was molded using a split pattern (or pattern halves mounted on a 'matchplate'). This would put the parting line of the casting running right on the centerline of the bearing bores. The holes, as cast, likely got a bit of 'fettling' (chipping off any flash or projecting pieces of iron at the parting line or split line for the cores). Once that was done, a manufacturer looking at mass producing the drills for the lowest cost would be unlikely to have bored the casting prior to babbitting. Rather, a mandel which was shaft diameter or perhaps a little undersized, was positioned in a jig to hold it on centerline location in the casting. The two bearings were then babbitted. The rough surface of the iron casting in the cored holes did a great job of mechanically locking the babbitt in place. After the bearings were poured, they may well have been line-bored to final size.

Hence, if the bores in the casting are 'as cast' cored holes, or were cleaned up using a core drill prior to babbitting, it would not be possible to press or shrink in bronze bushings. A core drill is a four-lipped drill which self-centers in cored holes in castings. It is used for a roughing cut in cored holes and does not produce a finished or accurate bore.

This brings it back to the babbitted bearings. For a first-class repair, the old babbitt would need to be melted out and the bearings re-poured. Centering a mandrel (or the shaft itself, if the journals are not scored or worn undersized, aka "necked down") would be required. This would give you babbitted bearings at the shaft diameter or slightly larger due to shrinkage of the babbitt on cooling/solidfying. That is what the oldtimers would have done. No line boring. A slow-turning cone pulley shaft on a camelback drill would have been fine running 'as poured' babbitted bearings.

Now we have to think like a backwoods mechanic years ago. The cone pulley shaft on that drill was likely designed to run at maybe 200 rpm by the manufacturer. While 1/16" as you describe it is excessive clearance, there is a way to live with it. Dundeeshopnut suggested it earlier in this thread. Namely: go to grease lubrication in those bearings. Punch in some heavy duty grease such as is made for use on pins and bushings of bulldozers and the like. This type grease is more tacky than automotive grease and a bit heavier in body, being a waterproof grease. The grease will give good lubrication at the lower speed that shaft runs, and will provide some lubricating film for the shaft journals to ride on. Oil would run right out of those bearings. Plain bearings (such as babbitt, bronze, or cast iron) rely on a wedge-shaped film of lubricant to support the rotating shaft journal. As the shaft journal begins to turn, viscous drag pulls lubricant between the loaded side of the journal and the bearing. This wedge shaped film supports the journal while the shaft is turning. Actual metal-to-metal contact does not occur except when the shaft is at a standstill or accelerating or decelerating from running speed. Bearing clearance is one of those interesting topics as too little clearance/too thick a lubricant/too low a speed can result in a failure to form the wedge shaped film and seized or burned out bearing. Similarly, too much clearance prevents the wedge shaped film from forming and the result is a "wiped" bearing (a type of damage to babbitt), or a scored bearing/scored shaft journal.

Run with grease and you and your drill will be fine. Get a couple of brass grease cups and you can fill them with grease and give them a half turn each time you start to use the drill. Unfortunately, the steampunk crowd has been buying up anything like brass or bronze lubricators, fittings, grease cups and the like. A couple of grease cups tapped into the bearings in place of the oil hole covers (or whatever is on there) will work fine. While you have things apart, you could open the oil holes in the casting and tap 1/8" or 1/4" NPT. This will let you screw in the grease cups. Grease zerk fittings are OK, but do you want to have to use a grease gun anytime you want to use your camelback drill ? Look up "Lubriplate" lubricants. Lubriplate has been around since Noah's chief engineer greased the bearings on the Ark. They are a respected maker of specialty lubricants. They should have a grease that will do the trick for the lower cone pulley shaft bearings.
 
Joe I am honored to get the advice you and everyone give. Your patience with someone who, comparatively, knows so little is an honorable trait. It does look as though the previous owner had me beat to the punch. If all that is needed is cleaning these up and some fresh grease we will give it a try. Hopefully it will work. The shaft is rough. Mostly where pulley and collar set screws have been. A soft touch with a file and some emery may fix any ridges that popped up. The portions of the shaft that would ride in the bearing are nice and clean though.
 

Attachments

  • A15.jpg
    A15.jpg
    81.1 KB · Views: 11
Good info as always, from a man with experience! I use on the farm a grease from Certified lubricants, but a similar one more easily found in single tube quanities is Red tac grease. I think it is also marketed by Lucas Oil. Incredibly sticky/stringy downright messy stuff but it will stay in the bearing [unless you squirt in so much that it strings out the ends. Unless you are running the drill 10-12 hours a day, 6 days a week one filling of those grease cups should last for months if not years.
 
Todda323:

Thanks for the kind words & for appreciating our posts. I enjoy passing along what I can. Plenty of people along my own path in this life took the time to teach me and bring me along in a lot more than just machine work & engineering. As the saying goes, most of this is 'stuff you don't learn in school'. Now, I am one of the oldtimers, and being able to pass knowledge along is its own reward for me.

The previous owner did, indeed, beat me to the punch with those grease cups. Those are exactly what I was referring to. Now, you can punch in some grease (how's that for a pun) and be on your way with your drill press. Shaft journals running in plain bearings are a whole subject unto themselves. Without giving a minor thesis on the subject, old slow turning machinery like your camelback drill is about as forgiving as it gets. The grease will do fine in lubricating the loose clearanced babbitted bearings on your camelback drill. The screw-top grease cups are just the ticket.
 
This was my attempt at squaring the top face where the crown gear sits. I'm hoping you guys think there is enough contact to be acceptable. Thoughts?
 

Attachments

  • 20230331_174549.jpg
    20230331_174549.jpg
    1.2 MB · Views: 14
Last edited:
"The existing bored bearing fits in the quill would then be bored out to receive bronze sleeve bearings (bushings). I'd bore the quill for a shrink fit with the bushings rather than pressing them into the quill."
In putting together several pages of punch list from this thread and other sites I have been discussing this project on I am considering ordering my list of things to do. I am considering starting with the quill and spindle as it would seem many things index off of the spindle alignment such as the crown gear to spindle and crown gear housing, work table etc. I would love to hear your input on this as I am still working my way through logistics and picking away at some of the easier things on the list for now. If, in fact, starting with the quill and spindle does not turn out to be such a bad idea I have a question. I would assume to use the quill and spindle as a reference movement in the bearings should be relatively minimal. There was about 12 thou movement in the top bearing between the spindle and and quill. Would this be considered unacceptable for this? Again not wanting to make a mountain out of a mole hill
 
If the 0.012" of radial play is in the upper spindle guide bearing (the babbitted bearing in the frame of the drill), I would say live with it. Go to grease lubrication and it will be fine for what you are doing with the drill.
The critical areas are:
-the fit of the spindle journals in the quill itself
-the fit of the quill in the frame of the drill.

Typically, these old drill were design with no separate bearings in the quill. Rather, the spindle journals ran in bored fits in the cast iron quill. This is the most critical
set of bearings on the drill. Any plain bearing has to have some clearance in order to run and not seize up. A few thousandths would be about all, ideally, that
should be there in the quill/spindle bearings. The quill was made of cast iron. Cast iron is, in itself, an excellent bearing material when incorporated in properly
designed machinery. I am guessing the spindle journals running in the quill have to be maybe 1 1/4" diameter. Ideally, 0.002" clearance with oil lubrication
would be about right when new.

I'd check the radial play in the spindle journals/quill bores. Use 'telescoping gauges' and the same micrometer to measure outer and inner diameters. Even if the
mike is off a few thousandths, it is a consistent error and you are making a comparative measurement.

Next, look at the condition of the spindle journals. If lightly scored or ridged, they could be polished with fine emery cloth in a lathe, and finished using an
oil stone, also in the lathe. If badly scored or ridged, we get into a whole other discussion, but let's see what the condition of those journals is, and what your
mike readings for journal outer diameters and roundness, as well as bearing bores in the quill come up as.

If the journals on the spindle are usable as-is (or with some stoning or polishing), and the quill has maybe 0.005" clearance, run it as it is.

If the quill bores are way out there (maybe over about 0.010" and possible worn out of round), then it's time to think of boring the quill and fitting bronze
bushings. My own 'druthers for this type of job is to make the bushings bored undersized and shrink-fit them into the quill. A little dry ice for chilling the bushings
and the quill warmed to maybe 250-300 degrees F, and a calculation for how much the quill bore will expand and the bronze bushes shrink is needed. The old
preferred method is to establish the new bore diameters first, then machine the outer diameters of the bushings to fit, with an allowance for the shrink fit.

Once the bushings are shrunk into place in the quill, you then set the quill up in a 4 jaw lathe chuck and indicate off the outer circumference of the quill. This
must run as close to 0.000" total indicated runout (TIR) as you can get it. You can chase your tail if the quill outer circumference is worn out of round, so mike
it ahead of time to avoid this little head banger. With the quill setup in the lathe, you then bore the bushings to final size. The shrink fit and a relatively thin-walled
bushing will put some crush on the bushings. I.E., the inner diameter you had with the bushings sitting on the bench is not the inner diameter you wind up with
when shrunk into place.

For what your drill is going to be doing, 660 bearing bronze should be OK to use. 660 bronze is a leaded bearing bronze, free machining, and the leaded content
gives a little self lubricating property to it. Bronze alloys used for bearings are a function of the hardness of the journals. Harder journals = harder bronze. I am
guessing the spindle journals in your drill are not hardened, probably just a plain carbon steel like maybe a 1030 or 1035 which was common for this sort of
thing back in the day. You could go to a slightly harder grade of bronze, but I would not go too much harder than the 660 grade. Put a generous chamfer on the
edges of the bushing bores after you get them to final size. The chamfer will help guide oil into the bushings. Some camelback drills have a small notch on the
top end of the quill to guide oil into the upper bushing, and an oil hole in the quill to send oil to the lower bushing. I would not bother with oil grooves as gravity
and shaft rotation will send the oil in a helical path down each journal/bushing.
 
Joe,
Thank you very much for the input. It is a tremendous help. This really is a lot of fun. It's even better when I get things right and don't bugger anything in the learning process.

Following your advice above I took some measurements.
Quill/Bore ID 12:00-6:00=1.4400 top and bottom bearings are the same readings between hours
9:00-3:00=1.4390

Spindle: Top Journal= 1.4305 Journals do not seem to be out of round according to my caliper.
Bottom = 1.4300
The blue mark seen in A17 is about where the top of the top bearing comes up to. As you noted above my quill does, in fact, have a notch at the top and oil holes.
 

Attachments

  • A17.jpg
    A17.jpg
    41.7 KB · Views: 6
  • A18.jpg
    A18.jpg
    195 KB · Views: 6
Todda323:

Thanks for posting your as-found measurements. The quill is in surprisingly good shape with only 0.001" deviation for out of round, and same readings top & bottom.

The spindle journals, unfortunately, are another story. Roughly, there is about 0.010" clearance. This can be lived with if the drill is run at lower speeds. If you start your larger drills with a smaller diameter pilot hole in the work, you will be OK.

If the clearance on the spindle/quill bearings were to be put right, turning the spindle journals undersized and fitting bronze bushings in the quills is NOT an option.
The design of the spindle is such that smaller diameter journals would be smaller than the rest of the spindle, so not possible to put things back together again.

This leaves another option, if you were to put a good deal of money into the old drill. That is to have the spindle journals ground undersized and then hard-chromed (or nickel) plated and reground to original size. This is a common fix in industry for this sort of thing. The problem with doing it on your old drill, aside from the cost, is the fact the spindle journals would then be much harder than originally designed. Running in the cast iron bearings, you'd probably be OK. South Bend lathes ran hardened and ground spindle journals in cast iron bearings on literally tens of thousands of lathes. That design held up well, but we are talking about lathe spindles with much tighter clearances and thin oil lubrication. If you went the whole hog and decided to have the spindle journals repaired by hard chrome plating/grinding, you'd likely want to fit hard bronze bushings in the quill to tighten up the running clearances and get rid of the out-of-round bores. This is an over-the-top "Cadillac" repair on what amounts to a well worn Model T of a drill press. A camelback drill was never really a 'toolroom' type of machine tool. These were rugged machines and saw service in shops where heavier rough work was done- places like blacksmith shops, structural steel fabrication shops, heavy truck repair shops, farm machinery shops, and in-plant maintenance shops. They were often treated like the proverbial red headed stepchild, given the barest minimum of maintenance, if that much. Most often, they were rode hard and put up wet by people who never bothered to oil the bearings before use, and often, were in gritty environments with coal fines and mill scale and grinding dust coating everything and anything in those shops. The old drills are survivors, but do not expect to turn yours into a toolroom grade machine tool. For the spindle bearings as they are, I'd get some Lucas Oil Extender or some STP ('stay together, please !') and mix it with some ISO 68 oil (I use tractor hydraulic oil in my old machine tool bearings). The Lucas Oil Extender or the STP will add 'tackifiers' to the oil and keep it from running out of the quill bearings quite so fast. About a 50-50 mix ought to do it. Backwoods engineering 101.
 
Joe what would your thoughts be on building a weld bead on the journals and machining them down. Something similar to this:
The reason I ask is I know some welders and have a few acquaintances who are machinists or friends that have lathes so it would seem this would not be too far off grid. Then again since I'm the proverbial student I really have no idea if that would be a viable alternative.
 
Todda323:

I would be hesitant to suggest TIG buildup of the worn journals. Any welding process creates stresses in the work. Building up a worn shaft can be done with TIG, but the risk is that the post-weld stresses will pull the shaft into something less than straight. The spindle is a relatively long/thin shaft. Putting some weld in the areas of the journals can pull the shaft into a bit of a curve. Normally, when weld buildup is done to repair worn journals and the like, it is done by putting the weld on in a sequence. "Quartering the welds" is how it is done, weld about 90 degrees around, then skip to the opposite 90 degrees, and build up in a sequence. The other thing is run what are known as 'stringer beads'. These are narrow weld beads, no weaving. Peening the weld as it is put down can also be done. Peening stretches out the weld metal, and somewhat relaxes the weld stresses which want to pull on the base metal as the weld cools and shrinks. I use an air needle scaler for this.

Stainless steel would be a 309L grade for buildup on a carbon steel shaft. This is a fairly ductile alloy, and with peening and quartering of the welds, you might be OK.
Post welding, the spindle would need to be checked between centers on a lathe, using dial indicators to be sure it had not bowed (curved) from the weld stresses.
If this had happened, straightening in a hydraulic press can be done. I've done this myself a number of times, and used a dial indicator to measure how far I took things when pressing against a bowed shaft. There will be spring-back, so you have to push the bow a bit beyond straight. Another method I've used to straighten work that warped as a result of welding is flame straightening. Using heat from a torch and a blast of compressed air or a fine spray from a garden hose applied in the right places and right combinations. Flame straightening is a bit of an art, and while I was 'management' at the powerplant, the mechanics (in a union) would come get me when things warped and did not line up after welding. I'd have them get an oxyacetylene outfit (or two) with rosebuds (heating tips) and rig up hoses for water or compressed air. We'd determine which way things went due to the weld stresses and I'd mark the areas to be heated with soapstone, usually in wedge shaped marks and with sequence numbers. We'd turn out the lights so as to see the steel when it just got to a very dull red in dim light, and go to it. I'd have worried mechanics come into my office asking me to help. I've done both press straightening of shafts and flame straightening of shafts as well as other welded work.

We had one journal on the turbine shafts of each unit at the powerhouse that was about 60" in diameter (you read right). It got chewed up by a shaft seal ring. The normal approach was to spend maybe 500,000 dollars and 6 weeks to take the unit apart (including rigging off the generator rotor weighing 500 tons by itself), send the shaft off site for getting a new split sleeve welded on (the journals had a split sleeve welded on and then machined when built) and remachining in a big lathe.
Another engineer got the idea of using an orbital machine (we had them for bevelling and cutting pipe) to do an in-place machining of the journal, and use that same orbital machine to do a weld overlay. He worked with the OEM of the orbital machine, and we came up with a semi-automated TIG welding head and a closed circuit TV camera so we could watch the weld happen. The journal was in a spot inaccessable to humans, but the orbital machine was tooled to reach in there. We did the weld buildup and remachining without taking too much apart. We used an E 309 stainless as we were building up a stainless journal sleeve. We quartered the weld passes to minimize distortion, even on a 60" diameter shaft weighing about 90 tons.

Interesting sidenote: a young mechanic apprentice turned out to be one of the best hands at running the remote semi-auto TIG welding. He had a remote control box with joystick controls and a small CCTV screen. He also had a great eye for checking when things were in alignment, plumb, level, or gauging distances and figuring how to rig loads. I asked the apprentice how he took to it so naturally. He told me the story: he had grown up playing some video games. Then, he joined the US Army and served in Iraq and Afghanistan. In Afghanistan, he was a sergeant, and was assigned a crew and a vehicle with a 50 caliber machine gun in a turret mount atop the cab, and some TOW (wire guided) missiles. On a patrol in the mountains, they came under fire from an emplacement up on a rocky escarpment. This fellow said the Taliban or whomever it was used to take ocean freight containers and drag them up to ledges or caves and lay up large stones around them, making a kind of emplacement for mortars and heavy machine guns and the like. They were taking fire from one of these types of emplacements. The mechanic had a new gunner, fresh from the USA. He hollered at his gunner to fire a TOW missile and take out the emplacement before they got blown to bits. The gunner had frozen. The mechanic took over and launched a TOW missile. He told me it was 'way cool' (or words to that effect), said the controls and screen were much the same as the semi auto remote TIG welding we were doing. He told me how he watched his target on a small screen, steering the missile with joysticks, watching the opening of the ocean freight container up in the rocks get larger and larger as the missile closed in on it. About the time the door opening of the emplacement took up the whole screen on the control box, the screen suddenly went white. This meant the missile had hit home and its warhead exploded. No more emplacement, no more hostile fire. Some of the older mechanics called this young fellow '50 cal.'. I asked him about it and he was kind of modest and hesitant at first. He told me he had grown up deer hunting and hunting small game. In Iraq, he was on a patrol as a corporal. They started taking rifle fire from quite some distance away, from what he described as a 'mud hut, about 1000 meters off'. He took a 50 caliber sniper rifle and fired into the window of the mud hut. A person holding a weapon came running out of the hut. The mechanic fired a second time, hitting the shooter and tumbling him. The third shot finished that shooter.

I retired when that fellow was still an apprentice. Ten years into my 'retirement'. That young apprentice is now one of the more senior journeymen. When I go back to the powerplant, called in to give advice based on my own experience, that young mechanic always gives me a hug. Interesting how a skill set developed from video games, and a skill set developed from hunting combined to be used in the workplace.


Back
Top