jwweathers
Aluminum
- Joined
- May 29, 2016
Follow along with the video below to see how to install our site as a web app on your home screen.
Note: This feature may not be available in some browsers.
I attached a 10ths dial indicator to the column of the grinder using a magnetic base. I zeroed the indicator in the front left corner of the table. I mapped the table surface with the indicator assuming that would give me some idea of its flatness relative to the spindle. I will post a picture or two tomorrow morning.We're going to need a little better description of what and how you're measuring. A photo or two showing your measurements in progress would be helpful. If you are just running an indicator on the table with table travel, that's not actually going to tell you a whole lot. A better quick test is to set a small granite surface plate of known provenance on the table and indicate that - then at least you know you're indicating a very near-planar surface.
I attached a 10ths dial indicator to the column of the grinder using a magnetic base. I zeroed the indicator in the front left corner of the table. I mapped the table surface with the indicator assuming that would give me some idea of its flatness relative to the spindle. I will post a picture or two tomorrow morning.
Makes sense. I suppose the table could travel in an arc which could indicate true with the method I am using. With there being some difference in the measurements in my case, there is some error somewhere. It is just a question of the source of the error (e.g. table travel or flatness). Am I thinking about it correctly?Nope, won't give you any real indication of flatness unless you know the surface you're indicating is dead flat. An indicator reading true (or not) to an unchecked surface does not necessarily indicate that the surface is (or isn't) flat. You need a reference flat or a way to check the surface you are indicating against one to get an actual idea of whether the machine table is traveling in a straight/planar manner.
I am measuring the surface of the saddle that the chuck will sit on. I am calling it the table. May be the wrong term…Are you measuring the surface of the chuck after grinding it, or the top of the saddle that the chuck attaches to?
Makes sense. I suppose the table could travel in an arc which could indicate true with the method I am using. With there being some difference in the measurements in my case, there is some error somewhere. It is just a question of the source of the error (e.g. table travel or flatness). Am I thinking about it correctly?
Thanks!
Jeff
My kind of plan!Most likely not even an issue..............throw the mag chuck on and grind it flat....................
I completely agree. I was being a bit facetious with the “my kind of plan” comment. Although, I am anxious to start making some parts.It never hurts to know what you're working with... Checking it out doesn't mean you need to get right on with fixing it if there's even a problem. Personally, I figure it's way better to know what you're working with so you can work around problems if/when necessary. If you're just using the grinder to make things look shiny, that's another story.
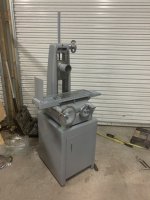
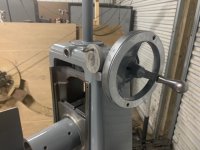
This is that machine. I disassembled it completely, cleaned, painted, and I am in the process of reassembling it. The table sweep is the first check I have made. I am excited to get it up and running. I have a 9” camel back straight edge I want to grind.I would call your measurements “sweeping the table”
Those numbers are not bad, it’s not a new Mitsui. Grind the chuck and make some parts.
Was this the machine with a broken cross feed screw? You ended up with a good machine that only has .0004” variance from a previously ground table to the spindle.
Again this variance means very little.
Right. I suppose one way to check that is to grind a part and inspect it on a surface plate, correct?The chuck top can have wear so showing an error due to chick condition. Traveling an indicator over a fresh ground chuck getting zero indicator trave check end to end and on the cross, a part ground there can have a .003 concave or convex on long or cross.. To be really zero the ways need to be dead flat and then the chuck ground.
Right. I suppose one way to check that is to grind a part and inspect it on a surface plate, correct?
I think I get it. Do something to eliminate the table flatness as a variable to isolate the source of the error.The long-travel bed ways can be out of wack and so the top grinding of the chuck may indicate good off the wheel head, perhaps zero after grinding the chuck and part grinding is not flat. the problem here is that the chuck top may be concave or convex after top grinding, reflecting the condition of the ways.
Such poor long bed flatness can be the result of lack of oil, air hose use near the machine, over-tightening the chuck. too heavy a chuck, prolong production job stopping at the same place reveres, ball ways worn, and likely other reasons.
Yes, sometimes this can be on the cross.
Grinding a part on an out-of-flat chuck can give a lot of confusing results, and can vary with the size of the part or where it is set on the chuck..
A simple test is to check that the chuck top is near dead flat after grinding the
chuck. or shim up a dead flat parallel on the chuck zero/zero and run a tenths indicator on top of that before grinding the chuck.
A rough test is to put three or four same height gauges on the chuck long ways and touch them noting that the down dial marks the same number (Might check for 1 to 3 tenths).


Notice
This website or its third-party tools process personal data (e.g. browsing data or IP addresses) and use cookies or other identifiers, which are necessary for its functioning and required to achieve the purposes illustrated in the cookie policy. To learn more, please refer to the cookie policy. In case of sale of your personal information, you may opt out by sending us an email via our Contact Us page. To find out more about the categories of personal information collected and the purposes for which such information will be used, please refer to our privacy policy. You accept the use of cookies or other identifiers by closing or dismissing this notice, by scrolling this page, by clicking a link or button or by continuing to browse otherwise.
