How to install the app on iOS
Follow along with the video below to see how to install our site as a web app on your home screen.
Note: This feature may not be available in some browsers.
Largest Manufacturing Technology Community on the Web
Stay Connected:
You are using an out of date browser. It may not display this or other websites correctly.
You should upgrade or use an alternative browser.
You should upgrade or use an alternative browser.
Hendey Tool & Gage Restoration
- Thread starter jwearing
- Start date
- Replies 141
- Views 40,308


Trboatworks
Diamond
- Joined
- Oct 23, 2010
- Location
- Maryland- USA
I finally opened the grease gun.
I am using the Lubriplate 1241 in my T&G for the last few years- in apron etc.

I am using the Lubriplate 1241 in my T&G for the last few years- in apron etc.
Cleaned, filled, prepped, masked.

The paint was going down real nice, but it started to rain and I had to race inside. So I'll spray the second coat in a few days.


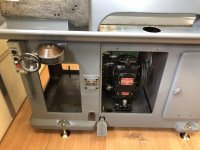
Side note: Inside the right cabinet door, there are some pegs for storing accessories. Does anyone know what accessories fit here? The steady, follower, taper attachment don't seem to fit. Any ideas?

Great. That's the same grease I chose as well.
The paint was going down real nice, but it started to rain and I had to race inside. So I'll spray the second coat in a few days.
Side note: Inside the right cabinet door, there are some pegs for storing accessories. Does anyone know what accessories fit here? The steady, follower, taper attachment don't seem to fit. Any ideas?
I finally opened the grease gun.
I am using the Lubriplate 1241 in my T&G for the last few years- in apron etc.
Great. That's the same grease I chose as well.
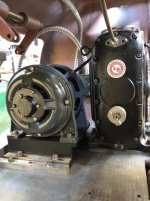
Here's a question for the PIV experts:
The PIV is lubed, the chain is tensioned, and I'm trying to set the RPM stops. The speed adjustment turns easily through the middle and low end of the speed range, however it gets tight and I can't go higher than about 1100rpm (it should go up to 1380rpm, input is 690rpm).
I fiddled with the chain tension but it didn't help. Is there anything else that can cause this? I would like to avoid disassembling again if possible.
Attachments

thermite
Diamond
- Joined
- Sep 21, 2011
Here's a question for the PIV experts:
The PIV is lubed, the chain is tensioned, and I'm trying to set the RPM stops. The speed adjustment turns easily through the middle and low end of the speed range, however it gets tight and I can't go higher than about 1100rpm (it should go up to 1380rpm, input is 690rpm).
I fiddled with the chain tension but it didn't help. Is there anything else that can cause this? I would like to avoid disassembling again if possible.
Same original patent but "as far as I know.." The PIV Werner-Reimers (on my Alzmetall AB/5s DP), the Fairchild and the Link-Belt units are all slightly different.
Fairchild info was found online. Link-Belt info is out there, too.
ISTR member Trboatworks has the same Link-Belt unit on his Hendey T&G as you have.
And that he rebuilt just about everything. I wasn't yet so deef as I am now when I heard his one run. Quiet unit as far as PIV drives go.
Have you PM'ed or emailed him?
ratbldr427
Titanium
- Joined
- Mar 21, 2006
- Location
- jacksonville,fl.
First off you have to set the stops on the bench when servicing.Why? Just to avoid the problems you now have.If someone changed a pulley size then you have no idea if the stops are correct or not since you are trying to set to a desired rpm not what the unit is possibly set for.The importance of setting the stops is to keep the chain from contacting the splined shafts at either end of its adjustment.
Pull the indicator dial off you should be able to turn the nuts if you can get to them in the position it is installed.Otherwise it doesn't look like any more than a 1-2 hr job,just bit the bullet!
Pull the indicator dial off you should be able to turn the nuts if you can get to them in the position it is installed.Otherwise it doesn't look like any more than a 1-2 hr job,just bit the bullet!
First off you have to set the stops on the bench when servicing.Why? Just to avoid the problems you now have.If someone changed a pulley size then you have no idea if the stops are correct or not since you are trying to set to a desired rpm not what the unit is possibly set for.The importance of setting the stops is to keep the chain from contacting the splined shafts at either end of its adjustment.
Pull the indicator dial off you should be able to turn the nuts if you can get to them in the position it is installed.Otherwise it doesn't look like any more than a 1-2 hr job,just bit the bullet!
I'm clear on how to adjust the stops, my problem is that the speed control shaft itself becomes very tight at about 1100rpms and won't go higher. I have the cover off and the chain is definitely not bottoming out.
Let me describe what I have done, to explain my problem more clearly:
- I started on the bench. Got it lubed, got the chain adjusted.
- I got the speed adjusted so that the output shaft was running half the speed of the input shaft. I set the lower stop here.
- I tried to adjust the speed of the output to 2x the speed of the input, to set the upper stop. I got stuck at about 1.6x.
- I decided to mount it on the machine so I can adjust it with the motor turning. This was easier, but I was still stuck at 1.6x.
- I measured the RPMs when powered by the motor, and confirmed that they match (pretty close) to the specs on the nameplate.
Specs on the nameplate:
4:1 ratio
690 rpm in
345 rpm out (low)
1380 rpm out (high)
Nameplate pic posted earlier in thread: https://www.practicalmachinist.com/...ge-restoration-356424/index3.html#post3409718
1-2 hour job? You must have a lot of practice. I think it took me that long just to reassemble the awkward thing. But yeah, I'll probably tackle it tomorrow.
ratbldr427
Titanium
- Joined
- Mar 21, 2006
- Location
- jacksonville,fl.
We used to have about 20+ units in service when I started 25 years ago.Even had one about 4' tall that had a wooden block chain which we converted to a metal chain.We now only have about 3-4 in service now as all the later machines are all done electronically.
Notice that your tag doesn't say 4:1,it says 4 ratio,A mote point in your case but can be confusing when configuring a set up from scratch;from 1:1 it adjusts from 2:1 to 1:2,under drive to overdrive or vise versa.
So back to your problem,on the bench you couldn't adjust one way.Its been about 5 years since I went through one but I think either the thrust yokes or the adjuster arms are offset so installing them backwards will keep from expanding all the way.If you are able to spin the traveling nuts freely to the fixed stop nuts then that rules out bad threads.Did you make sure that the pulleys were in line at 1:1?Was the chain tensioner centered at 1:1?The control screw and chain pivots must be adjusted within 1/2 thread pitch of each other.
It will probably be apparent when you get it apart.You are sliding the whole
assy out in one piece?
Just remember if it wont adjust on the bench it wont in the machine.
Got it. Three tries, but now it adjusts through the whole range.
That was helpful, thanks. It ended up being the alignment, as you suggested.
Took me about an hour and a half this time. Reassembly is the hardest part. Particularly getting the tensioners in place between the end caps, with the springs attached.
So back to your problem,on the bench you couldn't adjust one way.Its been about 5 years since I went through one but I think either the thrust yokes or the adjuster arms are offset so installing them backwards will keep from expanding all the way.If you are able to spin the traveling nuts freely to the fixed stop nuts then that rules out bad threads.Did you make sure that the pulleys were in line at 1:1?Was the chain tensioner centered at 1:1?The control screw and chain pivots must be adjusted within 1/2 thread pitch of each other.
That was helpful, thanks. It ended up being the alignment, as you suggested.
Took me about an hour and a half this time. Reassembly is the hardest part. Particularly getting the tensioners in place between the end caps, with the springs attached.
thermite
Diamond
- Joined
- Sep 21, 2011
Thank you both/all.
Saved this thread for when next I have to delve into the PIV Werner Reimers.
"The Devil is in the details."
Saved this thread for when next I have to delve into the PIV Werner Reimers.
"The Devil is in the details."
ratbldr427
Titanium
- Joined
- Mar 21, 2006
- Location
- jacksonville,fl.
Glad you got it fixed.A little late and probably won't make any difference.Did you notice that there are two notches on the arms for the springs? The vertical mount units the springs install in the notches closest to the pivot end.Installing the shoes and springs are probably the hardest thing to do as far as reassembling them.
By the way you are doing some very nice work.
Yours should have a manual chain adjuster.The automatic adjusters can self tighten under certain circumstances to the point the unit will bind up.If anybody reading this has that problem there is a fix for it.
By the way you are doing some very nice work.
Yours should have a manual chain adjuster.The automatic adjusters can self tighten under certain circumstances to the point the unit will bind up.If anybody reading this has that problem there is a fix for it.
A year later, and I'm back to work on the Hendey. Back in 2019 I had decided to scrape it. I acquired some scraping tools, and started learning how to scrape about the same time the Covid lockdowns started.
Scraping would be an ideal Covid lockdown hobby for most, but with a full time job and a 3-year old kid at home this has been the busiest year of my life. Anyways I've had about an hour a day for scraping, and in a year that has been enough to scrape a few surface plates, a few straight edges, a pair of master squares, and a few other odds and ends. After all that I still didn't feel confident enough to start on the Hendey, so I scraped my old South Bend 10L, just for practice. It came out pretty good, and now I've started on the Hendey.
Of course the first thing was to get the lathe into position and level it. I have pergo flooring in my garage (thanks to previous owner), so I removed enough to level the machine on solid concrete. I also plastic-wrapped the chip pan to hopefully avoid staining the paint blue. I really should have scraped before painting, but if I have to respray another coat it's not a big deal.
I blued up the area under the headstock and scraped the tailstock base to it. I leveled the base in the transverse direction, so that I can use the precision level to monitor twist while I do the ways. For some reason the front slide had about .005" more wear than the rear slide. I haven't leveled it longitudinally yet, so I'll be scraping this again after I finish the ways.

Once finished with the base, I used it to relevel the machine. I think this will be more accurate than what I did the first time, which was leveling on V-blocks on the worn carriage ways. It leveled ok, the main section of the ways is pretty straight, but the section under the headstock seems to lie in a different plane. I'm a little worried there might be some debris or a burr under the bed, twisting it slightly. I was careful when I assembled it, but it would take much, so I think I'll double check before I start scraping.

Look at this nice flaking. This is the unworn area under the front of the headstock. I haven't had much practice flaking, mine doesn't look anywhere near this nice.

In other news, I bought a bunch of parts from a member here, Peroni, who had acquired a parts machine. He sold me almost everything I need to repair my apron, the only thing I still need is a pinion, which I'm planning on making myself.
Scraping would be an ideal Covid lockdown hobby for most, but with a full time job and a 3-year old kid at home this has been the busiest year of my life. Anyways I've had about an hour a day for scraping, and in a year that has been enough to scrape a few surface plates, a few straight edges, a pair of master squares, and a few other odds and ends. After all that I still didn't feel confident enough to start on the Hendey, so I scraped my old South Bend 10L, just for practice. It came out pretty good, and now I've started on the Hendey.
Of course the first thing was to get the lathe into position and level it. I have pergo flooring in my garage (thanks to previous owner), so I removed enough to level the machine on solid concrete. I also plastic-wrapped the chip pan to hopefully avoid staining the paint blue. I really should have scraped before painting, but if I have to respray another coat it's not a big deal.
I blued up the area under the headstock and scraped the tailstock base to it. I leveled the base in the transverse direction, so that I can use the precision level to monitor twist while I do the ways. For some reason the front slide had about .005" more wear than the rear slide. I haven't leveled it longitudinally yet, so I'll be scraping this again after I finish the ways.
Once finished with the base, I used it to relevel the machine. I think this will be more accurate than what I did the first time, which was leveling on V-blocks on the worn carriage ways. It leveled ok, the main section of the ways is pretty straight, but the section under the headstock seems to lie in a different plane. I'm a little worried there might be some debris or a burr under the bed, twisting it slightly. I was careful when I assembled it, but it would take much, so I think I'll double check before I start scraping.
Look at this nice flaking. This is the unworn area under the front of the headstock. I haven't had much practice flaking, mine doesn't look anywhere near this nice.
In other news, I bought a bunch of parts from a member here, Peroni, who had acquired a parts machine. He sold me almost everything I need to repair my apron, the only thing I still need is a pinion, which I'm planning on making myself.
I finally got around to making a new rack gear / pinion, to replace the old broken one. This has been a back-burner project, I have been gradually acquiring tooling for the last couple years. I made the blank from 4140HT, two pieces secured with three dutch pins. I still have to press in some bronze bearings, then I should be ready to reassemble the apron.


I've been pretty busy with other things, but I've been scraping whenever I have a chance. I'm still working on the tailstock ways. I'll go into more details when it's done, but for now here's a photo.

I've been pretty busy with other things, but I've been scraping whenever I have a chance. I'm still working on the tailstock ways. I'll go into more details when it's done, but for now here's a photo.
RCPDesigns
Hot Rolled
- Joined
- Sep 3, 2014
- Location
- Atlanta GA.
Major respect for you for sticking with this project over the years. Looks like it will be a fantastic lathe, congrats!!
M.B. Naegle
Diamond
- Joined
- Feb 7, 2011
- Location
- Conroe, TX USA
I have a lot of respect for these old Hendey T&G lathes, but there aren't many out there from what I see. It's a big can of worms but you're doing it right!
Peroni
Cast Iron
- Joined
- May 18, 2007
- Location
- Yadkinville, NC
It's coming along nicely! You're going to have a fine lathe when you're done.
shapeaholic
Stainless
- Joined
- Oct 14, 2003
- Location
- Kemptville Ontario, Canada
That sure is coming along nicely.
My T&G has a hard bed so scraping wasn't an option ( just too frekin hard, I tried)
Are you going to use turcite or moglice to restore the height of the carriage? Moving the lead screw and drive rod would be a near impossible job.
Keep up the great work
Peter
My T&G has a hard bed so scraping wasn't an option ( just too frekin hard, I tried)
Are you going to use turcite or moglice to restore the height of the carriage? Moving the lead screw and drive rod would be a near impossible job.
Keep up the great work
Peter
Are you going to use turcite or moglice to restore the height of the carriage? Moving the lead screw and drive rod would be a near impossible job.
I haven't decided yet. I want to get a little further along and see how much build-up is required. If it's a lot, I'll probably use turcite. If it's just a little off, I'll make some offset pins to lower the gearbox -- harder than a South Bend for sure, but not impossible. I know everyone will recommend turcite/moglice, but preserving the original iron-on-iron ways is appealing to me, it seems like a more period correct restoration.
The same goes for the tailstock height. I haven't decided if I want to build up the tailstock base, or scrape the headstock down to match. It depends how far off it is, and I won't have a good measurement until the bed is finished.
shapeaholic
Stainless
- Joined
- Oct 14, 2003
- Location
- Kemptville Ontario, Canada
I haven't decided if I want to build up the tailstock base, or scrape the headstock down to match..
Scraping the headstock down is a "VERY BIG JOB" !!
I did it on mine, because I didn't have any option.
There are a lot of surfaces to get "straight, flat, parallel and in line". If it fits the re-scraped bed ok I vote to not meddle with it.
Just my $0.02 cdn, for what that is worth....;-)
Pete
Scraping the headstock down is a "VERY BIG JOB" !!
I did it on mine, because I didn't have any option.
There are a lot of surfaces to get "straight, flat, parallel and in line". If it fits the re-scraped bed ok I vote to not meddle with it.
Just my $0.02 cdn, for what that is worth....;-)
Pete
Agreed, it is a heavy SOB too. Even heavier with the spindle and everything installed. I expect I'll have to fine tune it, but I'd rather not have to remove a significant amount of metal.
On the other hand, the tailstock transverse way on this machine is tapered. So if I build up the tailstock in the normal way, the transverse way will need extra attention or else it will end up loose.
Similar threads
- Replies
- 20
- Views
- 1K
- Replies
- 10
- Views
- 1K
- Replies
- 13
- Views
- 1K
- Replies
- 7
- Views
- 566