What's new
What's new

How to tool up for under 100$

......

They will be a dramatic up-grade for any shop; and cost pennies to make.

........The possibilities are only limited by your imagination....

They can be made round, sq blocks, tapered, thin....:)

Here is a very expensive commercial unit pushing $400 that I don't think will hold up..
expensive that does not work well because of too tiny tubes.jpg
After some practice - I was able to make a basic unit - without the fittings - which with some imagination can also come in as cheap but a lot more rugged than the commercial fancies.. in a few min..yes, I know..:(

And then, you can bedazzel your visitors; and I think I did, even with recycled gal milk jugs, with the tube-hole drilled in the cap. (label removed tho);)

btw, never saw a need for filters, which makes it easier..

watch when you make a fogger - it'll run the boys out :D
 
A Method for Testing - [Proving] Indicators

A Method for Testing - [Proving] Indicators

Hi Antique Forum

Following is a method that I have arrived at for determining the accuracy of indicators.

This is a development from the way I was first shown oh not so many years ago, in 1957.

I was then apprenticed to a master journeyman tool and die maker who was also a lead-man in an ultra-precision tool and die shop. He is one of my heroes, that you only come across once in a lifetime. He was a tall gentleman, in his 60s, extremely dignified, soft-spoken, and very kindly to me. I feel guilty now, for being so naive back then; thinking that this was not so uncommon; and now realizing that he was a one and only. One of the projects I was supposed to do to complete my apprentice-ship, was to make a 5" sine-bar. But rather quickly, one of the older tool makers gave me his as a token of friendship, followed soon after by another, and finally one more that didn't want to be left out. So, I had 3 ! - 5" sine-bars in my tool-box. After thinking this over, my master tool and die maker left me off the hook, thinking diplomacy and shop politics - they might think that I (or him) was dissatisfied with the quality of their sine-bars etc.

Very early on, he wanted to teach me his system for testing - proving - indicators. We have 3 concerns.

1. LAG. This is the actual amount of physical movement on the indicator taking place before the needle nudges in movement. Typically, on the quite a few that I tested through the years; it was ~.00015, with some poor cases greater than .001. A .00015 lag means you are already off .0003 on an OD. I did have one moderately priced Japanese model that had zero lag and was my favorite for a number of years. One time I forgot when setting up a semi-CNC drill, and left my indicator in the spindle set for ~2000 rpm. When I started the mach, it slung my indicator across the shop like a bullet and ripped the back off. I took it to the dealer asking how much a new back cost. He fixed it with a replacement, and new lens at no charge. When I tested that indicator again, it still had no lag !! Lag needs to be factored in for high-accuracy.

2. MEASUREMENT. How accurate is the amount indicated on the instrument compared with the actual amount?

3. REPEATABILITY. How accurate will your indicator consistently repeat?

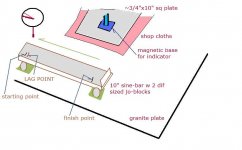
The principle for testing is quite simple, a very slightly angled bar is slid under the indicator. The method that my hero taught me, was to use the granite-plate, with the indicator magnetic base fastened to an ~10" sq plate, and protection for the granite by several layers of shop towels. Then, a 10" sine-bar with 2 slightly different sized jo-blocks are slid under the indicator. There is much math involved with this system; and I wont trouble us with details. I confess, I was always un-easy with shop towels being part of the equation, and couldn't rest until I removed them from the process. A basis sketch is included below.. btw, he would have went back to ~1915 starting his apprenticeship,,, so younger men, through me you are going back a century into ancient history.
indicator.jpg
In many of the shops out there, especially those doing big rough work, which was my love in my 40s - do not use granite plates. I was forced to improvise. Following is an illustration.
My kind of stuff.jpg

The system I finally came up with, was using 2 parallels; most of the time on my bench-plate, or at times, even on the machine itself. As you can see in the sketch below, it is a greatly simplified process. One inch movement on the top parallel equals ~.0005 movement on the indicator.
Geo's simplified.jpg

The last sketch is examples of indicator readings, which for many years now, I've needed about a 30X magnifier w good light. So how about it? what are your systems?
Indicator readings.jpg:):smoking::)
 
A Method for Testing - [Proving] Indicators

Hi Antique Forum

Following is a method that I have arrived at for determining the accuracy of indicators.

This is a development from the way I was first shown oh not so many years ago, in 1957.

I was then apprenticed to a master journeyman tool and die maker who was also a lead-man in an ultra-precision tool and die shop. He is one of my heroes, that you only come across once in a lifetime. He was a tall gentleman, in his 60s, extremely dignified, soft-spoken, and very kindly to me. I feel guilty now, for being so naive back then; thinking that this was not so uncommon; and now realizing that he was a one and only. One of the projects I was supposed to do to complete my apprentice-ship, was to make a 5" sine-bar. But rather quickly, one of the older tool makers gave me his as a token of friendship, followed soon after by another, and finally one more that didn't want to be left out. So, I had 3 ! - 5" sine-bars in my tool-box. After thinking this over, my master tool and die maker left me off the hook, thinking diplomacy and shop politics - they might think that I (or him) was dissatisfied with the quality of their sine-bars etc.

Very early on, he wanted to teach me his system for testing - proving - indicators. We have 3 concerns.

1. LAG. This is the actual amount of physical movement on the indicator taking place before the needle nudges in movement. Typically, on the quite a few that I tested through the years; it was ~.00015, with some poor cases greater than .001. A .00015 lag means you are already off .0003 on an OD. I did have one moderately priced Japanese model that had zero lag and was my favorite for a number of years. One time I forgot when setting up a semi-CNC drill, and left my indicator in the spindle set for ~2000 rpm. When I started the mach, it slung my indicator across the shop like a bullet and ripped the back off. I took it to the dealer asking how much a new back cost. He fixed it with a replacement, and new lens at no charge. When I tested that indicator again, it still had no lag !! Lag needs to be factored in for high-accuracy.

2. MEASUREMENT. How accurate is the amount indicated on the instrument compared with the actual amount?

3. REPEATABILITY. How accurate will your indicator consistently repeat?

The principle for testing is quite simple, a very slightly angled bar is slid under the indicator. The method that my hero taught me, was to use the granite-plate, with the indicator magnetic base fastened to an ~10" sq plate, and protection for the granite by several layers of shop towels. Then, a 10" sine-bar with 2 slightly different sized jo-blocks are slid under the indicator. There is much math involved with this system; and I wont trouble us with details. I confess, I was always un-easy with shop towels being part of the equation, and couldn't rest until I removed them from the process. A basis sketch is included below.. btw, he would have went back to ~1915 starting his apprenticeship,,, so younger men, through me you are going back a century into ancient history.
View attachment 118454
In many of the shops out there, especially those doing big rough work, which was my love in my 40s - do not use granite plates. I was forced to improvise. Following is an illustration.
View attachment 118455

The system I finally came up with, was using 2 parallels; most of the time on my bench-plate, or at times, even on the machine itself. As you can see in the sketch below, it is a greatly simplified process. One inch movement on the top parallel equals ~.0005 movement on the indicator.
View attachment 118456

The last sketch is examples of indicator readings, which for many years now, I've needed about a 30X magnifier w good light. So how about it? what are your systems?
View attachment 118457:):smoking::)
NFW that an indicator or anything else can be accurately read to less than the smallest graduation. If it accurate to a tenth, it will have tenth graduations. Are you trying to out do yourself ?
 
Indicator testing and proving

tmidget,I get what the OP is showing.Sometimes it's right and other times it's not.The indicator has tolerance too.

Thank you for the positive reply jrmach. Appreciated here.

The other two respondents have taken two different approaches to my post.

I'm aware where the first is coming from. He deals with a coefficient of linear expansion that is off the scale. Therefore normal approaches to precision tolerance, are not a part of his world. I would be lost in his world, as would most of the rest of us. But his world is not the world of the normal practicalmachinist.. He does send out electricity produced from a nuclear reaction; from an area short on conventional fuel. In this he has my respect.

All too often, the small practicalmachinist is faced with for example; a shaft repair job with a 3 to 4 tenths standard tolerance for a bearing press fit. If he were to take the approach that such accuracy is not achievable, then; he could take the approach of just cutting the shaft oversize by .001, and beat the ball-bearing on with a hammer. In most areas, that impracticalmachinist would before long, not have too many customers knocking on his door.

In the second respondent, he apparently tells us that in order for the practicalmachinist to get his $200 job out, it is necessary to buy a $200 indicator; or - send his half-dozen used economy priced indicators out for lab certification, which wouldn't meet the theoretical criteria anyway.

The practicalmachinist tip that I have given, is a tried and true method for the practicalmachinist to test his own collection of indicators; to be aware of each instruments shortcomings, and to also be aware of some of the instruments superior performance. And this with simple tools that could be made from scrap-metal, and not even necessarily having to be made on a surface grinder, and hardened.

Working within our theoretical practicalmachinist budget of under $100 for tooling, I let the readers judge..

Do you think this is an option for a small operation practicalmachinist???
 
Classification and Terminology for Skilled Precision Metal Workers

........


If a 'master journeyman' (?) didn't wise you up 57 years ago .. ...it is certainly too late now.

:(

Being aware that there is probably no readily available common source for classification of skilled metal workers, I submit my categorization to the PracticalMachinist Forum. Yes, this is considerably off topic for this thread; but I do not think completely.

I remove all management evaluations from the process; because all too often, whether it be the owner, shop manager or foreman, ulterior motives are a basis for management categorization; usually a reluctance to pay fully a wage commensurate with skill level, due to greed, miss-management on low-bidding jobs, or shop politics.

Therefore, I base my classification on the consensus of the skilled worker's peers.

prefix "Master" = one who served his apprenticeship and worked his way to the highest level of skill in the same shop.

prefix "Journeyman" = one who has acquired skill from working and learning in different shops. He may or may not have reached the skill level of the "Master", however; he has an advantage of being aware of different approaches to the work..

prefix "Master-Journeyman" = one who has acquired the highest level of skill from working in a large number of shops doing different variations of similar work. He has the advantage of knowing which approach of many, that is superior for a given situation; and generally acquired an intuitive comprehension of the elementary principles involved, often escaping those restrained by shop idea inbreeding; derived from the approach that there is only one best way to do a process, and that particular shop has possession of that knowledge. The Master-Journeyman need not be a super-genius himself; it is probably better that he is not.. but his skill is the result of the countless hours of development from his very many predecessors; of whom it was his privilege to stand on their shoulders....
 
Is there a nice square hiding in your scrap pile?

cylindrical square

Dear readers, in the past, I have made several of these; and was very pleased with the result.

About 50 years ago, Brown and Sharpe sold one for a very high price.

The configuration in my sketch below, seems to be a good compromise for medium size work.

With just a little care, you should be able to make a nice cylindrical square with about twice the accuracy as the common 12" tool-maker angle square. And imo, much more convenient to use; with the exception of working in narrow tight places.

If I were to make one for long-term steady use, I think I would make it from hardened and ground - soft dark anodized; which is much easier on the eyes - when you shine a light from the rear. For this reason, I don't think a finish smoother than ~40rms is desirable.
cylindrical square.jpg

The procedure for making it is as follows : 1. select a piece of tubing ~12" long. 2. Chuck in the lathe. I would try to run the part as cool as possible to avoid distortion. It is nice to "skin" bore the ID for the satisfaction of looking at a well made tool. 3. rough face the bottom face. 4. rough turn the OD for clean up. 4a. at this point for my personal preference, I like to put in the bottom chamfers. Most others feel uncomfortable doing it in the process at this state; so I've moved it to step #7 as an alternative. 5. finish cut the bottom face. 6. finish cut the OD, all you're really trying to do, is get a decent finish with your finish cut. You are not trying for a specific size dia, but you do want as concentric and uniform dia that you can get.. Check you work after your finish cut, and see is you have held a consistent dia to less than .0003. Measure along the length frequently, and don't forget the 3 o'clock measurements if you measure at 12 o'clock. If you are only high in some spots a tenth or two, you may be able to work it out with a file and fine emery. 7. chamfer the bottom face, I like the outside with a flatter chamfer, and the inside with a steeper. 8. Carefully blend in with emery a smooth radius on the corners of the chamfers. You don't want to get into the bottom flat any more than you have to. 9. Start the cut-off into the part ~1/2 way, then back off just a bit, so that you can put a good nice radius with the file. You should be close to the chuck jaws, and I try to work with the chuck in reverse and file towards me in case the file gets caught in the chuck. A long time ago, I thought it would be cute to work the file without a handle.. Almost put the tang through my hand... At any rate, this top surface is only for holding your square. 10. Finish the part off and then deburr and radius the top ID.

The cylindrical square can be checked for true by rolling on the surface plate; with a light behind it, running a test indicator on a surface gage over the top surface while the cylinder is laying flat; and comparing it to known squareness. A good thin film rust preservative, or light oil wiped carefully off before use, is all that I can think of, for finishing the job.

btw, I have found these new diode flashlights to be outstanding. Small, compact, cheap, and long lasting on batteries with a better light than the old style. A few days ago, I accidentally left one on over night, and the next morning it was still shining bright. 50 cents apiece at Dollar General.

Well, if all has gone well, you should have the satisfaction of having a nice tool. Think if you really really needed a precision square for a certain job.. how much would you be willing to pay for it?

Best wishes :)
 
Fun Time 2

Give us more

Some fun time # 2

We are on the Brigantine John Paul Jones II; she's sturdy in a storm, and when it calms, she's a haven.

brigantine.jpg
Brigantine John Paul Jones II

She's only about 60 tons, but she's fast..

Welcome aboard formally, Mr. Stonehaven. I see there's about 40 to 50 on board.
You have now acquired the position of first mate. I think that you are a good man for the job.

Let's see Mr. Stonehaven, you got on somewhere around Queen Sharlotte Sound or was it the Salish Sea? It's been a long journey since leaving King's Bay-Mayport on 09-18-2014. So many have come aboard and disembarked, it's hard to keep track. Our first stop was at Lillehammer, Norway to drop off a consignment of large facing-cutter tools. I think that was our only market for them. Then headed back to New England where we got caught by the cyclone that formed up over Chicago, and then created one dickens of a nor-easter for us. I thought we left off some Vblocks but not sure. Then, agents calling about one of our best lots - the hogging mills, but they couldn't get their attention off the idea of brazing; which I'm not really sure they were brazed. Certainly not to the bolt-head. That storm left us with little choice but to take on the North-West passage. Finally, off south of Bristol Bay the weather turned and the seas subsided. I thought we had an agent in northern-California for the hogging-mills but no final word from him yet. Possibly Houston. So thankful for all the crew that helped in those stormy times, really too many to mention each and every one - it's in the log and I'll see it every time I go through it, but the guy in Michigan that helped us out on boreing bars was a great boost at a critical time.

So now Sir : we are out in open seas again, and duty requires I keep you informed. Our next port of call is Pearl Harbor-Hickam to drop off some very good lathes and very expensive lathe tooling.

Then duty requires that you Mr. Stonehaven, know our final destination; so here is the map....

Tabiauea.jpg

We have a chance to pick up the jewel of our trip - a complete well selected total machine shop fully equipped.

A Mr. X is now in possession; but I've gotten word that he would really just like to leave it. He is relocating to a much more desirable place and this would be a lot more trouble than I think he would really like to contend with in his time of life. I spent 2 hours in discussion with the intermediary contact on Sept 28. I give it a 40% chance for going thru. We are scheduled to arrive there on 1 Mar 2015; sooner if needed..

 
Last edited:
Stonehaven puking

george i am sea sick and puking. what about more tooling ideas

Does this mean you are asking to be relieved of your duties Mr Stonehaven? :)

Perhaps you should go below and rest a while in your hammock.. :confused:

Then wait to grab something to make a few bucks

and.... quickly run off elsewhere, to continue your search :smoking:
 
Fun Time 2a with some seriousness


Some fun time # 2
.......
Then duty requires that you Mr. Stonehaven, know our final destination; so here is the map....

View attachment 119179

We have a chance to pick up the jewel of our trip - a complete well selected total machine shop fully equipped.

A Mr. X is now in possession; but I've gotten word that he would really just like to leave it. He is relocating to a much more desirable place and this would be a lot more trouble than I think he would really like to contend with in his time of life. I spent 2 hours in discussion with the intermediary contact on Sept 28. I give it a 40% chance for going thru. We are scheduled to arrive there on 1 Mar 2015; sooner if needed..


Continuing :

Since the readers have not asked me about my unusual format for the "fun-posts", an explanation..

The business world is often stressful for me; and I suspect for many of you also.. Well over 50 years ago - and to you younger readers - no - that is not ancient history; it seems like last week - a good friend in Houston Texas, that had some unpleasant experiences in the Korean War, told me about his experience working as a vacuum salesman. They started their day by someone pounding on the piano, different tunes with words substituted "vacuum salesmen". Then, the final rousing rendition of "The Eyes of Texas are upon You" - also known as "I've been working on the rail-road" with the appropriate words substituted with "we the super men"; and then, they were supposed to go out all enthused and start knocking on doors.. He joked about it a lot.. Jokes were a pressure relief valve. Hence, my format..


Continuing with Mr. "X", while I'm getting a lathe post ready.. I have a number of pictures that I did not post, in order to protect the possible deal. They show much tooling, that most has not even been used, and ordered with "spare no expense", the best quality available. This should be the ultimate example of how to tool up for under 100$. Including the machinery. "X" has dropped the remark to my contacts, that he probably would like to just walk away from it, and let someone else take care of disposal. In keeping with principle, and not allowing our budget to go over $100, I am steeling myself to not give in and pay anything for the shop; excluding hauling expense.

He is a proven commodity; on another incident a few years back, whereby he was loosely *connected*, 6 ! Bridgeports in excellent condition, including one that appeared to have not been used - were thrown into a dumpster. I did not hear about that incident until a month or so after it happened. Yes, these type of deals are "delicate" to say the least. I'm still sticking to my 40% chance it will happen. Below, is a flow chart of my contacts.


Flow Chart.jpg

A decision was made in the last two weeks, for me to prepare space for the possible acquisition of this new shop. To accomplish this, effective last week, I am in process of scrapping out at least 7 or 8 good sized machines; to whit : 2 large 440v 4 station gang drills, a large Cincinnati-Bickford 440v radial-arm drill, a 16 X 10'? 1920s Pratt&Whitney engine lathe, a #2 Warner&Swasey turret lathe, another small turret lathe, a #3 K&T Horz w vert head, possibly a Norton? surface grinder, a #4 1950? Cincinnati Horz mill, and possibly more. All the above are without serious rust, but have problems that do not make it worth-while to invest much labor into machinery that would be marginally effective in the small job-shop. I am now negotiating with the scrap-dealers to try and find one that will winch and load the machinery, without extra charge.


Back
Top