What's new
What's new

Lapmaster 20 Refurb

e-fishin-c

Cast Iron
Joined
Jan 1, 2008
Location
Hooksett, NH
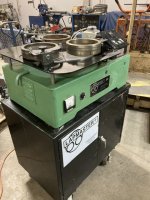
Picked up a 20” Lapmaster for refinishing hydraulic component valve plates.
The machine was reasonably tooled but set up for some other purpose, possibly ceramic or glass lapping. The original lapping plate was cast iron but not serrated so we purchased a new replacement OEM cast iron plate, abrasive media and oil vehicle to start fresh.
I am missing the original slurry pump and related tubing to dispense the abrasive media, the machine did come with a peristaltic fluid pump and a SS 7.25” dia x 8.25” deep tank for the slurry. I believe the OEM was a Graymills 110vac 1/15 hp pump.
I am looking for the pump nameplate info and model to possibly outsource a replacement pump. The tubing I should be able to fabricate using materials I already have but a few closeup pics would helpful. The mechanical timer switch needs some love (sticking buttons), might change it to digital in the future.

I am open to any and all suggestions as I am a newbie to mechanized lapping. Learning how to keep the plate flat will be my mission.
Thanx in advance.
Bill
 

Attachments

  • 443B6EF6-375E-43ED-9857-B338E824F39F.jpeg
    443B6EF6-375E-43ED-9857-B338E824F39F.jpeg
    126.9 KB · Views: 13
Have a chat with Lapmaster (if you can get them to answer the phone). Last time I bought a Lapmaster 20, 6 years and 2 jobs ago, the peristaltic pump was an upgrade for use with diamond lapping compound. Supposedly cheaper long term, but more expensive up front. Probably not great if you’re lapping something Diamond would embed in (I was).
The pump on ours also included a fan to keep the grit in suspension, a recirculating loop to drip it out, and a few other things. In comparison to the new price of the machine it wasn’t bad, and I’d just buy the whole assembly from them.
For keeping the table flat, they swapped from pretty knowledgeable to utterly useless unless you wanted to buy their gage. We ended up putting 3 screws for feet on a 6” long piece of 1/4” x 2” plate and dropping a digital drop gage at the halfway point. Zero it out on a handy granite table, and periodically check the table with it, after a solid cleaning of course.

That, reading a bit on how to adjust the rings (be patient, keep a log book), and some practice, will get you to 100 to 150 mm diameter parts that are flat to a a couple microns. Plenty better is quite achievable, but I’d need to know a lot more about what you are doing before going into specifics.
 
Thanx JCC for the reply.
I did purchase a new OEM pump and related tubing assy that dispenses the slurry. It works great.
I like your take on making a flatness gauge, most ones I’ve seen on fleabay a few for $425 to $500 for just the gauge without the test block. I may steal your gauge design cuz I really need a way to check the platen.
Thanx,
Bill
 

Attachments

  • 5F14B27E-36D9-4F5C-8B89-2A3E13FE7877.jpeg
    5F14B27E-36D9-4F5C-8B89-2A3E13FE7877.jpeg
    126.1 KB · Views: 9
Yep, that's the one.
1. The little red plastic plug (I'm making some assumptions) at the tip of the spout may fly out. DO NOT remove it while it's running or you'll take a bath.
2. Periodically the drip spouts will clog if you run your slurry mix to rich, just open them wide for a moment to clear.
3. At least with SiC grit, you absolutely can re-use it several times though you may end up with an occasional scratch on parts from large particles that sneak in. My application tolerated this without issue, yours may or may not.
4. If the machine has been off for a bit, lift the pump out and give the grit a good stir before starting the machine or it'll just sit settled in the bottom and you'll run clear vehicle.
5. Vehicle is really easy to settle out and re-use. Just pour off the top like paint thinner.
6. I wouldn't bother trying to use a filter sock to save vehicle from grit. The fines will pour through a 1 um filter sock like it isn't there, yet settling overnight in a beaker (or bucket, or whatever) will drop them all out nicely.
7. A granite table or other known flat does just fine to zero the gage. Just move it around a bit to make sure the zero is steady. Use a digital gage so you can just hit the zero button, no need to deal with a screw adjust. Your lapper might have a constant curvature, IE not flat, but granite tables won't so if you move around and hold zero then you probably are flat.
8. NEVER EVER REMOVE THE WEIGHTS OR RINGS WHILE THE MACHINE IS RUNNING!!!!! All will be well until they stick one day and take your finger off.
9. Until you get used to it, checking flatness every hour or two of run time isn't a bad idea.
10. O-rings are a nice way to keep parts from bouncing hard off of the walls.


Back
Top