marka12161
Stainless
- Joined
- Dec 23, 2016
- Location
- Oswego, NY USA
Folks, below is an outline of my plan for scraping and aligning my Monarch 16CY lathe. I apologize if there's excessive detail but it is a fairly complex project and since i'm looking for feedback, I tried to be clear. This plan focuses on scraping and alignment of my machine in it's unique current state and does not get into disassembly/reassembly of components or parts replacement. Much of this stuff has been covered elsewhere and is not unique to my project. Thenk you in advance for your feedback.
Mark
Current State of Machine:
Mark
Current State of Machine:
- Headstock, QCGB, Saddle, Apron, Taper Attachment & Tailstock have been removed
- All sliding ways on the bed have been ground. Saddle inverted v-way and flat way, tailstock inverted v-way and flat way as well as keeper ways on the underside of the bed.
- The bed is on the pedestals
- The apron and taper attachment have been rebuilt (cleaned, worn parts replaced, lubrication system cleaned etc). Still need to rebuild Headstock and QCGB and clean/repair the lubrication system on the saddle. Any questions on these rebuilds will be topic on another thread if not covered in the archives
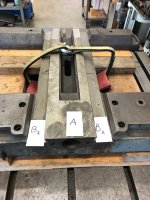
- The saddle cross slide dovetails and ways have been ground and milled (refer to picture). The top of the cross slide dovetail (surface A) and the dovetails themselves were ground. The cross slide flat ways (surfaces B1 & B2) were milled. The shop that did the work did not have an appropriate cup wheel to grind these surfaces so I decided to have these surfaces milled (and later hand scraped) rather than wait. The grinding & milling was done on a very large planer fitted with precision grinding heads and milling heads. As such, I believe surfaces A, B1 & B2 were machined using a single set up. The dovetails measure parallel over their entire length when measured with dowel pins and a micrometer.
- The saddle underside v-ways and flat ways have been milled to prepare them for application of turcite.
- The cross slide, compound and tailstock have been cleaned but no machining has been done yet on these parts.
- Level the bed by the normal methods
- On the surface plate, verify that saddle surface A is a flat plane.
- Using saddle surface A as a reference, determine if saddle surfaces B1 & B2 (milled surfaces) are co-planer to each other and parallel to surface A.
- Hand scrape saddle surfaces B1 & B2 to achieve proper bearing surfaces and maintain/achieve co-planer to each other and parallel to surface A
- Take careful measurements of QCGB, apron & saddle to determine the thickness of turcite required under the saddle to maintain proper alignment of feed rod and lead screw. I have some thoughts on how to do this but when the time comes, I may make this the topic of another thread if not already covered in the archives.
- Glue turcite to the bottom of the saddle and scrape/align the cross slide dovetails perpendicular to the bed ways using the technique shown in the Keith Rucker video when he did this same alignment. Note that since the dovetails have been ground, I do not plan on scraping these surfaces. Feedback on this point would be appreciated.
- Align the headstock to the bead. On this machine, the headstock registers to the tailstock inverted v-ways and the tailstock flat way, both of which have been ground; therefore as a minimum, the headstock alignment must be checked. I plan to remove everything from the headstock then re-install the main spindle and bearings. This will lighten the headstock casting to facilitate manipulation for scraping and will allow me to mount an alignment bar in the spindle taper. Using the newly aligned saddle as a sliding reference, align the spindle in the horizontal and vertical axes relative to the lathe bed by scraping or shimming the mating surfaces on the bottom of the headstock casting. I would appreciate input on whether to use shims here or scrape the headstock casting.
- On this machine, there is also a rod that runs through the headstock perpendicular to the bed and into the QCGB to engage the leadscrew reverse. Because the bed was ground, if the headstock is aligned by scraping the casting, the headstock will sit lower relative to the QCGB and I will likely need to account for this as well. I can do this at the QCBG end.
- Machine the cross slide dovetails and flat ways to correct for wear. Machine or manufacture a new tapered gib as well.
- Using saddle surfaces B1 & B2, as references determine the turcite thickness required on the bottom of the cross slide flat ways to maintain proper cross slide screw alignment.
- Apply turcite to the bottom of the cross slide and hand scrape the cross slide to achieve proper bearing surface and fit to saddle surfaces B1 & B2 as well as saddle dovetails.
- At this point, saddle surfaces B1 & B2 will be co-planer and the cross slide will have been scraped and aligned to these surfaces therefore the flat ways on the bottom of the cross slide will also be co-planer and can be used as a reference for machining and scraping the top of the cross slide (mating surface for the compound)
- Machine the bottom of the compound as required and scrape/align it to the cross slide.
- Machine, scrape, shim and align the tailstock to the spindle.