LKeithR
Stainless
- Joined
- Sep 1, 2011
- Location
- Langley, B.C.
Follow along with the video below to see how to install our site as a web app on your home screen.
Note: This feature may not be available in some browsers.
If you had like a little 25 footer, with a Magma grill on the back and a 12 v refrigerator ? Late afternoon run down the hill there, fire her up, head north-east a ways then do a u-turn and back west to Plumper's Cove, park overnight, grill hamburglers or make burritos or catch a few crabs .... back the next day or if it's the weekend, up north a little then down skookumchuck to porpoise bay, nice pizzas, nice people, it's on the way to texada or princess louisa ... leave the boat, take the electric seaplane back to work for a week, repete repete ...I think it's a conspiracy to shut me up and retire me before I'm ready.
Proprietary explains a lot. They succeeded in making it unusual.
Good to hear of your progress.
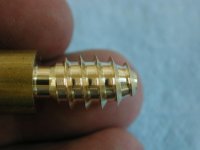
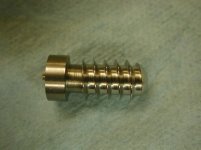
You have not mentioned if you are using a center or not. They can be very helpful- but can also get in the way with smaller work. Because you have one end of the work in a collet, the end in the center does not have to be under much pressure. I would think about putting a 60* taper on the end of the tap and making my own female dead center for the tailstock.
You have not mentioned what you are using for a cutting fluid. Moly-Dee is messy and makes it hard to see what is going on- but it is great at reducing friction and edge build up.


 to your co-workers...you deserve to swagger (but not TOO much)
Notice
This website or its third-party tools process personal data (e.g. browsing data or IP addresses) and use cookies or other identifiers, which are necessary for its functioning and required to achieve the purposes illustrated in the cookie policy. To learn more, please refer to the cookie policy. In case of sale of your personal information, you may opt out by sending us an email via our Contact Us page. To find out more about the categories of personal information collected and the purposes for which such information will be used, please refer to our privacy policy. You accept the use of cookies or other identifiers by closing or dismissing this notice, by scrolling this page, by clicking a link or button or by continuing to browse otherwise.