Bakafish
Hot Rolled
- Joined
- Feb 21, 2022
- Location
- Tokyo Japan

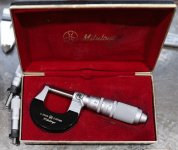
I just picked this up for a couple thousand Yen, it looked to be in great condition and although I have new digital micrometers I thought it would be cool to have a mechanical micrometer that could theoretically measure microns. When it arrived it was clear that it would need disassembly and cleaning, because what appeared to be the micron barrel section was frozen up. As with all the old Mitutoyo stuff, documentation or any kind of support diagrams were frustratingly absent. If anyone knows of some obscure archive of Mitutoyo service docs I would be very appreciative.
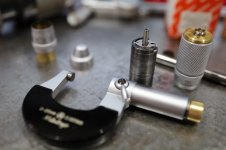
Anyway, I bought this to understand how they managed to get such small measurements mechanically, and with it clearly not working it was time to dig in. The rear end is covered with a thin pressed cap threaded on with a single hole for the typical mini-hook spanner, but the diameter is much larger than a typical barrel, so some care is needed if you don't have an appropriate wrench. This was easily removed and exposed a large flathead screw that held down a black metal cap. The cap has a tiny hole in the top edge that holds one side of a tiny coiled tension spring that fits entirely in it's recess. Removing the screw and the cap revealed the coil tension spring which is fastened on the main thimble body by a tiny slot that has been peened to permanently retain it. A small shaft extended through the center of the spring, it was threaded to accept the screw and when working properly would convey the force of the thimble via the spring to the internals. This part is quite clever once fully exposed, and I will detail it later.
The thimble body has two main sections, a measurement ring indicating 0-50 in hundredths, and the larger micron section which has 0-10 microns repeated 6 times around the barrel. The hundredths ring is just press fit into the main section and can be gently removed. The body then seemed to have an inner section that was tightly fit (corroded in place in my case) to the outer micron band. The main threaded shaft with the carbide anvil is bound to the thimble body with both a taper and an internal thread that accepts the opposite side of the clever part.
In order to get the thimble fully disassembled I had to reattach the main shaft and gently work it left and right with lots of penetrating solvent. This unit was in otherwise perfect condition, but a small amount of rust had built up in this tight interface and jammed it. Once that was out the micron indication mechanism was exposed, but it wasn't at all what I expected. I had assumed that there would be some secondary screw or wedge arrangement that would work in conjunction with the primary screw (which appeared to my naked eye to be identical to a standard hundredths micrometer) but instead there was a simple little mechanism.

The shaft that I first mentioned that transferred the spring tension and threaded into the main threaded measurement shaft had a disk in the middle and fit in a recess of the black metal body insert (now cleaned of rust.) The disk had a tiny pin, and a little protrusion that fit into a gap in the middle of the raised border of the insert. Riding on top of that disk and affixed by the pin, and with a similar protrusion that also fit in the gap, was an odd little plate. The plate had a curved slot machined in it so that the shaft could extend through it, there was a recess on the opposite side of the protrusion that engaged with a pin in the thimble body, and by pivoting on the pin in the disk it acted like a fulcrum reducing the rotation of the main barrel by about a 1:8 ratio.

Quite an odd, but clever little arrangement. But no actual threads or ramps or anything, what I was looking at but didn't know it yet, was a mechanical vernier. After cleaning, lubricating with Mitutoyo Metrol oil and some special grease for the barrel and reassembling it, I was still a bit puzzled how the thing was supposed to work. Setting the spring tension was difficult, and compounded by the fact I had no idea how much tension it should have or how it was supposed to affect the measurement. There was no clicky spring tension knob, turning the main barrel extended the anvil as expected, once it encountered resistance the spring and the little mechanism came into effect, but you were basically able to cover the entire range of the little fulcrum, where do you stop?
A bit more fiddling and it dawned on me that the way it was used is that you turn the main barrel until you make contact, then you continue tuning (now under the spring load and the fulcrum range) until the nearest hundredths indicator (on the first rotating barrel) exactly aligns with the line on the fixed 0-25mm barrel. When that unit is perfectly aligned, you can see where the micron indicator is on it's own pointer line and you have your measurement! Once you've done it a few times it is completely intuitive and natural. I adjusted the spring tension one last time to what seemed to be a reasonable amount, calibrated it to zero (like a normal unit, by rotating the fixed barrel but taking care to make sure the microns indicator repeated to zero as well), then made a couple measurements of several different sized Cera gauge blocks and got results within a micron or two. That was without being super fastidious with everything, quite impressed with it!
Anyway, hope this helps someone out or was an interesting read at least. Let me know if I got anything wrong too, I'm old but I'm still new to some of this stuff.

