Charlyman
With your ecentric on top would the pump stroke be limited if the handwheel ecentric was already in the downstroke position?
I see what your trying to do there.
Some thoughts below.
Both Round Dial lathes and square dial lathes will gravity drain the oiling resovoir in the apron if not used daily. Then excessive handwheel turning is needed to refill it. How can you verify that its full.
The oiling system was designed with daily use in mind to keep it primed. Production work.
Your thoughts on a secondary pumping method are good.
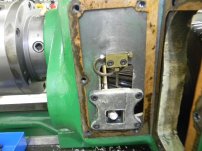
The small reievoir in the top of the apron could be prefilled by either drilling a fill hole directly above it in the apron with a pipe plug or set screw for a cap. You could also fill it by drilling through from the front of the apron just above that reservoir for a fill oiling port. That would verify that the gravity fed oiling of the apron is full before operation. Without hand cranking.
The carriage is the farthest away and gets starved of oil without everything working perfectly and primed. Therefore, the thought of a seperate hand pump or manual Gits oilers for that.
The feed worm drive, bronze gears rely on the gravity fed reservoir inside the apron. Those gears are often ate-up from running dry. It a blind area with no easy way to verify that it is getting oil.
Texas Gwar Trane has a fix by adding an oil sight tube idea that I'm going to adopt. Its on his Monarch series 61 thread.
If that copper tube blocks up or resevoirs not full those gears run dry. And too often do.
I plan to retain the original pump system but will have a second way to verify oil Everywhere without handcranking a handwheel around and around and "guessing" the resevoir is full that oils two clutches, worm drive, half nuts.
This system was an early attempt to idiot proof machine oiling. Its failures are evident in all the ate-up gears and worn Ways.
You can't see that it's working properly by looking at the apron.
Blame it on lack of maintenance, yes, no, maybe but if it's a lot of work to maintain something it will likley get neglected.
oiling needs to be simple and verifyable.
I'll give the Monarch engeneers credit, but they designed it before engineer's addopted the KISS rule. Keep It Simple Stupid.
It's to complicated per all the small valves and orfices on a machine that cuts metal. Grit everywhere!