What's new
What's new

Monarch Series 61, Rebuilding for Improvement

For bed ways that were ground, I never saw them cut any kind of relief in the bed ways in front of the headstock. The grinding wheel would stop on a dime at the same place on every stroke on that planer they used.
Ken
Just speculation on my part, but i think probable on a specialized and serious machine. . .To accomplish grinding without a relief, I'm thinking the machine had stops with switches set up.

In that case, grinder reaches end of pass just before headstock, as it begins to hit the stop, the wheel begins to raise off work, thus looking perfect, and no relief cut.

Where a wheel remains in contact, at cutting depth, it will leave a burn mark, or cut deeper, if stopping the pass with that wheel still contacting.
 
Took a little time for the holidays plus an away vaca during the past month. Getting back to it.

While I still had a decent amount of depth to cut, I experimented a bit trying to improve finish. With the direction grinder is turning, and I'm pulling sled from headstock toward tail stock end, that would be "down grinding".
630.JPG

I tried up grinding, by swapping the direction, and pulling from TS side toward HS side. Didn't change anything for me, and its more dangerous as I have to stop on a dime at HS end. So I swapped back to original of starting at HS end and pulling toward TS end.

In with swapping wheels, dressing etc I ended up with an increased vibration that I could fell, hear, and transfered to the work in a horrible finish. Another mis-adventure, either from the vibration or maybe when I swapped wheels, or both ? But one of two compound screws loosened and the compound moved by a degree, from 45 to 46 degrees. I caught it right after dressing a wheel and coming in to kiss off. . .

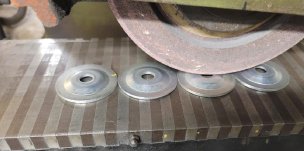
I finally got aggravated enough to start addressing known problems. I know how the washers/clamps sat on grinders arbor was a problem, plus wheel being unbalanced. First looking at the arbor. Main portion for wheel measures .499"-.500". The step that inner wheel clamp sits is .575", so a whole .0375" around circumference to contact the clamp. Making matters worse, there's a trench wide enough for clamp/washer to drop into at .490".
624.JPG

First fix/patch, I sliced a thin piece of scotch tape, measuring .001" thick, and wrapped in that trench so clamp will sit more true. This worked and helped with vibration as clamp itself is spinning centered.

Next I cleaned up mating surface of clamps to sit on that interior step more squarely:
625.JPG

Note*: You can't have a grinding wheel itself tight or snug on an arbor. There's always a few thou's atleast. This allows thermal expansion or arbor and wheel. Otherwise wheel could fracture or blow apart if no room for thermal growth.

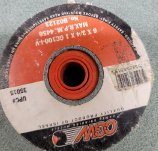
Now knowing that, I'm still trying to reduce a balancing problem and reduce vibration. And looking at how you typically get 6" wheels, there's several removable adapters inside to fit 1/2" up to 1" arbors:
626.JPG

Even though I have been dressing wheels, I think I had gotten off centered, and though dressed, more weight was still to one side. To fix, I got a brand new 60 grit green silicon. I just slightly snugged with clamps and nut on arbor. I then used a dial indicator with a garbage flat tip and indicated with wheel in as close as possible before tightening wheel. Tightening pulled me off center a few thou, but I was close. Then dressed wheel

The result of these fixes has the grinder running the absolute smoothest since I began, and naturally it shows on the finish of the work. Grinder powered off, I can rotate and stop the wheel anywhere in 360 degrees, and stays put, no more rolling the heavy side to 6 oclock. So I know I nailed the balance pretty good.

1 of 2
 
2 of 2

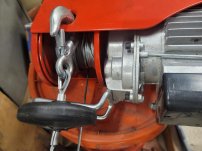
More of a minor problem. But I reported an occasional stutter step with hoist I'm using to pull sled. Problem being the cable tended to spool up toward one end of spool, then drop off top of that mound, causing a slight pause in travel. This would leave a mark when it happened. This is a vertical hoist that I'm using horizontally. I fixed the problem by using a rope to pull hoist to a slight angle. This allows cable to feed toward center of spool and distribute more evenly. Knock on wood, not a single stutter step since I did this:
627.JPG

End results are my best finish since beginning. I'm still on my first surface, the carriage inner vee. But I'm down to about 12" of surface the grinder hasn't reached yet. I'm speculating another .004"-.005" to reach final depth.

628.JPG 629.JPG
 
Isn't that always how it goes ? you get the process just about perfect, fifteen minutes before you finish :)

I woulda been interested in seeing how a cubitron wheel worked, if you had more experimenting time.
I'm not familar with cubitron wheels. A quick search seems like abrasive is a precision type ceramic grain.

Quite a while ago, in another thread in the Abrasives section I've seen Eric and others mention or recommend CBN wheels for steel, which I can find them, but a bit more specialized from what seems like only a small handful of sellers, depending wheel size. Are the CBN wheels cubitron ?

I too would like to experiment more, but its really hard to get momentum going sometimes. Seems like I every single time I get on a roll, here comes someone to interrupt, lol. And this project has taken way too long as is :D. I did in fact receive a new AO wheel, which I wanted to try, but I'm scared to mess with the good mojo I have right now.
 
Cubitron is basically a shaped aluminum oxide grain. They form the grains so that they're spiky and sharp, very free cutting. I'm not certain they offer it for bench grinder wheels. Maybe not even for common surface grinder sized wheels
 
Texasgeartrain said:
I too would like to experiment more, but it's really hard to get momentum going sometimes. Seems like I every single time I get on a roll, here comes someone to interrupt, lol. And this project has taken way too long as is :D. I did in fact receive a new AO wheel, which I wanted to try, but I'm scared to mess with the good mojo I have right now.

You worked through all the setup and
your winch cable issues. If it's going smooth, I would just continue and get past that last 12' skip thats still low. You have to be within a couple of thousanths.
I'll bet your adrenaline is pumping with every pass. You have come a long way!
Changing your game now could be a hazard to your mental health.

Lock the doors, leave the phone in the truck and ask for some time alone. Work at 1a.m. if necessary.
Have an ice cold six pack ready for that final pass.
You got this whipped!
 
Took a little time for the holidays plus an away vaca during the past month. Getting back to it.

While I still had a decent amount of depth to cut, I experimented a bit trying to improve finish. With the direction grinder is turning, and I'm pulling sled from headstock toward tail stock end, that would be "down grinding".
View attachment 423482

I tried up grinding, by swapping the direction, and pulling from TS side toward HS side. Didn't change anything for me, and its more dangerous as I have to stop on a dime at HS end. So I swapped back to original of starting at HS end and pulling toward TS end.

In with swapping wheels, dressing etc I ended up with an increased vibration that I could fell, hear, and transfered to the work in a horrible finish. Another mis-adventure, either from the vibration or maybe when I swapped wheels, or both ? But one of two compound screws loosened and the compound moved by a degree, from 45 to 46 degrees. I caught it right after dressing a wheel and coming in to kiss off. . .

I finally got aggravated enough to start addressing known problems. I know how the washers/clamps sat on grinders arbor was a problem, plus wheel being unbalanced. First looking at the arbor. Main portion for wheel measures .499"-.500". The step that inner wheel clamp sits is .575", so a whole .0375" around circumference to contact the clamp. Making matters worse, there's a trench wide enough for clamp/washer to drop into at .490".
View attachment 423485

First fix/patch, I sliced a thin piece of scotch tape, measuring .001" thick, and wrapped in that trench so clamp will sit more true. This worked and helped with vibration as clamp itself is spinning centered.

Next I cleaned up mating surface of clamps to sit on that interior step more squarely:
View attachment 423486

Note*: You can't have a grinding wheel itself tight or snug on an arbor. There's always a few thou's atleast. This allows thermal expansion or arbor and wheel. Otherwise wheel could fracture or blow apart if no room for thermal growth.

Now knowing that, I'm still trying to reduce a balancing problem and reduce vibration. And looking at how you typically get 6" wheels, there's several removable adapters inside to fit 1/2" up to 1" arbors:
View attachment 423487

Even though I have been dressing wheels, I think I had gotten off centered, and though dressed, more weight was still to one side. To fix, I got a brand new 60 grit green silicon. I just slightly snugged with clamps and nut on arbor. I then used a dial indicator with a garbage flat tip and indicated with wheel in as close as possible before tightening wheel. Tightening pulled me off center a few thou, but I was close. Then dressed wheel

The result of these fixes has the grinder running the absolute smoothest since I began, and naturally it shows on the finish of the work. Grinder powered off, I can rotate and stop the wheel anywhere in 360 degrees, and stays put, no more rolling the heavy side to 6 oclock. So I know I nailed the balance pretty good.

1 of 2
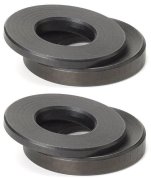
Just passing on something I stumbled across not wanting to try to make a decent set of arbor washers without a grinder and balancing wheels. "Morton Low Carbon Steel Spherical Equalizing Washer Sets for 5/8" Arbor" from eBay seller Viking Mountain Tool Works. Grinder ended up being junk, no idea if they have made any difference on the 8" Jet I replaced it with.

1705631055817.jpeg
1705631099061.jpeg
 
I would just continue and get past that last 12' skip thats still low. You have to be within a couple of thousanths.
I'll bet your adrenaline is pumping with every pass. You have come a long way!
Changing your game now could be a hazard to your mental health.
Your guess was a lot closer than mine ! Your comment made me think about it, and I had not mic'd anything since I did the initial check prior to grinding. Got to thinking I might want to do that before I hit final depth.

With the cold snap, I have not ground anymore. Even here in Texas the temp dropped quite a bit. I have some space heaters, but not enough to keep up. The shop has been maybe low 40's inside And I didn't want to chance it affecting the grinding.

I did go out to get some readings though. Back on post #160, bottom of page 8, I made a jig to mic inner vee:

460.jpg 461.jpg

I marked 15 spots about 6" apart, along the entire way. My initial readings prior to grinding, also at post #160:
464.jpg

Using the same set up, and same marks, my current readings, still with 12" of un-ground section:
631.JPG

With wheel dressings, experimenting, I've lost track of my total removal so far. However, at a guess I was thinking around .020". Quite embarrassingly, I believe each of my steps in depth drop has been half of what I was thinking. It didn't dawn on me until I just looked at the original assessment and saw my worst spot was only .0105" deep. Shocked, thinking I already took .020", I go out and measure. . .sure enough I've only taken .010"-.0115" off so far. Using a radial reading dial, took me a minute to realize. I'm feeding straight, but into a 45 degree angle vee. . .so anyway, I'm dummy :D.

Funny enough, that's good news. I was hoping to control within .00025", wasn't sure how that would go with my dial, but now I feel sure I could control down feed by .0001-.0015".

On to the readings. . .Big improvement ! Not perfect. But I have some answers. Miscues and misadventures mostly happened at spots 1 & 2. Though that has been largely corrected, and not visible by eye, I suspect those spots will level more closely to 3 & 4 as I go a little deeper.

The unground section starts at 4 and finishes at 6. Presume 5 is the lowest spot. This very well may be ground out within another .001", woot !

Prior to grinding, TS end mic'd .002" more than HS side. That has grown to .0037". However I do think I can lower that number. Grinder is hitting and working harder between 9 & 15. As I hit final depth, I think If I run a bunch of passes without lowering depth, I should get that number lowered by at least .001".

Good news is the low valley under chuck is nearly ground out, and considering the vee way is 88" long, numbers aren't too shabby.
 
Last edited:
Living in the Houston area, our winter temps here are quite a bit more mild than most who live a bit more north. During my last grinding session, it was some point in January, and the temps were colder than what I have now. Its currently 65 degrees at 7:30pm, and I'm thinking its averaging 10 to 15 degrees warmer than my last session.

Point being, I'm not entirely sure if the temp change has affected my readings, but maybe a little.

During the last couple of weeks I have run multiple series of grinding passes without changing my depth of cut. I did this because based on my last readings, it appeared the difference had grown between head stock side and tail stock in way thickness.

I forget the actual number, but I'm thinking I ran 9 sets of passes, 3 passes per set. So at least 27 total passes without changing depth. This does appear to have moved the numbers in the direction I was hoping. It looks like I dropped .0005" on head stock side, while dropping a full .001" on tail stock half of the bed. One oddity, the 12" un-ground section between points 4-6 did not shrink. Here's the numbers after all those passes:
649.JPG

From this point, I'm going to begin lowering cutting depth again, however I plan to increase the number of passes for each depth drop.
 
I can’t wait to see the result. I don’t know if I have the guts for this project. I’m genuinely envious and inspired.
I had spent at least a year or two thinking and talking about whether it was feasible. So in part, part of the goal was just to know if I could. So now, I think yeah, its doable.

The other part was budget. Previously I was on a tighter budget, and at just a guess, I was thinking probably $6k to just regrind the bed. I'm not in any kind of hurry, so in terms of doe out of pocket, I'm way under that. In fact the only real money out of pocket specifically for the bed grind, is grinding wheels and the 1" thick flat bar for the base of sled. So for the bed itself, I'm in for maybe $500. The rest I owned, or got for free.

This project has eaten a great deal of free time. But it does make for a good conversation, so there's that :D. I have more expenses for bearing surfaces of carriage, cross slide and TS, but I would have those expenses on top of a re-grind anyway.

I still work full time with OT. Then with home, family, and other side projects. . .well its drug on quite a bit more than I like. I want to get it wrapped up so I can throw big pieces back on the machine. :D
 
I had spent at least a year or two thinking and talking about whether it was feasible. So in part, part of the goal was just to know if I could. So now, I think yeah, its doable.
...

Thanks for posting your progress. It has 100% motivated me to get my shop going which is in year two. Mine is a "retirement plan," as I don't believe I'll save enough to sit on a beach for the rest of my life. The next best thing for me is earning a humble living working in the shop at the house. Which has taken way longer than expected, but hopefully, I will start rebuilding my machines in the May timeframe.


Back
Top