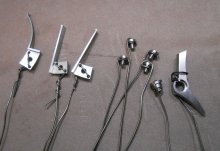
Looking for some guidance and recommendations on how I should go about heat treating a trigger that has the sear on it. The trigger was machined using O1 tool steel that started out as 1/4” thick flat stock. The trigger tang and sear itself remains at 1/4” thick. The trigger is 1-3/4” long x 1” tall. A good portion of the middle section had to have 1/8” of material removed to accommodate other parts that work with the trigger assembly. The trigger also has a 1/4” hole drilled in it to accommodate the pivot pin for the trigger. There is also a section of the trigger that had to be machined and measures 1/4” thick x 1/4” L x 1/8” Tall. This small section acts like a shelf. I had to drill a very small hole in this shelf to install a pin to hold a spring in place.
I’ve been reading up on heat treating for the past week to figure out the best method to eliminate warping, cracking, or deformation. My main concern is warping in the thin areas in the middle part of the trigger that has majority of the material removed. Another concern is cracking around the pivot pin and spring retaining pin hole. On the pivot pin hole I did a very light chamfer on the ID to remove the sharp edge as I read that will help reduce cracking. I also plan on packing this 1/4” hole with steel wool as well. Can’t do much to the small pin hole as it’s very small.
After reading for days and discussing it with coworkers, I’m trying to find out if I should go with an oil quench or let it air cool since this part is rather small. I feel that a water quench would be too aggressive and would do the most harm.
If it is recommended to oil quench, I plan on using some type of vegetable oil, peanut oil, etc.
I’m also considering an air cooled method as I have read that it can work on smaller parts made with O1 and warping, cracking will be some what non existent. Just need to make sure it’s hardened in the end.
If doing one of the two above methods, I plan on tempering afterwards to draw it back just a tad if either method passes the file test.
A coworker and I discussed just heat treating the sear portion if warping and cracking was a concern, but I feel that the area behind the sear would be brittle and eventually break. We also discussed just heating the part up the a cherry red and case hardening it.
Any thoughts or recommendations? I’m very new to this so excuse my long drawn out first post…lol.
JMD82
Thanks in advance for your help.