What's new
What's new

Ready to glue on the Rulon

Gard

Aluminum
Joined
Mar 18, 2016
I have been working away on this old South Bend 10 Lathe. Most recently I have scraped in the planed bed and machined the saddle Vs so they are the right height, spacing and alignment to the bed all within about 0.001". The milled surface was roughed up with 60 grit drum sander and cutoff wheel on the Dremel. My plan is to add adhesive, rulon and wax paper to the saddle then flip it over and set it on the bed. 150 lb of weight will be stacked slightly offset from center (there is more glue area in front than rear). The weight was calculated from the recommended clamp pressure of 10-15 psi and the bond area, adjusting for the 45 degree wedge angle of the V way.
The Tristar instructions say to use the supplied notched trowel to apply the CE211 adhesive to both surfaces. The trowel has 3/16 notches, so that would result in complete coverage adhesive thickness of about 3/16" (about 0.18"). I thought I remember the final thickness after clamping is 0.005". This seems like an awful lot of excessive adhesive (at $50 for the kit) that will be running out of the ways as I stack the weight up. So what am I missing here, it seems like a trowel with much smaller notches spaces further apart would be more suitable.

KIMG1549 (Medium).JPG

KIMG1546 (Medium).JPG

KIMG1550 (Medium).JPG
 
Be sure the lathe bed is level longways, if it isn't the saddle will slide or creep off the Rulon. Also you could c-clamp wood to the bed so it won't slide. I use the corner of a power scraper blade and scratch the surface deep, a lot more then sand paper. If you don't have a power scraper use your hand scraper. cut them 90 degree to the way. The .010" scratch acts like a key to lock in the epoxy. Moglice says to scratch it until your eyeballs bleed. After it's scratched file or clean stone off the burrs of the scratch,

I would spread the epoxy on with a steel bladed putty knife first on both sides and then use the notched tile putty knife to make the groves. The epoxy has .003 to .005" glass beads in it and that's all the epoxy you need.
The thinner it is the faster it will dry. Also I cut the wear strips 1 to 2 inches longer then the saddle and trim it after it dries. If it creeps a little bit if it is cut to the exact length you won't get a good job. I buy a wax die release agent and spray the bed and don't use wax paper anymore as wax paper rips. I used wax paper years ago. The spray release agent works so much better.

If you use wax paper leave it as a sheet or use plastic wrap and set it down on it as the epoxy squeezes out all over you won't imagine. I also cut it wider as it will creep up into the saddle vee. It's a learning curve. I would do a test run with-out the epoxy so you know the method your going to do it. be sure to mark where the oil holes are beforehand. Be sure to glue the dark acid etched side and not the green side. I like to add extra epoxy on the ends as it wants to squeeze out more on the ends. Another thing I do is to lay a straight edge on the milled saddle to be sure it is not high on the middle, If it is high in the middle scrape it flat. Less Rulon to scrape off later.

I use brake cleaner in a spray can, the one that evaporates fast or electrical contact cleaner and wash the iron and the Rulon. Set the saddle up and spray from the top down from the top of the ways. It sprays the oil and crud down and off. The rubbing alcohol has oil in it if you buy the wrong kind. I never use alcohol even when Tri-Star say to use it. The pressure spray cleans better. Spray and let it air dry and don't touch it or wipe it with a rag. Wear nylon gloves too.
 
Last edited:
Thanks for the suggestions. I did find the milled saddle was a little higher in the center so I milled some shallow steps to make sure there will be contact between Rulon and the saddle only at the ends and 0.0015 thicker glue in center area. Turns out my little mill does not cut in a perfectly straight line, a project for another day.
I will give it some time with the hand scraper and make some deeper scratches, not sure about the bleeding eyeballs. I did leave the Rulon long, I was not thinking about it shifting sideways but thought it might try to drift higher or lower on the V. I bought some 99% IPA off the internet, the stores around here mostly only carry about 70%. I use a lot of brake clean in the garage so I may use that as a final step. It does effect some kinds of plastic. Do you happen to know what chemical is in the kind you use? I like the idea of setting it up and letting the solvent run off especially with such a rough surface. I have some mould release that I have used on other epoxy projects with good luck it is a PVA that can be painted on. Seems like that would be better than wax paper to protect the bed, also its much thinner.. Probably also some masking tape and paper on the areas away from the V ways. Excellent idea to do a dry run first, sometimes I skip that step in woodworking and often regret it.
 
The spatula that Devitt provided me with the Epoxy glue was way too wide for my needs. Took a pair of tin snips and cut a piece off about 3/4" wide. Worked out perfectly for applying small amounts of Epoxy on the saddle I recently done. I had a can of mold release left over from another project years back. Had no problem with any of the excess Epoxy sticking.
 
The spatula that Devitt provided me with the Epoxy glue was way too wide for my needs. Took a pair of tin snips and cut a piece off about 3/4" wide. Worked out perfectly for applying small amounts of Epoxy on the saddle I recently done. I had a can of mold release left over from another project years back. Had no problem with any of the excess Epoxy sticking.
Does the spatula you used look like the white one in my photo? Mine from Tristar has has 3/16 high teeth in a continuous pattern. Seems like it would be too much glue but I have tried it yet.
 
Use that after you spread it on with a regular putty knife. Spread it thin then rake it long ways on the ways and then do it 90 degree's on the Turcite or Rulon. That notched putty knife won't fit into the cans. I use 2 plastic teaspoons to scoop it out of the cans. then mix it with a 1"wide regular putty knife and use it to spread the mixed glue on the iron. Remember the glue has .005" glass beads in it . to get a bond line of .005" . No need to spread it thicker then that. I would estimate I have glued it on hundreds of times. I used to sell and use Moglice.
 
Use that after you spread it on with a regular putty knife. Spread it thin then rake it long ways on the ways and then do it 90 degree's on the Turcite or Rulon. That notched putty knife won't fit into the cans. I use 2 plastic teaspoons to scoop it out of the cans. then mix it with a 1"wide regular putty knife and use it to spread the mixed glue on the iron. Remember the glue has .005" glass beads in it . to get a bond line of .005" . No need to spread it thicker then that. I would estimate I have glued it on hundreds of times. I used to sell and use Moglice.
Richard, thanks for that explanation. Notched trowels in other applications (i,e., tile work) are a way to apply a uniformly thick amount of adhesive across an area, so that is what had me confused. I do tend to overthink projects I have not done or seen done before. I think spreading it thin with a flat spatula and using the notched one to rake it is excellent. If it is spread to the thickness of the beads on both surfaces there will be plenty for a bond with some squeeze out. I will make a spatula that can run the length of the rear inverted V, about 1/2" wide.
We have an unexpected warm spell in Vermont now, into the 40's, so I am trying to get some projects finished in the unheated barn before getting back to the lathe in the heated basement.
 
You could also do a practice piece on a steel block first, but it's easy. Be sure to over roughen and clean the iron and spray Rulon dark side. In my classes I show the students a trick if you forget what side to glue, cut a small piece of the Rulon off the roll and pour water on each side. The dark side wicks in and the green side it beads up as that's where it fails if done wrong. You can also shine a light on it to heat it up before and during if your concerned with the low temp. If your good at rebuilding and are looking for a full or part time job my friend in Springfield, VT was looking for help in rebuilding used machines. Private message me for details.

I hope I didn't tick you off by adding my 2 cents worth as I teach and I believe it's my calling. I know I tick some folks off by adding my advise. I hate seeing bad advise and the other readers screw something up.. Not many people who write here have been getting paid to rebuild machine tools for over 50 years. Happy New Year! Rich
Richard I took no offense to anything you said and appreciate your thoughtful comments. Tristar also recommends the water beading check on old product to check if the etched surface is still good for glueing to.

I have done a little reading on spray can brake cleaners. Turns out there are 2 kinds. Chlorinated and non-chlorinated. Chlorinated brake cleaner was initially trichloroethane; it has been mostly replaced by tetrachloroethylene, (perchloroethylene, Perc), Methylene chloride and dichloroethylene due to ozone depletion. These are often advertised as non-flammable and fast drying. They are high VOC and mildly cancer causing and have thus been banned by California. These brake cleaners create deadly gasses if heated, phosgene and hydrogen chloride ( think WW2 chemical warfare). Be very careful about using a torch and brake cleaner on the same part as I saw in your posted video. I contacted Tristar and they said it would be OK to use chlorinated cleaners for cleaning prior to glueing on the Rulon.

The newer slightly more environmentally friendly and expensive brake cleaners are non-chlorinated. They may have a variety of petroleum hydrocarbons as well as polar solvents such as ethanol, methanol, IPA and acetone. They tend to be not quite as effective, do not evaporate quite as fast and are extremely flammable. The chemist at Tristar said he would not recommend non-chlorinated brake cleaners because they have found anything with hydrocarbons to be unreliable. Their most recent literature suggests 95% IPA , it has a strong desiccating, drying effect removing moisture that causes adhesion problems. I had to shop around some to find higher strength IPA, most places around here carry 70%. Some of their older literature says Acetone is another option.

I have seen some brake cleaners affect some kinds of plastics, it will ruin the plastic cover on a pressure gauge. One reference I found said it will have no immediate effect on rubber hoses but the rubber will harden and crack within weeks or months. Rulon 142 is PTFE (like teflon) and is unaffected by most chemicals.

Tristar also said the plan Richard suggested of using a putty knife to spread the glue in a thin uniform layer and then rakeing it in opposite directions with the notched trowel is good. They confirmed my suspicion the trowel they provided is not optimum. Tristar has a lot of technical info on the website tstar.com but is not set up for internet sales to the public. It was not too painful, I contacted them via the website, they sent me a quote, I called back with billing info and they wanted to know my corporate fedex account number, they ended shipping it (USPS I think) and then charged me later ($34) after sending it out.
Not sure how to attach a pdf of the instructions
 

Attachments

  • TriStar Plastics Corp. - CE211R Bonding Instructions 2023.pdf
    372.7 KB · Views: 6
I know Richard preaches it's his way or bust and I have respect and appreciation for the man for what he teaches. Somebody has to do it and I'm glad that he does.
I like to offer a couple of suggestions here. One is on cleaning the surfaces prior to applying the Epoxy. With your flavor of "Brake Cleaner" apply it and wipe it dry with a clean paper towel. Repeat this until the paper towel comes back clean. Be surprise how much oil and crud is embedded in those surfaces. Final spray with brake cleaner and let dry, do not wipe. As for using a putty knife to apply, I don't see the reasoning for doing so on such a small surface. Large surfaces, yes. Doing so on such a small surface just creates a big mess trying to trowel with the serrated trowel along with trying to remove the excess. I wasn't aware that Epoxy was supposed to be applied to both surfaces, I just applied to the metal surface only. That Rulon in thin sections is like waving a piece of paper, it doesn't stay flat easily. Thicker sections no problem working with.
I recently did a saddle similar to what you have as well as the cross slide with Turcite on saddle vee and flat, and Rulon on the cross slide flat and dovetails including the gib. All turned out great! I love how both scraped.
Good luck on your rebuild.
 
There are several ways to skin a cat Ken. I do both sides as over the years of doing only the metal side or having students and I do one side I was told by Tri-Star the Rulon wholesaler said I would have better luck doing both as you will be assured there will be no spots that don't get it. I forgot to mention the white cloth technique, Thanks Ken. I have taught to use a whit cloth as paper will leave small ripped pieces of paper, Don spray with air as many lines have water or oil in them.
 
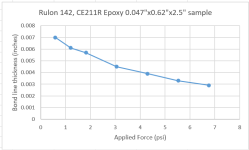
I did a couple of experiments with the rulon and tristar CE211R (Just because I like measuring stuff). I a small piece rulon is between 2 gauge blocks. I applied a clamping force force with a spring gauge and measured the stack height height, first with just the rulon then with the epoxy added. The difference between those is the bond line thickness. As expected the bond line decreases to about 0.003" at 7 psi of applied force. This is the advertised glass bead size in the epoxy. Here is a photo of the experiment setup on a drill press table and measured results. I used 0.25 to 35 lb spring gauge and 0.0001 to 0.03" indicator with right angle attachment.
KIMG1563 (Medium).JPG
Another photo from a little further back.
KIMG1564 (Medium).JPG
1673797523213.png
A photo of the rulon and gauge blocks disassembled before the glue has set.
KIMG1565 (Medium).JPG
I cleaned off the epoxy and did a couple more tests with varying initial thickness of adhesive. I also made a simple roller to stick the rulon down as recommended by the video on the tristar web site. This seems to reduce how much the rulon slips and slides around when the gauge block is inverted and the clamp force is increased. I experimented a little with force applied to the roller. I wanted enough force so the rulon sticks in place but also leaves enough glue so a little more is squeezed out as it is clamped. I concluded I only wanted about 1 lb of force for the 0.62" wide roller. At high clamping forces the glue line is less than 0.003", suggesting the glass beads are being pressed into the rulon. I could provide more details if anyone is interested. I found could press the rulon down with the roller, wipe off excess glue than set it in place and add the clamp force.
1673800688534.png

The instructions recommend stirring both the resin and hardener for at least 2 minutes before mixing. The part B is quite thick so you need a sturdy stirring tool like a clean screwdriver. One document I found says to use 0.94 oz per square ft of rulon. This works out to about 0.2 gms per square inch of rulon (0.1 gms of part A and 0.1 gms of B) to cover the steel and rulon. I would guess this is around 0.02" thick. I usually use a small inexpensive electronic scale for mixing 2 part epoxy.
The instructions also recommend using a lint free cloth, I purchased some from the internet using these search terms "cleanroom polyester cloth lint free wipes" they are only around 10 cents each (depending on size), quite durable cloth with laser sealed edges, they seem way better than paper towels and cheap enough to be disposable. Next post will be applying rulon to the saddle.
 
I got the rulon glued on the saddle without too much trouble. I realized the strips were just a little too wide, I should of done a more careful job of the dry fit up as suggested by Richard. I used the mould release compound on the bed. I scrubbed all saddle and rulon surfaces with lint free cloths and chlorinated brake cleaner until the cloths came up clean then did the same thing with 95 percent ipa. The epoxy was spread on all surfaces, I would guess about 0.02" thick than raked with the notched trowel. I lightly rolled the rulon with about 1 lb of force, I wiped off the excess epoxy with a clean cloth, set the saddle on the bed and added 100 lb of weight. I had masked off the bed, this turned out to be unnecessary, there was a small amount of glue that squeezed out from under the rulon but not enough to drip anywhere. Cheap insurance I guess.
KIMG1568 (Medium).JPG

KIMG1570 (Medium).JPG

KIMG1571 (Medium).JPG
After 24 hr cure and trimming the rulon, I blued up the bed and set the saddle back in place The contact looks pretty good to me (below). If the alignment of the cross slide to the bed is good, should I still scrape the rulon for better contact? Good alignment as I understand is slightly off 90 degrees to the bed ways so the lathe will eventually cut a face that is about 0.0005" concave across the 10 inch diameter.
KIMG1574 (Medium).JPG

This South Bend 10L lathe from about 1945 did not have any oilers or groves on any saddle ways, I have not convinced myself I if I should add them. I doubt this will ever be a high production machine.
This was my first experience with rulon so I am happy to hear any additional suggestions.
 
Very Interesting. I like the spring gage Idea. This info will help future generations :-). Being a scraper tech I would scrape it to give it some oil pockets so the pocket traps oil in the pocket when not in use. On those machines South Bend used a felt wiper inside a small cage on the 4 corners. So when you moved the saddle it wiped oil on the ways. To the other readers, on CNC VMC I have seen stick slip on Rulon / Turcite especially on the Y underside of the saddle because they had light scraping .0002" deep. The correct scraping depth should be .002".

You should grind a blade with a 20mm radius with a neg. 12 deg. rake or on your narrow ways you could make a hand scraper out of a sharpened 1/2 pin punch or tool steel shaft to add some old pockets. I use a pin punch to cut in oil grooves in machines with oil pumps. Making sure the groove doesn't leave the ways it slides on. On big machines I use a BIAX 1/2 moon flaker blade to scrape Rulon. A R60 with a 12 deg. neg rake. I also scoop scrape.

The scraped Rulon will leave a fuzz burr and I put some 400 grit emery-cloth wrapped around a 1 2 3 block or a square something that is flat.

Again I want to THANK YOU for such a GREAT thread.
 
I was thinking of another few things you should do when your bluing it up. Take a soft blow lead hammer and tap on the 4 corners of the saddle wings and listen for the same thud sound. Sometimes if the V is open it will not sound the same. This is better done mostly when you don't Rulon the saddle, but give it a try with the Rulon. If it has a clanging sound the blue your seeing is false as the saddle shifts as you push it back and forth.

Another thing is to mount a mag base on the front side of the lathe bed and rest an indicator on the underside of the saddle where the carriage bolts on. That surface is original and there is no wear. The saddle bottom should indicate + on the chuck side on a lathe your size .0005" to .001", so as it wears it gets better. Putting something dead nuts flat, as it wears it gets worse.
 
Richard, thanks for the kind words.
Your comment on the V way felt being for oil distribution makes perfect sense, I had always thought of them as dirt excluders, I guess they do both. There is no provision for this on the cross slide or compound rest which probably explains why they are so worn on both my old lathes.
I taped on 4 corners with a soft hammer and they all sound the same, I will probably check the 4 corners with an indicator. I am not as confident about the possibility of false markings with V ways, they seem trickier to interpret than flat surfaces on the granite.

I checked alignment of the bottom of the saddle where the carriage bolts on and it is parallel within about 0.0002". When I checked before disassembly the head side was 0.016" low so I am happy. I understand high on this side would be a good idea here but its probably not as important to lathe accuracy as some other checks. The lead screw is quite flexible and a little sloppy fit thru the carriage.
I checked cross slide alignment and it will cut a 0.0001 concave face, I would like to see a little more. I am trying to get my head around which area to scrape, I guess mostly the front side of both Vs on the tailstock side of the saddle. If I want to just fix alignment to cut more concave then also the back of both Vs on the head stock side. Photo of checking cross slide, I wish I had a larger more accurate square.
KIMG1580.jpg

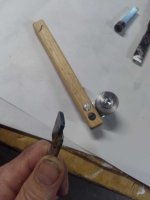
I have made 2 scrapers for the rulon, first has a handle that is 1/8 x 3/4 (so a little more flexible than my Darpa), the carbide tip has a 20 mm radius and -12 degree rake on both sides as you suggested. This seems to cut about like the other scrapers I have used on cast iron, on the order of 0.0003" deep when scraping for alignment. I made another one from an old screwdriver that was in a box of random tools off craigslist. I ground one side to a 1/2" diameter like 1/2 of a pin punch, the other side is 11/32 diameter, both are sharpened to the negative 12 degree rake. The 1/2 inch diameter side easily makes 0.002" deep marks on the rulon. I assume I will do this in some pattern after scraping for alignment. What some references call flaking. Let me know if I have misunderstood something. Following are some photos of the scrapers I made, the narrow putty knife and also the rollers I made from a cam follower bearings that was in the box.
Regards
David

KIMG1577.jpgKIMG1579.jpgKIMG1586.jpgKIMG1587.jpgKIMG1588.jpg
 
I would slide in some shim stock or the cellophane of a cigarette package (.001") before you scrape the V. This will show you the amount you need to scrape. No guessing and less math. Or buy some Argus plastic shim assortment from McMaster Carr. They have a .0005" shim and you can cut it with a scissor. It has several thickness's from .0005" to .030. I use it a lot for tests.

Then scrape the opposite side of the Rulon. so scrape the chuck side inside and tailstock end outside of the saddle. If you have a Connelly book look at page 305 and they say the spec is .0008" in 12" for a tool room lathe. Your machine is smaller. Plus your measuring a short side of the angle block, what 4". So it won't take long to scrape it or just leave it alone as it will wear better over time..

When I scrape Rulon or Turcite the depth of the scraping is .002" Be sure to leave the middle 40% low by scraping the surface .004" to .006" using passes using highlighter. That was as it wears it gets better. What is the tool that is round and on the end of the wood handle?
 
The first couple photos above show a fairly conventional carbide tipped scraper with 20 mm radius and -12 degree rake on the end. If I attempt to get a 0.002" deep scrape mark with this tool it takes a lot of force and leaves a mark that is about 1/4" wide which seems like it will be too much on these narrow Vs?

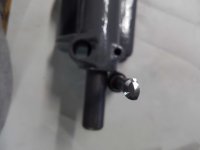
The second tool has a round shaft about 5/16 inch diameter, I ground the last 1/2 inch of it to create a top and bottom, one side has a radius of 1/4" and the other is about 1/2 of that. The 1/4" radius side will work the same as the 1/2" diameter pin punch you mention. The last photo is an end view, sorry for the crappy photo.

I like the idea of trying shim stock.
David


Back
Top