What's new
What's new

Replacing Y axis linear rails on Matsuura.

e723

Aluminum
Joined
Jan 27, 2005
Location
Southern California
Hello. Come to find out the y axis rail blocks are leaking ball bearings and the rail does not look too good. Wanted to see if replacing is doable. I am pretty hand around machines but never a job this big. Looks like I need to lift the table off the X axis to get to the Y axis blocks and completly remove the table to replace the rails. Might as well replace both sides? Nice little machine. Hate to go to waste.
 

Attachments

  • 20220804_205419.jpg
    20220804_205419.jpg
    748.4 KB · Views: 66
"leaking ball bearings".....:ROFLMAO::ROFLMAO::ROFLMAO::ROFLMAO::ROFLMAO::ROFLMAO::ROFLMAO:

You killed it! I was probably talking for a long time that it wants some oil! Personally, I would slide the trucks off the rails and reload new balls and hope for the best. Some might question that approach, but I have actually done it many times. It takes skill and math, but no way I would try to revive an old machine installing a rail like that. What machine are we talking about here?
 
It's all just bolted together...
You don't have to remove the saddle and table, you can change the Y-axis rails and blocks by ever-so-slightly jacking the saddle. You can then roll the trucks out and new back in later.
You can source the rails and trucks from many places, although THK has a great online store with good prices on top-shelf components.
The black plastic caps aren't worth trying to save, just buy new ones. I use a power drill to drive a wood screw down though them, when the screw hits the bolt head the spinning action will lift the cap out.
A solid machine like that is definitely worth a couple grand $$ in rails and trucks, and a couple/three days of your time...
Good luck!

ToolCat
 
If you can get to all of the bolts holding the rails and blocks on by moving the table around then replacing them isn't that hard. As ToolCat said you just jack the side your working on up a few thou. Keep in mind there are about a dozen details you have to get right when ordering your rails and blocks like preload, reference surfaces, accuracy grade, seals, the height of the reference ledges on your machine, etc. You have to replace them in pairs and standard accuracy is generally +/-.004" in height of the assembly of each rail and block, as in the two blocks on each rail could be .008" different in height and be within tolerance if you don't spec a better accuracy than standard. When I did them on my old machine the scariest part was loosening the little screws that held the rails against their reference ledges and the bolts holding the X axis blocks on since someone had torqued them down to double tight or more. Do use a torque wrench to tighten ALL bolts, and you will be amazed at how light the torque is holding the blocks in place. When I bought mine HiWin was by far the least expensive for what you get.
 
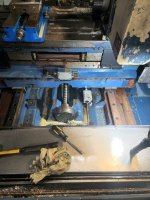
Thanks guys. I did just that. The process was a little back breaking but ultimately got it working. Just following up to help other if they want to replace the rails on their CNC. Started off by cleaning as mush as I could. Got lucky and ordered a set of rails and blocks from flea bay. They were almost the exact match but the rails were 12" longer. I cut them to length and now I have a couple of precision parallels left over. Not bad. Getting to the bolts to the blocks were daunting to say the least. Some modified stubby allen wrenches and a few ratchet ball hex were needed to open the blocks. Moved the table back and forth and got the rail screws out. Jacked one side of the table and slid the hole assembly out. This is where you have to think ahead which I ignored. lol With a smaller machine and rails being so long and heavy, I had to move the jack screws a few times. Slithered the new rail assembly into place and loosely bolted everything down. I got this, now to move to the other side. Feeling confident and experience on my side, I tackled the other side but karma had other plans. All the electrical and lubrication hoses run just above rails which made things a lot worse. Took twice as long but eventually got her all bolted down. Placed a granite square to see how perfect of a job I had done. Holy cow I was out of square in the X & Y by .003". Not acceptable, the bridgeport clone is better then this, so I loosened the bolts on the blocks to adjust the table but that made no difference. Then I got a brain fart, maybe I need to loosen the Y axis ballscrew nut assembly and re-tighten after it settles into its new position. Sure enough that did the trick. Opening the 6 bolts to the ballscew nut was a bitch. Seems like it was torqued to 1000f/lbs by a gorilla on steroids. Time to cover her up, fill her up with fresh coolant and push the green button, but not so. Swept the head to find out the head was out of tram by .002 on a 12" circle. Now what. Well, I had to open re-open the bitch side blocks and place shims and re-tighten them. Now I'm running within less then .0005 and I can live with that. Decided to just make some plastic counterbore covers with some delrin rems and it worked better then the cheap plastic covers that I destroyed while trying to remove them. All in all it took me 3 days and half a quart blood loss from busted knuckles. The trick is smaller hands with dexterity on both hands. Thnx


Back
Top