What's new
What's new

Takisawa Lathe Rebuild Plan

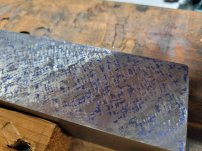
As a first scraping project I bought a Foster 8" straightedge. I did the machining and am now scraping the base of it. I have a Biax BL-10. I'd love some feedback. I did about 15 passes on it and it is looking I think pretty decent but the fine finishing isn't easy (not shocked!).

First pass is after I rough-scraped it (full stroke on the BL10). I dropped the stroke down as the spots got smaller. The last passes were set around 3mm for the last few passes. I can see that some of the high spots are "shinier" than the others and I presume these are the highest areas. Difficult to hit a single spot with the power scraper but maybe i just need to go slower and practice more. Would it be easier to switch to a hand scraper for the final passes? I may also just be going to light now. I notice a lot of my "chicken scratches" are on areas that are still showing high.

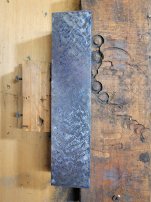
My plan is to scrape this in and then use it to spot the compound slides first. They don't have any particular "alignment" with the rest of the lather other than needing to be parallel with their base, so should be straightforward.
 

Attachments

  • 20230220_205041.jpg
    20230220_205041.jpg
    3.1 MB · Views: 29
  • 20230220_222703.jpg
    20230220_222703.jpg
    3.8 MB · Views: 29
  • 20230220_222233.jpg
    20230220_222233.jpg
    1.9 MB · Views: 29
Show us the tip of the blade and how you are sharpening it, what size blade width and length.. Is that a prism straight edge? How are you holding it to the wood cradle? Is it tight in the cradle?
 
I have two blades. Both pretty worn down! Both "short", one has about 30mm radius the other about 140mm. I used the larger radius for the roughing. Both are pretty well used and I likely need to get at least one more blade. They came fairly sharp and I haven't resharpened them yet although I'm working on rigging up a diamond wheel rig (imminent). I may leave this where it is until I can properly sharpen the blades. I figured since these were already sharp I'd play around with them as is before buying more blades or sharpening them to different radii.

It is fairly tight in the wood cradle although not clamped. It can move maybe 1mm? Doesn't seem to move when I'm scraping.

1677038759174.png
Appreciate the tips!
 
They came fairly sharp and I haven't resharpened them yet although I'm working on rigging up a diamond wheel rig (imminent).
My experience is that, while old blades might seem sharp, those results imply that they are not nearly as sharp as you need and will create scratches and chatter. I bought some second hand blades and thought they were already sharpened and usable and got bad results. Only after really giving them a good hone did I start getting better control and clean scrapes. Lots of good ideas on blade sharpening here in this sub-forum.
 
Those blade look like they are L side 90mm rad and R side 120mm. A simple trick to see if they are sharp enough is to see if you can shave a little off your thumb nail. We check fishing hooks that way up here in Minnesota. Then slide the edge along the side of the radius and the side of your finger nail and feel for any nicks in the blade.

Those pictures look like you started to try to get a bearing before cutting thru the machine marks. Pic one it is really noticeable. When your radius blade hits the machine marks you get chatter. Sets a height gage on the SE and use a .0001" indicator and check how deep your scraping. The minimum depth of high blue spot is .0002" and a max. of .001".

Your depth looks to low...You need to average .0004 to 5 tenths. Your blade looks dull. Those short blades narrow blades contribute to chatter. Use a wider blade 20 or 25 mm wide and 6" long blade ground at a 60 mm radius with a 5 neg degree rake on both sides of the blade. 8 degree if the iron is soft. I recommend sharpening brand new blades on a 1200 grit diamond lap for super sharp. Use a 260 or 600 to lap the smaller radius when roughing in the radius.

You need to grind a 60mm radius on the blades when your a rookie. Then the more points grind one to 40 mm radius. You need to buy one of my DVD's (also have USB sticks) as I show in there how to scrape 40 PPI. 3 sections on how to, 1) Hand scraping to 20 PPI and hand 1/2 moon flaking. 2) BIAX power scraping to 20 PPI and power 1/2 moon flaking 3) How to hand and power scrape 40 PPI. I sell them on eBay. If you want one, message me your regular email and I will email you. buy direct and I will give you a forum discount. I also sell the Connelly book and my training classes on eBay under "surface plates" or King Scraping

You can also see many of my students showing my techniques on You Tube for free - search "Richard King Scraping" NYC CNC and Stefan Gottswinter have some good ones.

You also need to move faster side to side on a diagonal line and have a gap between scrape marks the same width of the scrape mark, make sure you also separate the lines of scrape marks. If you scrape and don't get all the blue high spots, stand 90 degree's to the SE and scrape the ones you missed. Trying to get all of them on one side standing you will get chatter and dig holes. :-) "Practice Makes Perfect"
 
Last edited:
Alright. Sounds like I need: 1) scraper diamond sharpener, 2) some long scraper blades, 3) Richard's video's :) I have everything in house for #1 I just need to put it together.

I think you are right that I didn't quite get through the machine marks when I rough scraped it. I still have low spots left over from the rough scraping as well, which I suspect means I went from "rough to fine" too quickly. I'll poke around on the surface plate a bit while I work on correcting my deficiencies.

Thanks for the advice folks!
 
I tell the students in the classes. Shortening the stroke is like putting the brakes on when driving. You gradually slow down. Same with scraping you start with a long stoke and as you get more PPI you shorten 1 /8 turn at a time until your stroke is no less then 1/8" long. No need to shorten it less then that. A BL-10 longest stroke is 3/8" . Once you have a sharp blade off a lapper you will see how much easier it is. I see your in San Jose area. My friend D H Mayeron lives in Berkeley and he has a Glendo and would sharpen them for you, probably has a used 6" Blade. Email me and I will forward it to him. [email protected]
 
I bought some flex type blades from https://www.hudsonmachinerepair.com/shop
They have been good so far. It only looks like he has the 25-150 flex in stock, but you can email him.
You could also get the stiff style blades and thin them out.
There isn't much of a price difference vs Dapra, I mainly used him as he has an ebay store and it's easier shipping to canada.
I also bought a bunch of blades and handles from him. Good place.
 
Had some time today to do a little scraping on the straightedge. I sharpened up my blades. I also realized that the stroke adjustment on my scraper was too loose and had been opening up while I was scraping. Explains why I had been trouble controlling the length of the marks! I'm getting a better handle on it now. I'm figuring out how to work the film thickness on the surface plate to get the best marks. It is clearly a smidge low in the middle, but is in pretty good shape I think. There are a few small low spots from where I gouged it a little deep roughing but I think they are acceptable. My finishing blade is basically sharpened to nothing and I need to get a replacement (came with almost no carbide left). Once I get a new blade I'm going to finish the angled surface and maybe do a few more passes on this surface to touch it up.

Any feedback on the pattern?

1708753385224.png
 
Looks a bit low in the center band and definitely a couple holes where you mentioned going too deep but seems to be progressing nicely. I would continue roughing down the blue areas, skipping over holes until you have a pattern over the whole thing. Wouldn’t hurt to take some measurements with a tenths indicator to see how low those spots are.
 
The deeper looking grooves on the left there appear to be about .0004 and .0003 deep respectively (top and bottom). Acceptable for an amateur hack? :)

It is a bit hard to judge the center (by this i mean the slightly lighter/lower spot from the top to the bottom in the pic) since I am not trying to scrape for parallelism and it is about .001 out of parallel in the short direction and likewise about .001 out of parallel on the long face (across the whole face). By eye, it appears like that center is be about .0001 low relative to a straight line though. Maybe there is a better way to measure this like placing small gauge blocks in test areas to get an "average"?
 
Was working on the top of the dovetail surface on this straightedge and I think it is pretty good shape. I have to say I'm having trouble getting a good print near the "point" of this part. With the weight of the straightedge cantilevered off the edge and the difficulty getting an even application of the ink near the edge of the surface plate it seems like a lot of my markings are "biased" towards the heavy end/edge. Maybe there is a slight low there though? I've been using HiSpot and maybe it is time to try the water washable oil based ink that everyone else seems to like. I think I'll do another session with this and then actually move onto the lathe parts :) One of the interesting aspects of scraping is that "finished" is a somewhat vague term. I could go back and tune this up more as needed, endlessly!

1709410069940.png
 
Was working on the top of the dovetail surface on this straightedge and I think it is pretty good shape. I have to say I'm having trouble getting a good print near the "point" of this part. With the weight of the straightedge cantilevered off the edge and the difficulty getting an even application of the ink near the edge of the surface plate it seems like a lot of my markings are "biased" towards the heavy end/edge. Maybe there is a slight low there though? I've been using HiSpot and maybe it is time to try the water washable oil based ink that everyone else seems to like. I think I'll do another session with this and then actually move onto the lathe parts :) One of the interesting aspects of scraping is that "finished" is a somewhat vague term. I could go back and tune this up more as needed, endlessly!

View attachment 431321
Looking better! I used the Dykem for a long time but have mostly switched to a 50/50 mix of canode and Charbonnel aqua wash. It works well but is definitely different acting and requires a bit of a learning curve. Even Richard says he hated it the first time he tried it.
 
I should have bought a better spreader. I bought a cheap one off Amazon and no surprise it was pretty poor quality. The roller isn't quite round and it doesn't spin too well. Makes it harder to get a really even film on the surface plate.

Why the blend of the Canode and aqua wash? I believe you can't buy Canode anymore right? I had read that some others are thinning the aqua wash with alcohol or windex. I bought some of the aqua wash to use as a contrast highlight so I'm familiar with the "texture". I didn't find the highlight helped me much so I haven't been using it.
 
I believe you can't buy Canode anymore right?
No, ARTCO found another manufacturer able to make it, so it is available again. As far as mixing it, there are a number of formulas out there. Being water based it has a tendency of drying out over time, and the starting consistency isn't to everyone's liking.
 
I should have bought a better spreader. I bought a cheap one off Amazon and no surprise it was pretty poor quality. The roller isn't quite round and it doesn't spin too well. Makes it harder to get a really even film on the surface plate.

Why the blend of the Canode and aqua wash? I believe you can't buy Canode anymore right? I had read that some others are thinning the aqua wash with alcohol or windex. I bought some of the aqua wash to use as a contrast highlight so I'm familiar with the "texture". I didn't find the highlight helped me much so I haven't been using it.
As Bakafish mentioned ARTCO has started making it again. The Aqua Wash isn’t good by itself for either bluing or highlighting. A lot of people mix windex with the canode to help it stay wet - but the aqua wash does a much better job- it is oil based but is also able to be cleaned up with water. I believe that aspect keeps the canode from drying out. It also has a really rich blue color that makes the spotting stand out even more.

I mix the aqua wash 50/50 with canode - I squeeze a little out then put the canode next to it and use an artists palette knife to mix them well before rolling them out with a small foam paint roller. I do this in a corner of the surface plate or in a plastic roller tray. That lets me control how much I put on the area I want to use to blue up. All of this (except the palette knife thing) was suggested to me by Richard King and it really works well. I also mix a silver dollar size blob of canode with aqua wash Bistre and mix that with 2-3 full windex sprays again at Richard’s suggestion. It takes some practice to get the mixes and coating on the plate right but once you do it’s great as it comes off your hands and the plate easily with windex.
 
I purchased a better ink spreader. An ESSDEE roller which cost all all of $12. This was dramatically better than the cheaper one I bought off Amazon. My ink is now much easier to get evenly rolled.

After doing a bunch more finish passes I think I'm calling the straightedge "done" for now. Curious what folks here think though. I have to say it is quite difficult to get a good inking on the dovetail top edge since it has to be close to the edge of the surface plate and the weight of the straightedge hangs over adding pressure to the one side of the edge. This is one pass before I brought up the middle a bit more on the bottom. Photographing these inked surfaces is also hard!
1710197251131.png

The top dovetail you can see it is "darker" on the top edge but I think that is just how it is marked.
1710197276988.png

I started roughing in the compound bottom surface after giving it a light facing on the mill.
1710197350706.png

My plan is to finish up the compound first since that is essentially a "separate" unit from the rest of the lathe and doesn't have to align with anything. I'll need a longer dovetail straightedge to finish the inside surfaces of the piece above. I ordered an 18" piece of cast iron which I plan to machine into an 18" long 45 deg prismatic straightedge.
 

Attachments

  • 1710197141082.png
    1710197141082.png
    3.4 MB · Views: 3


Back
Top