What's new
What's new

Thoughts on reproducing a pre-1900 spindle

M.B. Naegle

Diamond
Joined
Feb 7, 2011
Location
Conroe, TX USA
This task has a few specifics I'd like to nail down, so I figured I'd start a separate thread from the general rebuild thread here:

https://www.practicalmachinist.com/vb/antique-machinery-and-history/brainard-small-hand-milling-machine-388135/

Brief recap: I picked-up a boat-anchor, incomplete machine, because I didn't want to see it melted down, or turned into a homebrew C-and-C job. I like it because it's unique, small (easy to find floor-space), and I think the age commands a little respect (made sometime between 1871 and 1899). One of the holes to fill is that it's missing the spindle.

The dimensions for it are easily obtained as both bronze bearings remain and catalog photos indicate nothing special. In general, I need a bar of stock that's 2 1/2" at the largest diameter and 16 1/4" long. The largest diameter is the non-critical OD of the front flange, so material that's exactly 2 1/2" would be fine. The front bearing behind that is 1.875 OD with take up nuts threaded to the shaft behind it, center section for cone pulley and rear bearing all turned to 1.500 OD. The center will be bored 3/8" through, and have a Brown & Sharpe #7 taper reamed into the front. I'd like to add a tang drive slot behind that, but there would be no place for a drift, so I'll just use the drawbar for tool ejection and plug the outside of the slot, leaving the center slotted for tang driven endmills and such (which I have a lot in store). My research has turned up that 4140 pre-hard is the ideal spindle material, but I have 3 problems with that.

1. The middle diameter (front bearing) needs threads cut into it for take-up nuts. I've no ability to grind threads and don't expect good results with cutting pre-hard threads.
2. The whole 16" length needs a 3/8" bore for a draw-bar. Again, conventional cutting methods.
3. Cost. A 4140 pre-hard bar is going to run $250-300 which isn't in the budget for a side project like this unfortunately.

I've also considered going with annealed 4140 to cover the first two points. However, still not cheap, and the hardening process adds the additional concerns of:

4. Making the threads brittle, and potentially warping the overall piece. Both issues would be corrected by post hardening grinding, but again I don't have thread grinding resources. For OD grinding, my tool n' cutter grinder is a ways from functionality (however a pending job could offer motivation), so any OD grinding could be done via TP grinder on the lathe, or dimensions made close enough to be finished by hand on the lathe (stone/Emory cloth), or I make some kind of thread grinding attachment for the T&CG, (which as an asside is a 1900 Cincinnati who's operating range means that the newer Cinci tooling won't fit and I'll need to make everything for it:):crazy:).

So one other option I'm considering is going with 1018 CR steel and case hardening it. This covers the first three issues as it'll easily machine and I have a bar of it on hand already. My only issue with this route is problem 4 is still a concern.

So, does anyone have any input as to the best methods to case harden threaded tubes with minimal distortion or thread brittleness?

One thing I'm considering is that this isn't going on a high precision, high speed machine. While manufacturer's would take greater care making a part like a spindle, it was still done with pre-1900's tech, so how did they do it? Also I'm thinking that my tolerance for a pre-1900 spindle can be open as well. If I can cut everything to size, I'm confident I can get the taper to run at least .0005" or better concentric to the front bearing without any grinding, which IMO is pretty good for a pre-1900 hand-operated production milling machine.

So correct me if I'm wrong, but a 1018 spindle made to size, case hardened and polished; what problems will I see? what would you do different? What about just leaving the spindle soft? The tool taper and front face I think would benefit the most from hardening, so could I just case harden those surfaces and leave the rest soft? I'm thinking about case hardening by packing in a sealed case of carbon (powdered charcoal), but if I only do that to the front face, I'm thinking that burning off oxygen in the remaining space would be tricky without also burning up the charcoal.
 
Pre hard is not "hard" ( you can easily file on it) and will make beautiful threads

Get in your vehicle and come down to north Houston and I will gift you a bar at least 16" long and probably some larger than 2.5"

17" of 3.25 will weigh exactly 40 lbs which my 81 year old bod can still pick up:D

PM your possible interest and I'll reply with a "phone" number as needed

Thank you very much for the offer! (PM inbound). How about drilling out the center? Would a 3/8" HSS drill make it half way from each end? Can it still be reamed with a HSS taper reamer, or will carbide tipped boring be the better solution (might be time to dust off the chips on the South Bends taper attachment!)?

Sorry for the questions. I don't remember the last time I personally worked with pre-hardened 4140. We've made parts with it in our shop before, but always in the CNC with carbide tooling, and I'll be doing this job manually.
 
The stuff John has drills easily, lots of cutting oil, peck drill it about 1/4" at a time till you get to depth. About 250-300 RPM. That material cuts beautiful threads with ER style inserts! BTW- John gifted me with a couple of those bars a few years back, too. Ken
 
As a guy who's had a grinding shop I'd urge you to not circle grind or thread grind on a T&C grinder. You'll do better and have a lot less grief with a rigid Tool post grinder on a lathe.

IF you are going to pack harden 1018, start off with 1018 hot roll and anneal. Differentially pack hardening: time and temp are critical easy to have not enough carbon / not enough depth or at the other end of the continium too much grain growth. What you guench in, how the bath is agitaged and maintained is really critical.

Better to find a commercial heat treat firm and let them tell you what they need to see from you before you go any further!

Letting a shop who specializes in heat treating is do the work is a treat. There is a steep learning curve.

Alternately make the shart out of ETD-150 (Rc-32ish) and insert / sleeve hard parts where it matters.
 
Mr. Naegle:

You are to be commended for giving another life to the old Brainard Milling Machine, albeit with a major transplant. Not unlike the way some humans are kept going with new joints, valves, and similar.

The subject of making a new spindle is an interesting one. In the times the Brainard Mill was made, manufacturers spoke of spindles being made of 'best hammered crucible steel' and similar. While a spindle with hardened journals and female taper would be the ideal, the question is whether it is really necessary given the service your Brainard Mill will actually see.

One thought is to make the new spindle from a steel such as 'Stressproof' and use it as-is, with no further heat treating. The other thought is to use a steel such as 8615 or 8620 (? on this exact numbering). The '86" series of steels are specifically formulated for surfacer hardening with minimal post-heat treatment distortion. This steel is a 'go to" steel for surface hardened parts such as gears, camshafts and the like. A few years back a friend of mine asked me about having a short production run of some motorcycle transmission gears and shifter cams done. The 8615 steel was recommended as it has good dimensional stability, particularly on parts such as gearing where no final grinding of the gear teeth would be done.

I plead ignorance as to what a commercial heat treating shop would charge to surface harden your spindle. I do know that depth of the 'case' is a function of time the part is held at the 'transformation temperature', and the old rule of thumb was one hour for each 0.001" of case depth. Hence, to get a case of 0.040", which would allow some for finish grinding, 40 hours of 'soak time' in the furnace would be needed. Depending on which steel you choose determines what compounds are used for the case hardening. I think the old 'pack hardening' methods are not done so much anymore. Rather, the atmosphere in the furnace is what does the job. The electric furnace atmosphere is first purged with an inert gas, then flooded with a carbon-rich gas once the furnace gets up to temperature. It's a lot cleaner than the old pack hardening methods and no scaling of the part results.

If you go with an unhardened bar of something like 4140, consider the 'machinability'. 4140 machines nicely enough, but a good surface finish with a single point tool can be a bit difficult to obtain.

As for DIY pack hardening, you would need to make an air-tight container to hold your part plus the pack-hardening compound. "The Bullseye Mixture" by Guy Lautard details DIY pack hardening as pertaining to color-casehardening of gun parts. By making the container air-tight and packing the charcoal or whatever else you use tightly, air should be mostly eliminated and the chances of the charcoal burning up or excessive scaling or your part is reduced. There is a commercial casehardening compound known as "Cherry Heat" which may work for you as well. The old tried and true "Kasenit" case hardening compound was taken off the market a few years back as it contained some cyanide compound. funny thing is we used Kasenit at Brooklyn Technical HS in machine shop and metallurgy classes and suffered no immediate ill effects.

There is a way to limit the surfaces on a part to receive case hardening. I believe one method is to coat the surfaces with something like chalk. I'd suggest looking up Cherry Heat as, if I recall correctly, they may have a ready-made pack hardening compound.

In terms of heat treating for your spindle, I am a great believer in several steps:

1. Start with a fully annealed piece of stock.

2. After roughing the part to size, do an in-process stress relieving. On critical parts like a spindle where the journals must remain on a common centerline within a couple of tenths of thousandths or better, or parts which have some 'assymetrical' features such as long keyways, this is a critical step.

3. Finish machine, leaving a grinding allowance if final grinding of journals or other surfaces is required.

4. Heat treat. Some heat treaters will stress relieve or normalize a part first, then go for the hardening (or surface hardening). A post hardening 'drawing' or tempering is done as the final step.

I may be off base, but for a restored small milling machine such as your Becker Brainard, I'd get a chunk of something like Stressproof and machine the spindle from it. Stressproof gives great dimensional stability, machines beautifully, and while not hardened will be more than adequate for your purposes. I've made a number of parts from junked truck rear axles shafts and transmission main shafts, but this required annealing the steel first. In addition, I know I am dealing with a 'mystery metal', so while the "price was right", there is the unknown as to weldability and heat treatment. A quick test is to take a chunk of 'mystery metal' and do a grinder spark test. This will get you into the ball park as to approximate carbon content and alloying elements such as chromium and nickel. Then, take a scrap chunk and cut partway thru with a hacksaw. Heat to an orange-red and quench. Put the sample in a vise so the saw cut is about even with the jaws and smack the projecting portion with a hammer. If it snaps off, the steel will 'take hardness'. Try an old file on the saw-cut surface and see if the file 'skates'. If it does, the steel is likely 'glass hard', about 60 Rockwell-c. Examine the fractured surface. If it appears as a silver-gray with a fine 'grainy' surface, that steel is hardened. What this test establishes is whether a steel can be 'through hardened' vs surface hardened. A popular steel for machine tool spindles 'way back when' would be roughly equivalent to what we know as 1045. This is a plain carbon steel with 0.45 % carbon, or just enough carbon to 'take hardness', but not so much as to be usable for cutting tools. Hardenable but still able to have some toughness. The additions of nickel and chromium to steels with 0.30%-0.40% carbon produced steels which have what is known as a 'carbon equivalent' to a higher carbon steel, yet possess a good deal of toughness or shock-resistance. This would be the 4140, 4130, 41340 steels.

There are also some design rules in designing plain bearings such as those made of babbitt or bronze. A rule of thumb concerns the hardness difference between the bearing metal and the spindle journal. IOW, if the bearings are a softer grade of bronze, running a hardened spindle is not necessary. If the bearings are a harder grade of bronze such as a manganese or aluminum bronze, then hardened journals would make more sense. Common bearing bronzes are 'leaded bronze' and work well and last ages (if properly maintained) with unhardened properly finished journals.

Again, while you are to be commended for your efforts to safe the little old Becker-Brainard Mill, don't overthink it or put too much modern engineering into the making of the spindle. Consider the service the spindle will see and you may come to the thinking that heat treating really is not needed. On a bigger spectrum: as I have come to realize all too well, none of us knows how much time we have allotted to us in this life. Getting projects done properly and workable in a reasonable time or, to use a fancier word, "expeditiously" is something to consider. Chasing around with DIY pack hardening and maybe winding up with a badly scaled spindle, or chasing after heat treaters and then having to finish grind a spindle burn up time and money that may not need to be burnt on this project. Just the thoughts of an old dinosaur engineer, so bear with me.
 
As a guy who's had a grinding shop I'd urge you to not circle grind or thread grind on a T&C grinder. You'll do better and have a lot less grief with a rigid Tool post grinder on a lathe.

IF you are going to pack harden 1018, start off with 1018 hot roll and anneal. Differentially pack hardening: time and temp are critical easy to have not enough carbon / not enough depth or at the other end of the continium too much grain growth.

Better yet find a commercial heat treat firm and let them tell you what they need to see from you!

What you guench in, how the bath is agitaged and maintained is really critical. Letting a shop who specializes in heat treating is do the work is a treat. There is a steep lerning curve.

Thanks. We do a lot of A2 D2 and some 01, but have always outsourced our case hardening. I've wanted to get into it, but your points remind me why we haven't yet.
 
Mr. Naegle:
.....
There are also some design rules in designing plain bearings such as those made of babbitt or bronze. A rule of thumb concerns the hardness difference between the bearing metal and the spindle journal. IOW, if the bearings are a softer grade of bronze, running a hardened spindle is not necessary. If the bearings are a harder grade of bronze such as a manganese or aluminum bronze, then hardened journals would make more sense. Common bearing bronzes are 'leaded bronze' and work well and last ages (if properly maintained) with unhardened properly finished journals.

Again, while you are to be commended for your efforts to safe the little old Becker-Brainard Mill, don't overthink it or put too much modern engineering into the making of the spindle. Consider the service the spindle will see and you may come to the thinking that heat treating really is not needed. On a bigger spectrum: as I have come to realize all too well, none of us knows how much time we have allotted to us in this life. Getting projects done properly and workable in a reasonable time or, to use a fancier word, "expeditiously" is something to consider. Chasing around with DIY pack hardening and maybe winding up with a badly scaled spindle, or chasing after heat treaters and then having to finish grind a spindle burn up time and money that may not need to be burnt on this project. Just the thoughts of an old dinosaur engineer, so bear with me.

Thanks! Good call on the bearings . Any advise on how to test their hardness? We have rockwell hardness testers, but I don't think I've done brass/bronze on them before. What numbers would I be looking for, or should I just compare results to testing known bearing material?

I agree on the projects too. I'm still young, but know I could find myself under a bus at any time and wouldn't want to leave too much of a hassle for the family. Everything needs an exit-plan. I've always wanted to build a 10" swing lathe entirely of my own design (patterns and all), but have settled that that project will be for a latter time in the cosmos, not in this life:). Other things I follow my dad's lead that if the kids are into it, I'll leave some work for them to do.
 
Mr. Naegle:
The softer bronze bearing materials would be checked on the Rockwell B scale. You may need a different penetrator point on your tester and a lighter weight or load will need to be set for it. I know I always had a hard time during my 'working career' with this sort of thing as Bearing metals hardnesses were usually spec'd in Brinnell hardness 'points' as were the journal hardnesses. I tend to think in terms of Rockwell hardness numbers.

A quick test would be to try paring a sliver off a corner of the bearing (as if you were making an outside chamfer) using a pocket knife or 3-corner scraper. Leaded bronze will pare off quite easily and have a slightly more reddish color than the gold of aluminum or manganese bronze. Aluminum or manganese bronzes will not pare off so easily. I'd get a chunk of something like '660' which is a leaded bearing bronze, pare an edge with a pocketknife of 3-corner scraper and use that as a reference. I doubt that Becker used anything too hard for the bearings, most likely a 'high tin' bronze.

I did check with Cherry Heat's web site. They do offer a pack hardening compound called "Willcarbo". 5 lbs is about 80 dollars. You would need to pack the spindle in this compound in an airtight container. A clay crucible would be the ideal, since a steel box would also absorb carbon from the compound. A cast iron box could also be used. The crucible would need to be sealed with fireclay or refractory cement. The holding time at temperature to get a good deep 'case' is about 8 hours. Between the cost of the new steel, the cost of the pack hardening compound, the cost of the crucible and cost of running a furnace for 8-12 hours, you are in for some expenditures.
 
Lovely project! I agree pre-hard is the way to go. Gun-drilling would be the ideal way to get a straight hole, but I do not have one and probably neither do you. You could aproximate the process if you bought just the drill, made a coolant-feed adapter fo it to hold in your tailstock. You would have to constantly retract the quill and slide the tailstock forward to go the ful deptih, and you would need a lather with more than twice 16" c-c, unless your spibdle hole can swallow the stock.

But I guess that a hole drilled gently with successively longer properly-sharpened twist-drills, then reamed, will be straight enough for a draw-bar hole. Drilling would be my first op, then I would csink both ends for 60 deg centers and rough the rest of the dimensions.
Then I would put the front journal in a steady-rst to bore the taper, ream it, then put it back between centers to turn the journels to final size. I think that would give better concentricity than running finished journal in steady to bore the taper.
 
While I will not be able to add anything to this thread, I'm excited to see how it goes. Having "spindle making" capabilities for old machines that might follow me home would be awesome. :)
 
Thanks for the input everyone. So, case hardening will be enough of a hassle that I don't think I'll pursue it unless as a last resort. I'm going to test the bearings and let them decide the course of action. Soft bearings and I'll go with the 1018 CR and leave it soft. Hard bearings and I'll stick with the 4140 pre-hard solution. If I go with the soft spindle, the only issue I can see arising is if there's a crash that mars the face or damages the tool taper, or progressive use distorts the taper over time. If that happens though, I can always chuck it up and re-cut the taper a tad deeper, which is something I'll want to consider with how deep I initially ream it and at what depth I put the tang slot.

I don't see this little mill ever working hard enough to bend the 1 1/2" spindle, but with hand milling, extra rigidity helps. I'd rather blow up a cutter than anything worse. One of the tasks I want to do with this mill eventually is cut small gears with an indexer. The rotary gear cutters I'd want to use are the arbor variety for 7/8"-1" arbors, and this mill has no overarm or provision for one, so I'm thinking about making a stub arbor that gets the cutter centered over the knee (3-4" projection?), and making it with a larger diameter shaft to keep it from flexing. It won't be under a lot of force, but I don't see the B&S #7 holding that well with the cutting side force levered that far out, SO, I'm thinking about adding a ring four screw holes for face mount tooling. They wouldn't detour from the original design much and enables a simple repetitive operation.
 
One other thought: When it comes to seating steep taper tooling, I know having clean damage free tapers is imperative, but whenever seating non-drawbar cutters, I typically resort to the lead hammer or a steel hammer with a wood or aluminum pad. Especially when seating tang driven end mills as the side force will pop them out if not seated well enough. Would that added hammering have any play in the spindles required hardness and longevity? Similarly is that B&S 7 collets are not keyed, and even if they don't slip and gall the taper, long term they could fret lines into a soft taper, especially if they are repeatably clocked for minimal run-out. The mill might not see 24/7 operation, but I'd prefer to only make one of this spindle in my lifetime.
 
...
Again, while you are to be commended for your efforts to safe the little old Becker-Brainard Mill, don't overthink it or put too much modern engineering into the making of the spindle. Consider the service the spindle will see and you may come to the thinking that heat treating really is not needed. ....

This. The idea would be to attempt to find another similar machine that somebody owns, and have them check the hardness on an OEM spindle.

1) what taper are you going to put in the front of the spindle?

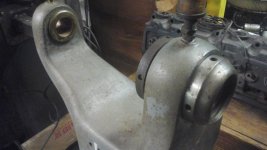
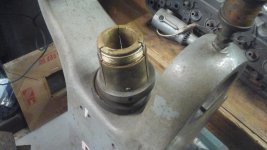
2) the front bearing is adjustable. This is more or less the same type as the old Cataract bearings, which were cast iron. The OD of the bronze is tapered and fits into a tapered bore in the cast iron body of the machine. Before you get too far involved in the project, be sure to remove the existing bearing from its bore and check to see if a former owner has put any shims in there. This was a common dodge when the bearing was too worn out to get a good minimal clearance by snugging the nut on the backside. Point being the cylindrical bore of the bearing really only is cylindrical at one ID of the bronze, which varies as the nut is tightened. You need to have the dimension for the front journal well-set in your mind before you start cutting metal for the spindle. Also the original setup of this bearing may have involved hand-scraping the ID of the bronze bore for fitting-up.

3) I cannot tell about the rear bearing but again there may be some adjustability there.

I myself would consider making an aluminum spindle to start with, to get the dimensions all set in my mind.

1) Brown & Sharpe #7, chosen as I have a decent amount of tooling for it and it matches other heads/spindles I have, and it seems an appropriate size for the power the machine would see.

2) Yes the front bearing is tapered on the OD to match a taper in the cast iron frame, and is adjusted via a take-up nut on each side of the bearing for radial play. Both bearing ID surfaces are straight with no taper. There is some wear on the front and back faces of the front bearing, but it can be stoned level and accounted for with the lateral take-up nuts I'll be adding with the new spindle. The bearing fits cleanly into the casting with no shims present and looks to sill have room to adjust, but making a aluminum or steel plug to test isn't a bad idea.

3) The rear bearing is non adjustable letting the tail end of the spindle float with all adjustment in the front. Both bearings look to be in good shape with no grooves in the ID and both measuring close to the nominal sizes posted above.

Overall, the mill shows signs of being run without adequate cleaning and way lubrication, but I've seen worse. My assumption (not knowing the mills history) is that the prior owner started gutting and modifying the mill to be a generic little horizontal, but gave up on the project. I say this as the gear-rack movements of the knee and table had been replaced with crude all-thread screw adjustments, there's holes drilled into the side of the column to accept a small motor, too close to have worked with the old cone pulley, and the ornate cabinet door is missing (likely stolen after it became a lost cause machine). It doesn't strike me as a machine that was flat-worn-out and scrapped.
 
So one other option I'm considering is going with 1018 CR steel and case hardening it.

So, does anyone have any input as to the best methods to case harden threaded tubes with minimal distortion or thread brittleness?
You've gone another way but for the record - I actually like carburizing, would probably go 8620 tho, cuz Overkill is my middle name :) It does make a nice part.

If you have areas on a carburized part you don't want cased, it's easy. Nicest method is to copper plate the piece, then sand it off where you want case. Easier but not quite as crisp edges is, the heat treaters have some masking stuff they can paint on. Another method is to leave excess, then turn it off -- If you are going to .030 case on a round part, add .060" on diameter, then turn it off after, the material underneath if it's 8620 will be forty-ish Rc and thread very nicely. Carbide inserts will do that easily.

You can also use a thread grinder even on 63 Rc material but then you get very brittle threads, which will snap right off under even a light load, zo ... maybe okay in some situations (nylon nut ?), but not in general.
 
I agree 1144 or "stress proof" would be the best option, really nice to machine and hard enough to work well as is. That said, a chunk of free 4140ph would be my choice. It machines better than 4140 annealed in my opinion, you just have to run it a little slower, especially if using HSS, around 60SFM if I remember.

Also, material from McMaster comes in around $160-$200 for either option.

McMaster-Carr

McMaster-Carr
 
20211105_073645.jpg
20211105_073724.jpg
Here are a couple pictures of the bearings. I whittled a little on a corner and think they're soft enough, so unhardened 1018 could be an option. As I noted before, my only concern with that would be how the tool taper holds up.
 
Bearings look to be in good shape. The cataract lathes had those as cast iron, and I think the spindles were not heat-treated. 1018 unhardened would work fine I think. The journal is floating on an oil film in any event. In the cataract lathes both front and rear bearing are taped for draw-in.
 

Attachments

  • 59_exploded.jpg
    59_exploded.jpg
    99.7 KB · Views: 44


Back
Top