One option I haven't seen discussed is to build a slatted table like the buildpro tables. I've been kicking around table designs for about a year...Spoke with lots of guys on here and read other places, did lots of research and even spoke to the owner of the Buildpro Tables, I went down to Weldsale to look at their operation and put a deposit on a light duty 2" thick 36" x 72" table. After all was said and done I decided to build my own table. It's 40" x 74", but expandable to 50 x 74.
Used 2" square P&O tube for the top frame .25" wall, and 3/4" x 6" x 1018 CRS plates that are drilled and tapped into the tube frame with 3/8-24 socket head bolts. I'm making alot of my own tooling from scraps I had in stock...most of the buildpro tooling is outrageously priced and you can make stuff just as good from scrap. You could easily make a table like this from 1" x 6" x 48" on a heavier tube frame. Once I get a little breathing room from the jobs I have going on I'll build my undercarriage frame from 2.5" square tube with 1/4" wall so I can move it around with my pallet jack., Set it anywhere and just shim it level and bolt it to the floor I'll make the feet leveling... or just shim into level easily. I set this up initially on an existing bench to knock out a couple medium weight precision jobs I have to get done and work out the design and give it a test run...so far so good.
Here's why I like this table...the plates are infinitely shim-able into dead flat. There's 4" x 1" x 7/8" spacers under each plate. You can shim the plates individually into flat, and shim the top frame onto the undercarriage as well. The plates bolt to the top frame and the top frame will bolt to the undercarriage. The plates can be easily moved or swapped out with wood or composite if needed, or any other type of sacrificial material. The plates can be removed to accommodate parts and setups during welding and fitup. The 6" plates easily fit into my mill for drilling/tapping/ and machining into square. The plates can be drilled to accommodate and use most any buildpro tooling. Clamping and fixturing is open to a zillion different configs. Table top weight is about 600 lbs...(the 3 x 6 x 2" thick cast iron weldsale platen top weighs 800 lbs). I figure by the time I build the heavy duty base with shelving I'll have a table that weighs over a thousand lbs by a good bit...AND if I ever have to move the table can easily be broken down into manageable pieces and reassembled in the new location no problem.
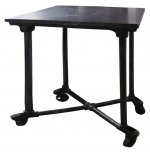
I didn't like the Buildpro table because it was too light weight...and I didn't like the weldsale platen because it didn't have the flexibilty to expand like my table. So I made a bastardized table and I already love it. it's square to within less than .032 all around and it is damn near dead flat and shimmed dead level. The 3/4" plates take all the heat I can throw at it, and haven't flexed or moved a bit...even when the plates are too hot to touch. Here's a couple pics...something to think about. Once I build the undercarriage this thing will be perfect for my needs. I have about $1200.00 in materials into this so far.
The plates are all numbered and referenced, so later I'll take them to my buddies CNC shop to get em peppered with 5/8" holes for the tooling and expanded layout capabilities the buildpro table has. This should be a nice table that will serve me for the rest of my days when it's all finished in a couple months...
View attachment 90913View attachment 90914