dgfoster
Diamond
- Joined
- Jun 14, 2008
- Location
- Bellingham, WA
Background: I get lots of questions from purchasers regarding fixturing my straight edge castings for machining. I have posted several threads specific to various castings in the past and have found that methods applicable for those castings are quite specific for those castings and for the machine used to cut the surfaces which will later be scraped. To date, I have used only a vertical milling machine (Bridgeport 1 HP J-Head) and a horizontal boring mill (Lucas vintage mill in very nice condition). Unfortunately, I do not own or have access to a suitable planer, though I would love to machine the SE's on a planer as that is arguably the best machine for the job. I recently improved the fixturing for milling 26" prisms on the Lucas. My BP does not have enough table travel to do a 26 on it in one pass.
The 26 setup uses ball end mounts also used on the 18 system. But the position-adjustability needs for the horizontal mill are quite different for the horizontal mill vs the vertical. Using the same end blocks on the horizontal that I used on the BP simply was ungainly and, without added blocking etc, was unstable as the previously-used end block system had to be mounted on angle blocks to achieve adequate clearance. And that was too complicated. I actually tried that on Friday, but found myself fiddling and futzing and still not getting a solid and secure hold on the part. So, I gave up and decided to make new simpler end blocks. They turned out to work very well yesterday being rock-solid, easily adjusted, and simple to use.
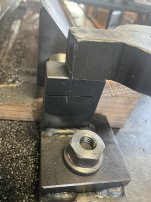
Here is a photo of the general setup on the horizontal (apologies for the cluttered background). Seen are the end blocks being held down on each end by two t-slot bolts and strap clamping down from above and 45-degree block located along the rear end of the casting and held down by a strap. The end blocks provide little rotational stability but do well as far as vertical and horizontal fixturing is concerned. With three bolts each providing a few thousand pounds of down-force the blocks are secure fore and aft, up and down, and laterally.

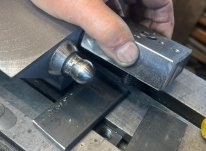
Here is what the end balls look like consisting of tapped round steel bases with 3/4 ball bearings silver soldered to them.

They are attached to the ends of the casting using 5/16 SHCS screws

Those balls are held by the end blocks


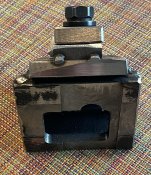
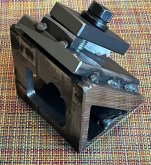
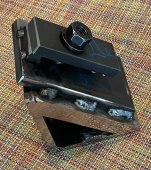
Construction of end blocks. (If you think these weldments and the 45 deg weldment look sort of like Topsy who "just growed," you would be right. I will admit to just going out the the shop and gradually piecing them together until they looked like they would do the job.) The holes in the end blocks are bored to just a couple thou over .750 so that the clamping force of the straps pressing down on the flexure provides a very firm grip on the ball mounts.


And here is the 45 Degree Block. It traps the sole which is the first surface machined and holds it at a 45. I was extremely lucky to have this weldment actually match 45 degrees very accurately. It started out in my shop as a brace used for a different purpose. But it so happened that the incline of the braces, just previously done by eye, landed as closely as I could measure on 45!!!
[I had a little sign come up saying I had reached my 10-image limit in this post. So, I'll ramble on in the next post.]
Denis
The 26 setup uses ball end mounts also used on the 18 system. But the position-adjustability needs for the horizontal mill are quite different for the horizontal mill vs the vertical. Using the same end blocks on the horizontal that I used on the BP simply was ungainly and, without added blocking etc, was unstable as the previously-used end block system had to be mounted on angle blocks to achieve adequate clearance. And that was too complicated. I actually tried that on Friday, but found myself fiddling and futzing and still not getting a solid and secure hold on the part. So, I gave up and decided to make new simpler end blocks. They turned out to work very well yesterday being rock-solid, easily adjusted, and simple to use.
Here is a photo of the general setup on the horizontal (apologies for the cluttered background). Seen are the end blocks being held down on each end by two t-slot bolts and strap clamping down from above and 45-degree block located along the rear end of the casting and held down by a strap. The end blocks provide little rotational stability but do well as far as vertical and horizontal fixturing is concerned. With three bolts each providing a few thousand pounds of down-force the blocks are secure fore and aft, up and down, and laterally.
Here is what the end balls look like consisting of tapped round steel bases with 3/4 ball bearings silver soldered to them.
They are attached to the ends of the casting using 5/16 SHCS screws
Those balls are held by the end blocks
Construction of end blocks. (If you think these weldments and the 45 deg weldment look sort of like Topsy who "just growed," you would be right. I will admit to just going out the the shop and gradually piecing them together until they looked like they would do the job.) The holes in the end blocks are bored to just a couple thou over .750 so that the clamping force of the straps pressing down on the flexure provides a very firm grip on the ball mounts.
And here is the 45 Degree Block. It traps the sole which is the first surface machined and holds it at a 45. I was extremely lucky to have this weldment actually match 45 degrees very accurately. It started out in my shop as a brace used for a different purpose. But it so happened that the incline of the braces, just previously done by eye, landed as closely as I could measure on 45!!!
[I had a little sign come up saying I had reached my 10-image limit in this post. So, I'll ramble on in the next post.]
Denis
Attachments
-
 General Setup.JPG282.8 KB · Views: 88
 -
 End Block Detail 6.JPG433.2 KB · Views: 90
 -
 End Block Detail.JPG320.6 KB · Views: 89
 -
 End Block Detail 5.JPG482.3 KB · Views: 89
 -
 End Block Detail 4.JPG248.8 KB · Views: 89
 -
 45 Deg Block 3.JPG294.8 KB · Views: 4
 -
 End Block Detail 2.JPG163.3 KB · Views: 90
 -
 End Block Detail.JPG320.6 KB · Views: 88
 -
 Bottom Block Top.JPG204.7 KB · Views: 89
 -
 Ball Mounts.JPG359.2 KB · Views: 88
Last edited: