What's new
What's new

Learning to scrape - with help from Richard King

p3bhambama

Aluminum
Joined
Jul 5, 2023
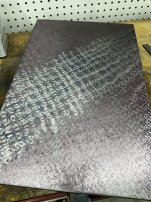
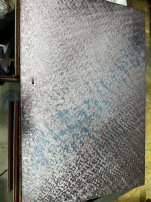
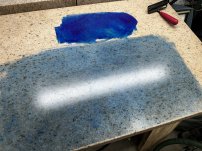
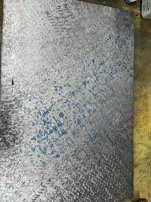
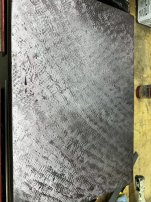
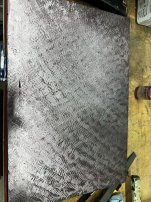
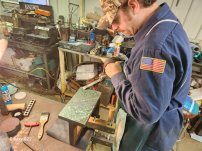
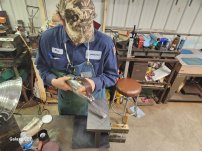
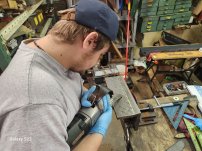
Hey guys newish member here. I've lurked around for a while - being a long time woodworker who has just in the last year begun a journey into learning machining. One of the first subjects that really caught my interest is scraping, and having watched all the videos on youtube I could find along with reading many threads here on PM, I reached out to Richard King who I had heard mentioned so many times and seen so many of his classes being held on YouTube. I honestly wasn't expecting a response given that I can't currently afford to take one of his classes. I was very wrong.

Not only did Richard respond to my email, but he faithfully responded to a dozen or so follow up ones I sent asking questions about methods, tools, and what I was/wasn't doing correctly. I'm frankly blown away at his kindness to take the time to do so. I'm sure there's lots of people out there in similar situations such as myself, wanting to learn and a little lost at where to start. I feel fortunate that someone like Richard, with his experience and reputation all over the world, not only posts on here helping regularly, but took a not inconsequential amount of time to guide someone he doesn't know from Adam.

That's basically all I've got but thanks to all of you here who provide an incredible knowledge base for those of us who are trying to learn and most especially a huge thanks to Richard King for taking pity on someone who has the interest, but no skills lol. It speaks volumes of him as a true teacher at heart. He and his son are still teaching classes and I'm certain if you are interested and can swing it, he has an upcoming class you could join.

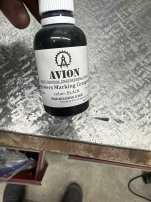
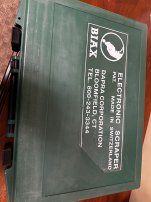
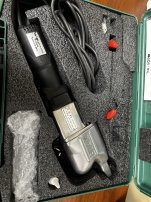
https://kingwayscraping.com/services/#tools
 
My pleasure to speak to everyone on how you've helped me Richard. It means a great deal.
I'm no tech wizard so in lieu of copying and pasting our emails I'll summarize that Richard early on stressed to me the importance of a sharp scraper blade and how a slow speed diamond lap is critical to properly sharpen the scraper blades at a five degree angle.

Following his advice I kept my eyes open for an Accu-Finish machine - I bid on quite a few at auction but they all went in the $1,500 range. A few months ago I bid on and won a Leonard Grind-R-Lap machine which is somewhat similar to the Accu-Finish though perhaps not quite as nice. However Richard assured me they were nice machines and would suit my needs. Recently it arrived at my house and using 600 grit diamond I proceeded to sharpen my scraper blades in the manner Richard recommended.

The results were as I said to him "as if I have never scraped before". The sharpening of the blades truly made all the difference in the world. I should've known this would be the case since Richard insisted it would - but also because I have cut more dovetails by hand with a chisel than I can remember, and a sharp chisel not only makes the whole thing easier, it offers control as it takes much less effort to push the cutting edge through the workpiece. Scraping with a freshly lapped carbide blade is very similar - it goes from "skating" over the surface to instantly grabbing and being predictable in the amount of force required to make a proper scrape.
 
Continuing to learn to scrape - now it’s serious lol. I happened upon a reasonable deal on a basically new Biax BL40. I’ve seen where Richard has said it’s a world of difference and as with everything scraping related - he’s right. This old surface plate had no scraping and is totally beat up. Honestly it needs machining before scraping. But I’m using it to practice with the Biax and man is it fun and way more quick 😂. Again just a huge amount of thanks goes to Richard King for his seemingly endless patience and generosity in sharing his knowledge.

For those who haven’t used one there’s definitely a technique to it. Too low an angle it doesn’t cut. Too high and it digs. But when you hit that perfect feed and speed it lays down perfectly spaced scrapes and moves some metal. This was two passes each way on the old beat up plate. I’ll do a few more blind passes to get the worst of the dings gone before bluing up.
 

Attachments

  • image.jpg
    image.jpg
    2.5 MB · Views: 53
  • IMG_1428.jpeg
    IMG_1428.jpeg
    1.6 MB · Views: 53
  • IMG_1429.jpeg
    IMG_1429.jpeg
    2.4 MB · Views: 53
Continuing to learn to scrape - now it’s serious lol. I happened upon a reasonable deal on a basically new Biax BL40. I’ve seen where Richard has said it’s a world of difference and as with everything scraping related - he’s right. This old surface plate had no scraping and is totally beat up. Honestly it needs machining before scraping. But I’m using it to practice with the Biax and man is it fun and way more quick 😂. Again just a huge amount of thanks goes to Richard King for his seemingly endless patience and generosity in sharing his knowledge.

For those who haven’t used one there’s definitely a technique to it. Too low an angle it doesn’t cut. Too high and it digs. But when you hit that perfect feed and speed it lays down perfectly spaced scrapes and moves some metal. This was two passes each way on the old beat up plate. I’ll do a few more blind passes to get the worst of the dings gone before bluing up.
When I taught at Detroit Diesel Allison a div of GM in Indianapolis they did work studies of my students before and after the 40 hour classes. The men knew how to handscrape but had never used a BIAX power Scraper. Doing the same job rebuilding tool and cutter grinders, one fellow went up 54% and the other went up 76% in increased productivity.

Those who never tried one or stubborn about "you can't scrape 40 PPI with one" never tried one or were never trained how to operate it correctly.
I believe it. At full tilt it will really move some metal. And dialed down to it's shortest stroke it is extremely controllable - using your "dive bombing" technique it is relatively easy to hit blue spots exactly where you're aiming. There is definitely an art and feel to using it though having only practiced with it a short while it is pretty intuitive as to what the machine wants from an angle and movement standpoint. You kind of have to lock your body into the right position and sweep without changing that angle or letting the machine move away from your body.
 
Went home for lunch. Couldn’t resist taking a couple more blind passes. The canode red really helps to be able to see where you are. 60 R blade.
 

Attachments

  • IMG_1461.jpeg
    IMG_1461.jpeg
    2.7 MB · Views: 28
  • IMG_1462.jpeg
    IMG_1462.jpeg
    3 MB · Views: 27
  • IMG_1463.jpeg
    IMG_1463.jpeg
    2.5 MB · Views: 27
  • IMG_1464.jpeg
    IMG_1464.jpeg
    2.7 MB · Views: 26
Just remember the "Richard King Scraping Rules"
1. Scrape individual Scrape marks. Meaning move sideways fast enough so there are individual Scrape marks. If you move to slow there will be long areas that are like a horizontal valley. The rule of thumb is the gap between scrapes is the width of the Scrape mark.

2. The next row you scrape below or above the next row you want a separation between the rows. If not and the touch top to bottom you will get vertical valley's. There should be a minimum of 1/8" between rows. Your picture looks like there to close and are touching.

3. Measure the depth of the Scrape marks with a tenths indicator. Minimum of .0002" maximum of .001". Average .0004 to .0.0005"

4. When you rub your part or rub a straight edge on a part. Hinge or pivot the part. They should hinge 30% from each end. Airy points. Rotation of points. This assures the parts aren't high in the middle and rock like a rocking chair creating a false bluing.

5. Always wipe the parts and bluing with your hand. You can feel the dirt with your fingers. If you use a rag only you could leave dirt on the parts and scratch the part.

Some hosts have extra rules like 6. Don't be a A whole to the Host. OR 7. tips are accepted....lol
 

Attachments

  • 20231109_150953.jpg
    20231109_150953.jpg
    3.6 MB · Views: 30
  • 20231109_112133.jpg
    20231109_112133.jpg
    3.1 MB · Views: 26
  • 20231012_102047.jpg
    20231012_102047.jpg
    3.1 MB · Views: 31
  • 20231011_091033.jpg
    20231011_091033.jpg
    3 MB · Views: 30
Just remember the "Richard King Scraping Rules"
1. Scrape individual Scrape marks. Meaning move sideways fast enough so there are individual Scrape marks. If you move to slow there will be long areas that are like a horizontal valley. The rule of thumb is the gap between scrapes is the width of the Scrape mark.

2. The next row you scrape below or above the next row you want a separation between the rows. If not and the touch top to bottom you will get vertical valley's. There should be a minimum of 1/8" between rows. Your picture looks like there to close and are touching.

3. Measure the depth of the Scrape marks with a tenths indicator. Minimum of .0002" maximum of .001". Average .0004 to .0.0005"

4. When you rub your part or rub a straight edge on a part. Hinge or pivot the part. They should hinge 30% from each end. Airy points. Rotation of points. This assures the parts aren't high in the middle and rock like a rocking chair creating a false bluing.

5. Always wipe the parts and bluing with your hand. You can feel the dirt with your fingers. If you use a rag only you could leave dirt on the parts and scratch the part.

Some hosts have extra rules like 6. Don't be a A whole to the Host. OR 7. tips are accepted....lol
Thanks Richard I always try to remember your rules as I scrape! This last pass I had a lot of trouble moving the Biax in a way to not have the scrape marks too close together - in fact as I was doing it I was thinking: "Richard is 100% going to say I don't have separate scrape marks and my lines are too close together" :)

I think getting used to the Biax will help in this regard - you really have to time up your motion to get those perfectly separated marks. And I'm very much still working at it. If I bung this thing all up I'll throw it on the shaper and start over - I bought it at auction because it's a large surface and is 2" thick - enough for plenty of mistakes! Thank you for all your help it means so much!
 
I also think looking at your pictures that I'm not holding the Biax quite right. I've been tucking it like that but not as tightly which probably is contributing to my inability to control it as well. I'll give that a shot next round.
 
More passes with the Biax trying to follow Richard’s rules of scraping better. I really like this black marking compound as a trace coat for roughing. Don’t think it’d be great for bluing up but really lets me see where I am for this stage.
 

Attachments

  • image.jpg
    image.jpg
    2.1 MB · Views: 32
  • IMG_1472.jpeg
    IMG_1472.jpeg
    3.4 MB · Views: 32
  • IMG_1473.jpeg
    IMG_1473.jpeg
    2.3 MB · Views: 32
Scrape marks averaging .0004”
There’s still a bunch of dingus low spots from just how rough this plate was. Not sure if I’ll end up surface grinding or putting it on the shaper to flatten it out before going through scraping it in for real but that’s likely as it’s +/- .0025 over the whole surface. But for now it’s just practice
 

Attachments

  • image.jpg
    image.jpg
    1.6 MB · Views: 19
Scrape marks averaging .0004”
There’s still a bunch of dingus low spots from just how rough this plate was. Not sure if I’ll end up surface grinding or putting it on the shaper to flatten it out before going through scraping it in for real but that’s likely as it’s +/- .0025 over the whole surface. But for now it’s just practice
That probe has a really small contact area, local deviation with a repeat-o-meter is over a larger contact surface. I wouldn't grind off valuable learning material either :-)
 
That probe has a really small contact area, local deviation with a repeat-o-meter is over a larger contact surface. I wouldn't grind off valuable learning material either :-)
Yeah I just don’t have a repeat-o-meter or the five grand to get one 😂
I’m also not checking for flatness with this one - just the depth of the scrape marks.
The grinding will be for when I want this to be a usable surface plate and not just practice fodder.
 
Went ahead and printed it. Looks like it’s got a high ridge running diagonally across most of the plate - which matches the way it was hinging (spinning in the middle essentially).

I really do love the mix of canode and Charbonnel Aqua Wash that Richard now recommends. I still prefer Dykem when it gets down to fine scraping but this stuff shows up beautifully, makes a nice print, and doesn’t give you Smurf hands when you rub your hand through it.
 

Attachments

  • IMG_1478.jpeg
    IMG_1478.jpeg
    2.6 MB · Views: 12
Five more cycles and it’s starting to come in. Always tough to photograph bluing but it’s beginning to spread lighter marks towards the edges. The center high strip has gone from about three inches wide to 6-8”. Still roughing at this point so not attacking individual dots but areas and still on a relatively long stroke length.
 

Attachments

  • IMG_1487.jpeg
    IMG_1487.jpeg
    2.8 MB · Views: 10
  • IMG_1486.jpeg
    IMG_1486.jpeg
    2.4 MB · Views: 8
  • IMG_1484.jpeg
    IMG_1484.jpeg
    2.5 MB · Views: 13
  • IMG_1482.jpeg
    IMG_1482.jpeg
    2.2 MB · Views: 12
  • IMG_1480.jpeg
    IMG_1480.jpeg
    2.6 MB · Views: 12
  • IMG_1485.jpeg
    IMG_1485.jpeg
    3 MB · Views: 9
  • IMG_1488.jpeg
    IMG_1488.jpeg
    2.6 MB · Views: 9
Last edited:
For those who haven’t scraped before and want to learn I would suggest the following:

First and foremost look up Richard King Scraping on YouTube and on here and read/watch as much as you can. And buy his DVD or jump drive there’s fantastic content on there.

Second treat his rules of scraping as the Bible. And whenever something isn’t working right - as above where my scrape marks and lines were too close together - go back to scrupulously following these rules.

Clean clean clean. Dust WILL get in the blue and on your part and absolutely will ruin a print.

Start as I did (per Richard’s advice) with a hand scraper and a 60R blade then to a 40R blade for spotting when you’ve got the feel of it.

Patience! Prints will look wrong. Scraping is difficult and requires many repetitive tasks. Sometimes your prints won’t make sense - they’ll change in a way that doesn’t seem logical. Go back to the rules and it will come around.

Remember it’s fun and a skill that once you have can be applied to learning to rebuild machines.


Back
Top