What's new
What's new

Poor Insert Life in 4340

Nerdlinger

Stainless
Joined
Aug 10, 2013
Location
Chicago, IL
Hello Everyone,

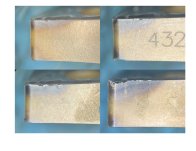
I suspect I am getting poor insert life but wanted to run it by y'all as a reality check as well as ask for any help you can offer. The picture shows what all four sides of the insert looks like. One thing I can say is an axial groove is milled into the side of the part and that extends into the beginning of the next part....so half of the turning this insert does is interrupted. On other interrupted cuts in 4140 I have turned the coolant off but for some reason I think doing that here in 4340 would be a bad idea.

Material: Annealed 4340
Insert: Sandvik CNMG432-PM
SFM: G96 S275 (also tried S300...S400 was smokey)
DOC: .200" on first pass, .100" on the second and third (turning 1.125" down to .325")
Feed: .003 IPR
Length of Cut: .500"
Machine: Tsugami B0325-II
Coolant: Swisslube something or other
Life: 50 pcs :ack2:

Please let me know 1) if you agree that that insert life is short and 2) if you have any ideas to make it last longer. Thank you!Inserts.jpg
 
.011 on interrupted cut? Never tried that, but .011 is half of .022 which is possible in that material without the interrupted part.

try dry
 
Feed is crazy slow. Increase to at least .011 IPR. .003 doesnt get past the hone of the insert.
Yup, the insert is rubbing in the cut 4x longer than it could be, and probably generated a lot of the smoke.

I'm not sure if a 32mm swiss will push it that hard at .200" doc, but if you can run at .100" doc, .012"/rev, 450 sfm, you'd probably see better tool life.
4340 annealed should probably be fine in the 4-500 sfm range.
 
50 pcs is terrible life for that size part. In all the pictures it looks like there is notch wear. Is there a hard skin on the material? How does it sound in the cut? Have you checked the material hardness? Maybe it's Q&T!

The failure mode is chipping, not wear. I agree that .003/rev seems slow but since the failure is chipping it doesn't make sense to me increasing the feedrate will help, especially in that somewhat flexy swiss machine. I assume you are in chucker mode. I'd try a tougher carbide grade but if notch wear is present that will become more pronounced.

Is it possible to backturn small enough behind the first part so after you cut the groove the second part will not have the interruption? I use a parting tool sometimes and just plunge the area that would be milled away. It will add time but you'll get it back when you run the next part.
 
Material: Annealed 4340
Insert: Sandvik CNMG432-PM
SFM: G96 S275 (also tried S300...S400 was smokey)
DOC: .200" on first pass, .100" on the second and third (turning 1.125" down to .325")
Feed: .003 IPR

4340 annealed is gravy. It's the interruption that causes issues.

What grade and chipbreaker is that insert?
Also, 2 things stand out.... your sfpm is very slow and so is your ipr.
Run it at least double that sfpm and feed.
Since it's interrupted, I'd take a heavier cut if the machine can handle it.
I'd try dry at first since there is an interruption and see if tool life gets extended.

What is the max rpm of your machine?
 
This is a screw machine with 5/8 shank tooling. You just can't push the feed like a turning center, especially in chucker mode.
Ahh, I don't know anything about that type of machine.
What about taking really light cuts and cranking up the feed by a ton?
Say maybe .025/side and feeding it like .02ipr?
Also getting a larger corner rad should help too but will want to vibrate/chatter more.
 
Thank you for the replies, everyone! :cheers:

I will start by increasing the feed and see how the wear compares to the initial feed rate after the same number of parts. Then I may try different combos of running dry and increasing the SFM. (I could spend the rest of my life, "optimizing" the op so hopefully the feed rate change makes it, "good enough.")

I like the idea of FIRST back turning the material that ends up getting removed with this insert on the NEXT part PRIOR to cutting the groove. The diameter of the material left connecting the "current" part to the next would be about 1/2" so I would have to see if that is rigid enough to support the part for the milling that is done.

FYI, I AM running this with a guide bushing (i.e. NOT "chucker mode") and the max RPM on the main is 8,000. To be continued...
 
Quick update: I started by increasing the ipr to F.004. I know that is wimpy but the way I see it it is still DOUBLE what I WAS going at. So far so good! (See the attached pic...this is after the same number of pieces as the pics in my original post. :cloud9: )

I will run a couple more sides like this to make sure it isn't a fluke and then either continue to increase feed rate (who doesn't like shorter cycle times!) or see how many parts we need to run at F.004 until they start to look like the inserts in the original post.

Thank you, again!

Insert.jpg
 
I'm impressed by the clarity and magnification of the pic of the insert.
My trick is just holding my phone up to the microscope lens...I tried it once when I was hunting up in a tree stand...a buck was bedded down 50 years in front of me forever so I tried taking a pic and couldn't see anything so I tried holding my phone up to my binoculars and it actually worked! Here is one of my favorites from Badlands National Park (phone + binoculars):
IMG_0149.jpg
 
My trick is just holding my phone up to the microscope lens...I tried it once when I was hunting up in a tree stand...a buck was bedded down 50 years in front of me forever so I tried taking a pic and couldn't see anything so I tried holding my phone up to my binoculars and it actually worked! Here is one of my favorites from Badlands National Park (phone + binoculars):
View attachment 414322
That is a great picture, BUT, what is really impressive it that you have binoculars that can see into the future, 50 years into the future.
If you can look at the ocean maybe you can put the rising sea level debate to bed ;)


Back
Top