What's new
What's new

advice on how to machine a back side counterbore.


Sorry. I meant chime in with more details. 40" long part seems like it might be kinda special. And I guess the tolerance and position is no problem?

But it is hard to suss out edm details without more info from op.

If some sort of milling tool is used it must have a shank smaller than .250. Seems quite a stretch unless the material is very machinable.
 
Sorry. I meant chime in with more details. 40" long part seems like it might be kinda special. And I guess the tolerance and position is no proble
Lol all good.

If I was quoting the part for EDM I would request they finish the small hole thru to pickup to make sure location is good. Definitely tight tolerance for size but doable.

I do things like this fairly often. Designers like the impossible features.
 
I'm going to post this here since it's more appropriate for this topic than your other one. I had originally suggested a back spotface. To clarify: I was suggesting circular interpolation using a back spotface tool.

Do you have one? Any idea how well you can sneak up on dimensions using it as a conventional milling tool?

I'd drill a test hole in something and attempt it in a piece of similar material before trying the real part. Circular interpolation isn't ideal but, you've got almost a thou to work with. If you picked up the bore with a well calibrated probe and sneak in on the offset diameter, I'm optimistic it could be done. To take vibration out of the equation, I'd probably do it at a much reduced RPM and delicate feeds. Maybe the ball screws on the machine are too loose?
I don't think interpolation is gonna work here. Would need a tool that's 6 inches long with likely less than quarter inch tool shank. How well do you think that would work?
 
I don't think interpolation is gonna work here. Would need a tool that's 6 inches long with likely less than quarter inch tool shank. How well do you think that would work?
tool idea.jpg

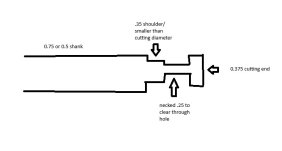
What about something like this made from solid carbide? Only have it relieved for the amount poking through the small hole. Way cheaper to make too since there's not a ton of carbide removal.
 
View attachment 432992

What about something like this made from solid carbide? Only have it relieved for the amount poking through the small hole. Way cheaper to make too since there's not a ton of carbide removal.
The bore it has to go through is about 2 inches long at .382 diameter so you'd still have a pretty flimsy shank. So let's say I go with this idea, the cutting part has to be no larger than .375, and has to create a .5 bore on the back side. Yeah basically would need a slightly under .25 shank that's a bit over 2 inches long. Might be doable
 
The bore it has to go through is about 2 inches long at .382 diameter so you'd still have a pretty flimsy shank. So let's say I go with this idea, the cutting part has to be no larger than .375, and has to create a .5 bore on the back side. Yeah basically would need a slightly under .25 shank that's a bit over 2 inches long. Might be doable
It only has to be as long as the depth from the base of the cbore on the front side to the backside of the other (why I put the larger shoulder to fit in the front cbore). So ~1.5".

How much tolerance do you have on the 0.382 hole? If you can drill it big you can get away with 0.25 neck easily, technically it makes it now ((.5005-.375)/2=0.0593<0.0625=(.375-.25)/2) but it is close.
 
Pretty much yeah, I'd go 16mm on the shank if it'll clear but overall I think it should work since you're only cutting aluminum. Going to have to baby it a bit but It's most likely the most cost effective solution and you should be able to hit your tolerance with some tweaking.
 
playing with it some more, think i came up with a battle plan.
1710513012025.png

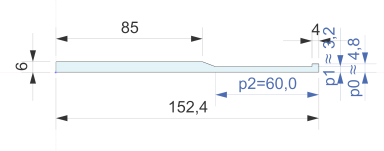
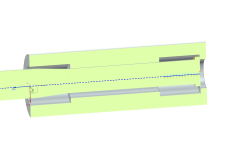
.375" diameter cutting size, 1/4" diameter reduced shank, 1.75" long, tapering back out to .375"
1/16" cutting width to minimize tool load, take 2-3 thou deep radial cuts at ~.04" step downs to rough it out.
for finishing, use same design tool just with 1/8" wide teeth. i feel like 1.75" long reduced shank should be relatively reasonable if i go slow and keep tool engagement/load down. this gives me the highest level of confidence.
having AB tools and SFS carbide quote me these right now.
 
Good morning Empower:
I've been noodling on your problem and here's what I would do if burning it is not an option.

I'd make my through hole 0.375" as close as I can ream it.
I'd buy an interchangeable shank for those interchangeable head endmills in 3/8" diameter.
I'd make up two rude and dirty boring heads to go on it, one for rough boring and one for finish boring.
I'd make the small one 0.490 and the bigger one right to size at the bottom of the tolerance.
I'd have a spiral grease groove ground into the shank so it can't pick up in the reamed bore.
I'd line bore the countersink after greasing the shank and poking it through the hole and threading my boring head onto it, using my 3/8 reamed bore as a line boring bushing.
Last I'd ream up the bore to 0.382" after removing the line boring bar.

If you line bore it like that you should be able to hold dimensions and concentricity...the biggest fuckarounds are making (or having made) the boring heads and fiddling them onto and off the shank for every damned hole.
I am pretending, of course, that they will repeat well for concentricity if you remove and replace them, but I'm told they're pretty good...within tenths

I don't know if Iscar or anyone else can supply blanks that you can get a tool grinding house to put a left hand spiral onto for doing the back bore, but you might be able to buy something stock and just have it butchered by a tool grinding house.
Failing that you can always make something up out of whatever steel you have laying around and put in a broken 1/8 endmill and then custom grind it to diameter basically like one of those old fashioned boring bars we've all used in decades past.

I'd personally try to have something ground up for me and I'd make the finishing tool with a LH spiral, RH cut reamer grind if the counterbore can tolerate a small chamfer at the bottom of it.
Obviously it's gotta be LH spiral, RH cut, so you can back bore with it without unscrewing the head from the shank while it's cutting.

It's still a bit of dicking around, but at least you can salvage the shank for other things and you don't have to deal with some skinny little nail hanging out a mile while you try to mill with it...it can be comparatively stout and you can just line bore with it instead of having to try to interpolate it.

Cheers

Marcus
www.implant-mechanix.com
www.vancouverwireedm.com
 
Last edited:
Good morning Empower:
I've been noodling on your problem and here's what I would do if burning it is not an option.

I'd make my through hole 0.375" as close as I can ream it.
I'd buy an interchangeable shank for those interchangeable head endmills in 3/8" diameter.
I'd make up two rude and dirty boring heads to go on it, one for rough boring and one for finish boring.
I'd make the small one 0.490 and the bigger one right to size at the bottom of the tolerance.
I'd have a spiral grease groove ground into the shank so it can't pick up in the reamed bore.
I'd line bore the countersink after greasing the shank and poking it through the hole and threading my boring head onto it, using my 3/8 reamed bore as a line boring bushing.
Last I'd ream up the bore to 0.382" after removing the line boring bar.

If you line bore it like that you should be able to hold dimensions and concentricity...the biggest fuckarounds are making (or having made) the boring heads and fiddling them onto and off the shank for every damned hole.
I am pretending, of course, that they will repeat well for concentricity if you remove and replace them, but I'm told they're pretty good...within tenths

I don't know if Iscar or anyone else can supply blanks that you can get a tool grinding house to put a left hand spiral onto for doing the back bore, but you might be able to buy something stock and just have it butchered by a tool grinding house.
Failing that you can always make something up out of whatever steel you have laying around and put in a broken 1/8 endmill and then custom grind it to diameter basically like one of those old fashioned boring bars we've all used in decades past.

I'd personally try to have something ground up for me and I'd make the finishing tool with a LH spiral, RH cut reamer grind if the counterbore can tolerate a small chamfer at the bottom of it.
Obviously it's gotta be LH spiral, RH cut, so you can back bore with it without unscrewing the head from the shank while it's cutting.

It's still a bit of screwing around, but at least you can salvage the shank for other things and you don't have to deal with some skinny little nail hanging out a mile while you try to mill with it...it can be comparatively stout and you can just line bore with it instead of having to try to interpolate it.

Cheers

Marcus
www.implant-mechanix.com
www.vancouverwireedm.com
thanks for the input! what do you think about my above idea?
 
I have made some tools to do this before.

I take the biggest round I can get into the hole then ream a 5/32 cross hole and tap from the end. Grind and insert round HSS blank in. I use my Hardinge and dial indicator to adjust the blank stickout.

Insert from backside on manual mill and feed with the knee.


Attachments

  • IMG_1006.jpg
    IMG_1006.jpg
    2.8 MB · Views: 19
Hi again empower:
The fundamental problem with line boring it is being able to control the size...rigidity and concentricity come for free and the stickout doesn't matter (within reason).
So you run it just like you'd run a reamer and you pray that the reamer will cut on size.
As soon as you put it in a collet, you also have to be sure the collet is dead nuts concentric, otherwise the shank of the bar will beat the tar out of your reamed guide bore, unless you put the whole shebang into a floating reamer holder.

The fundamental problem with interpolating is rigidity...if you can get enough of that, you can obviously manage size control pretty easily.

The only way I see to determine the rigidity without doing an engineering doctoral dissertation on it, is to eyeball the proportions of your cutter, commit to building it, and then pray your guesses were good.
You do have the luxury of making the shank any size you can get clearance with above the top counterbore.
So if you want to interpolate, make the shank honkin' big...as big as you have room for, like maybe 3/4" diameter.
That way only the bit that goes through the bore needs to be necked down.

Cheers

Marcus
www.implant-mechanix.com
www.vancouverwireedm.com
 
Actually...

If you make your cutter as you drew above but struggle to hold size, you could at least get it really close (within a few thousanths under), then stick a regular reamer in the hole with a really really long shop-made removable extension from the far side and run it in with a cordless drill.

Sketchy, but would work if careful.

Your hole is on the plus side, you'll be fine with a regular 1/2" reamer.

But i do think the tool as drawn will work, as long as you keep your tool width low.
 
have to be less than 1" diameter to clear the part.
View attachment 432731

so this is the feature. the main bore is .382" so i'm thinking maybe a back spot face tool 5/16" diameter with 5" reach.
counterbore needs to be .5000-.5007" .515" deep.

or maybe a custom reamer with the shank maybe .001" under the bore size, put it in manually from the back side and either use a drill or bridgeport to back face it using the ma
cant show the part in full but its about 40" long, so really can only come in from 1 side.
...
i can access one side, but back side is problematic. even if i got a 90* angle head, would have to be less than 1" diameter to clear the part.
View attachment 432731
WTO makes some small coolant speeders. Would that pocket allow you to interpolate with a itty bitty tool once you got it in there?

WTO, Product: CM-CI-R016-016-4-A: https://ecat.wto-tools.com/web/wto/.../WTOData/PG/CM_CI_Mini90_Coolant_/index.xhtml


Back
Top