What's new
What's new

Ames Crankshaft Journal “Roundness” micrometer.

4thTool

Plastic
Joined
Feb 12, 2018
I was told the instrument in the attached picture is a crankshaft journal “roundness” micrometer.

The major graduations on the adjustable stem are in 1” and the minor graduations on are in 1/10”. Graduations on the dial indicator are in 1/1000”. There is what appears to be a calibration screw on the jaw opposite the plunger of the dial indicator. The plunger protrudes through the spring loaded cradle.

I’m puzzled about the calibration and use of this instrument. As the diameter of an object in the cradle changes so will the calibration. Is anyone familiar with this instrument, its use, and most importantly, its calibration? IMG_5773.jpeg
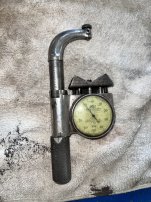
 
Yeah, it's intended to gauge out-of-roundness, or changes in diameter as you rotate the shaft in the instrument, not measure diameter. So you'd adjust it so "zero" was convenient then spin the shaft and note the maximum deviation from zero.
Having said that, this particular type of instrument cannot tell the difference between a perfect circle and a Reuleaux polygon or other curves of constant width.
 
I agree, it wasn’t intended to measure diameter; micrometers do that. Instead, it’s to measure variation around a chosen value. What I don’t understand is why it offers x.xxx resolution on a chosen value (zero). The stem adjusts from 1.0” to 2.2” the dial indicator adds another 0.100” so the tool appears to have been intended for automotive size applications. Seems like an ordinary plunger dial indicator with a 3” travel (in an appropriate frame) would do the same thing without all the fuss of a stem adjuster. I just feel like I’m missing something about correct/intended usage of the tool. I’m stuck on its design enabling the user to do something I don’t see at this point.
 
An ordinary micrometer (or indicator setup) will show out of roundness if it's an even number of lobes. You can have shafts with odd numbered lobes that are not discoverable by measuring directly across. The one illustrated has a V-anvil to find odd number out-of-roundness with three or maybe more lobes depending on the V angle.
 
Compared to an actual 3-flute or 5-flute micrometer, the V anvil on that roundness gage is pretty small. While I agree it's better than nothing, any constant-width-but-not-round error is going to be read much lower on the indicator than the actual discrepancy. I suspect the anvil is intended more to keep the indicator centered (so the operator isn't constantly hunting for max/min) rather than report Reuleaux non-roundness.
 
Of novel interest, the manufacturer, B.C. Ames, is still in existence. They’re unfamiliar with this gauge. They informed me the company has gone through three different owners since it was made. It still works well; quality tool!
 
It doesn't look like a roundness gage to me, as it's a simple 2 point measurement. The spring loaded vee block is just to centralize the indicator. Looks quick, like it would work on a rotating part.
 
Last edited:


Back
Top