How to install the app on iOS
Follow along with the video below to see how to install our site as a web app on your home screen.
Note: This feature may not be available in some browsers.
Largest Manufacturing Technology Community on the Web
Stay Connected:
You are using an out of date browser. It may not display this or other websites correctly.
You should upgrade or use an alternative browser.
You should upgrade or use an alternative browser.
Is this a Hilma Hydraulic Vise from the 1960's ?
- Thread starter ballen
- Start date
- Replies 36
- Views 19,965
ballen
Diamond
- Joined
- Sep 25, 2011
- Location
- Garbsen, Germany
Any chance of getting a copy of a manual?
Sure, send me your email address by PM, and I'll send you the manual.
ballen
Diamond
- Joined
- Sep 25, 2011
- Location
- Garbsen, Germany
Please send me an email (you can do this by clicking on my name) and I'll reply with a copy.
ballen
Diamond
- Joined
- Sep 25, 2011
- Location
- Garbsen, Germany
PS: I eventually built a pressure tester to check the vise and another similar one that I purchased later. Here is a thread about the do-it-yourself pressure tester.
hartvige
Plastic
- Joined
- Sep 30, 2014
- Location
- Copenhagen
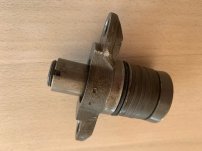
Hi, I have a similar (Deckel marked) vise, which however looks a little bit different in the details. For instance, the 28mm O-ring on the large piston is placed in the far end (as far away from the main hydraulic seal) as possible. See picture. Seems to make sense, since the larger distance between the main seal and O-ring will guide the main piston better. Also, the center part of the piston appears to be made of solid washers. There is nothing in the picture that appears movable. All the spring action is in the two springs pushing on the two "ears" on the piston assy.
I however have a basic question: How is it guaranteed that the small center piston is pushed back when the vise is opened? Sure, if there is hydraulic pressure it will be pushed back by the two springs pushing the main piston back in, but if there are any leaks or lack of oil, It seems to me that the small piston would end pushed in, and the vise would be in a deadlock. One would either have to take it entirely apart, or add pressure through the oil screw port to force the small piston back out, before refilling with oil and closing the hydraulic system?
I however have a basic question: How is it guaranteed that the small center piston is pushed back when the vise is opened? Sure, if there is hydraulic pressure it will be pushed back by the two springs pushing the main piston back in, but if there are any leaks or lack of oil, It seems to me that the small piston would end pushed in, and the vise would be in a deadlock. One would either have to take it entirely apart, or add pressure through the oil screw port to force the small piston back out, before refilling with oil and closing the hydraulic system?
Attachments
ballen
Diamond
- Joined
- Sep 25, 2011
- Location
- Garbsen, Germany
I'm not sure if this answers your question, but the procedure for filling the vise with oil requires that it be pumped in under pressure. I typically fill the vise with oil, then use compressed air (a bike pump) to put the oil under some pressure. Then I top it up to the brim. When you screw in the sealing plug, that has an o-ring and puts the oil under positive pressure. So it is important that the sealing plug o-ring is a clean fit in the opening. Screwing in that sealing screw pressurises the system, and it should stay pressurised indefinitely if everything is working right.
Nice to see you posting Bruce!I'm not sure if this answers your question, but the procedure for filling the vise with oil requires that it be pumped in under pressure. I typically fill the vise with oil, then use compressed air (a bike pump) to put the oil under some pressure. Then I top it up to the brim. When you screw in the sealing plug, that has an o-ring and puts the oil under positive pressure. So it is important that the sealing plug o-ring is a clean fit in the opening. Screwing in that sealing screw pressurises the system, and it should stay pressurised indefinitely if everything is working right.
BR,
Thanos
oliverhedlund
Plastic
- Joined
- Jun 12, 2023
Hi ya'll, I've just recieved the task of fixing our Hilma vise here at the shop and it seemed to work fine but there's a problem.
The plunger dosen't reach all the way to the pin, engaging the tranverse pin and thus keeping it mechanical, it's short of about 2mm.
The hydraulic mode functions very well.
Any ideas?
Have a nice one!
Oliver
The plunger dosen't reach all the way to the pin, engaging the tranverse pin and thus keeping it mechanical, it's short of about 2mm.
The hydraulic mode functions very well.
Any ideas?
Have a nice one!
Oliver
Last edited:
oliverhedlund
Plastic
- Joined
- Jun 12, 2023
Hi Bruce! If you'd like to share it and I'm not troubling you, I'd really like a copy of it.Botje, at some point I got a copy of the owners manual and spare parts list from Hilma for my vise. It is from a slightly later version (less rounded, more rectangular appearance) but also lists part numbers for the earlier model (keyed to serial number of the vise). If you think this would be useful and you want a copy, just send me your email address by PM. Cheers, Bruce
GR
Oliver
ballen
Diamond
- Joined
- Sep 25, 2011
- Location
- Garbsen, Germany
PM sent
PS: look at this post (# 8 in this thread):
starting from where it says "... I finally figured out what was wrong." Is that the problem with yours?
PS: look at this post (# 8 in this thread):
Is this a Hilma Hydraulic Vise from the 1960's ?
Dear Deckel fans, Yesterday a friend came by to see my 1965 FP2; he has an even older FP1 in his basement and was curious to see what I have been working on in my spare time. At some point, he asked if I had gotten a milling vise. I said yes, but it was mechanical and I wanted to get a...
www.practicalmachinist.com
Last edited:
can you send me a copie too my e-mail is : [email protected]Please send me an email (you can do this by clicking on my name) and I'll reply with a copy.
thanks
AlfaGTA
Diamond
- Joined
- Dec 13, 2002
- Location
- Benicia California USA
Well you have a cylindrical grinder with an ID grinding spindle , right?Hi Group,
I have a related question. I just purchased three (different, used) sets of jaws for a later-generation Hilma 125mm vise. They have identical dimensions to my vise, EXCEPT that that the two mounting holes are for M8 not M10, which means I need to enlarge them from 8.5 through/14mm pocket to 10.5/16mm. The jaws are hardened.
Is there tooling that will cut these gracefully, without being hopelessly dulled/ruined? Or should I pass them to my friend with an EDM machine (which I try to reserve as a last resort).
Cheers,
Bruce
Jig the jaws up on the grinder and open the holes up. Will take some time, but you will get a nice hole.
(Borazon point.)
Betting a solid carbide “ die drill” would get you close. Solid carbide reamer to finish. Boring head with cermet tooling would do.
Solid carbide coated end mill profiling the hole. Could be done on a manual machine and rotary table perhaps.
Last edited:
Tuurlijk, stuur me je e-mailadres per PM, en ik stuur je de hand
Kan ik ook een copy krijgen : [email protected]
ballen
Diamond
- Joined
- Sep 25, 2011
- Location
- Garbsen, Germany
Yes, true, but I got it five years after I posted the comment above, which was a decade ago in 2014.Well you have a cylindrical grinder with an ID grinding spindle , right?
I did enlarge the holes, but can't remember if I did it myself with a carbide end mill or gave it to my friend who has an EDM.
ballen
Diamond
- Joined
- Sep 25, 2011
- Location
- Garbsen, Germany
Check your emailcan you send me a copie too my e-mail is : [email protected]
")
Similar threads
- Replies
- 0
- Views
- 187
- Replies
- 6
- Views
- 560