What's new
What's new

3D Wax Printing for Investment Casting

FJsapper

Cast Iron
Joined
Nov 18, 2020
Location
Sterling Heights, MI
I am looking at investment casting to produce four modestly complicated small parts. They have thru holes and weird pockets that would make traditional casting less suitable. I believe investment would get me pretty close to net shape with just cleanup and threading to be done at the end.

I’m getting the parts high resolution scanned and will look to send the files off to be 3D wax printed. Currently planning on adding 2.5% to account for wax and metal shrinkage. Does that sound about right? Are there different shrink factors on different features such as long ID bored? What kind of struggles are associated with cleaning up the print lines prior to coating with refractory?

If anyone has a recommendation for a good 3D printing outfit for this type of work I’d love to hear about it. I plan on dipping and casting the parts myself, just need to get the complex wax work taken care of so I don’t go down yet another rabbit hole…thanks!
 
You are might need cores for deep holes. I'm guessing you are doing equiax casting and not directional solidification or single crystal. Your shrinkage rate may be closer to 1.8%.

What metal are you casting? Have you done this before?
 
You are might need cores for deep holes. I'm guessing you are doing equiax casting and not directional solidification or single crystal. Your shrinkage rate may be closer to 1.8%.

What metal are you casting? Have you done this before?
I have one 4” deep hole the diameter of a pencil, it’s a thru hole, does that fit the bill for a core? Im guessing there are some practical limitations to what you can expect dipped refractory to take care of when not being able to coat with silica after dipping etc? Fortunately, this hole is daylight accessible, so just slide the core in and then knock out once cast?

I have done some meager sand casting and lost foam with brass and have been through several casting operations. Part of my day job has me working closely with development of cast parts and AM so I’ve been seeking good mentorship when I can.

As far as investment casting, I’ve seen the process a few times and done homework to fill in the blanks. I made my own silicone wax molds for a different set of really simple parts and will hopefully get some initial pours done this weekend. Im talking awkward little catches and fiddly bits, small pour volume.

I am looking at 17-4 for material choice, I work with it almost exclusively for my turned parts right now and have a bunch laying around. Im assuming I can use clean drops without fuss, I’d love to use my chips, think my wife would mind if I threw them in the dishwasher? I obtained refractory and silica sand from Remet, seems like good stuff and I’ll start dipping this week. I do have a kiln to bake out and pre-heat the molds.
 
Bake out is not just heat it all up
Wax expands a lott when heating So eighter heat it really slow according a curve So the wax can creep out while expanding Or really fast with a big flame So the wax on the outside melts before the inner heats up
I reinforced the investment with glasfiber once

Peter
I’ve seen some reinforced refractory before, cool stuff, it was being poured unsupported and in a 75-80lb pour. Thank you for the insight on wax removal, it would be a heartbreaker to crack a mold due to pressure build up.
 
I work in a foundry, we cast mainly super alloy material. Molds are very finicky and can sometimes crack just from the metal being poured into them. The dipping process is a long one, taking days between coats. Then there's wax removal, (burnout), firing, and reheat/casting.

As far as your hole, as long as you can get good, repeated coverage with your slurry you won't need a core.
 
I've been doing lost PLA casting for a bit. Using an investment plaster meant for gold and silver casting. Works well, important to have a vacuum chamber to put the mold in after pouring the plaster. PLA burns out clean.
 
I work in a foundry, we cast mainly super alloy material. Molds are very finicky and can sometimes crack just from the metal being poured into them. The dipping process is a long one, taking days between coats. Then there's wax removal, (burnout), firing, and reheat/casting.

As far as your hole, as long as you can get good, repeated coverage with your slurry you won't need a core.
How different is the process for materials such as Ti or Inconel?
 
Give Dolphin castings in Phoenix AZ or Waltek castings in Ramsey MN a call.

I have used both places, and they both have their own wax printers on site for prototypes. Send the the Igs or STL file without shrink and they will take care of making your part with the correct shrinkages. Shinkage is not universal many times and needs to be applied differently if there is thick/thin spots to your castings.
 
VJET< Voxeljet, a German outfit just implemented a production line for BMW to print water jacket cores. I think it is for sand casting (?).
VJET, a penny stock that I have a position in now near $2.00.
Not recommending anyone buy this..all penny stocks are dangerous.
I think a multi-nozzle printer could make wax or sand castings PDQ.
RPS $3.71
Growth last quarter +27%
EPS ( - $1.99)
 
Last edited:
So I ended up getting pretty far down this rabbit hole… I got a MSLA printer and figured out to make the models myself. I have been making wax-resin prints and have made a bunch of shells. The resin expands during burnout more than wax so I had a learning curve to avoid my shells breaking. My current batch I used 1/4” chopped glass fiber as suggested by @Peter from Holland above. Got a shell about halfway burned out when I lost one of the coils in my kiln and it shut down. The good news is there were no cracks so maybe I got the problem licked. I should finish up in the next day or two and get a pour done.

Thanks everyone for all the advice!
 
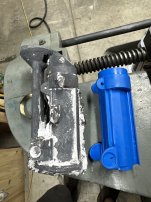
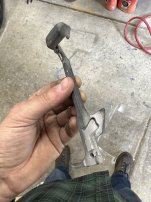
First pour complete! Lots of learning has occurred. This part is a no-go, good thing is I think I know the issues and will implement and try again. This is 17-4 stainless by the way…

Thanks again everyone!

70900782596__2712C47D-E751-451B-9A79-3C80EED672FD.jpeg
 
Automated investment casting line.
A memory that some may find interesting........
Back in my apprenticeship, I spent a couple of weeks on an automated investment casting line; this would be 1973.
The line made selector spools for automotive gearboxes, for Mini's and other "A" Series transverse engines (Austin). We made 10,000 spools a week.
There was a butter extruder used to soften the wax and extrude it into the wax molds. This was an arrangement of 8 spools from memory on a central sprue.
The spools were about 3" long and 1" dia.
The wax "pattern" then went on a chain loop where it was dipped in slurry and a fluid bed of silica or something, several times to build it up.
The chain then went through an oven to melt out wax and "cure" the mold.
Then the cured mold was plunged into a fluidized box of sand for support.
The slugs of steel (3" OD, 4" long) were then put in a setup of individual induction furnaces. Think of a "wheel" about 6 feet dia, with several induction furnaces that indexed to a position over the ceramic molds. There was a simple steel disc/button in the bottom of each furnace that would melt and allow the molten steel into the mold.
The way I remember it the line was very automated, and from initial wax pattern to poured part was measured in minutes, maybe 15mins, but don't remember that level of detail.
This was a very innovative process that was running in the Experimental Shop. The whole line was in a space of one or two bays; maybe 60 feet by 30.
Happy days,
Bob
 
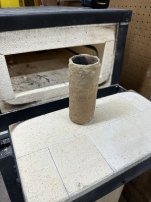
Was having issues with my crucibles getting eaten by the acid slag, turns out stainless is hard on certain materials :eek:. After trial and error of like 4 different crucible types I finally decided to just make my own. This little fella has chugged through three pours so far and shows no appreciable wear! The inside surface has vitrified to a nice dark chocolate brown, or maybe it’s something left behind from the stainless, not sure..
IMG_3435.jpeg


Back
Top