dgfoster
Diamond
- Joined
- Jun 14, 2008
- Location
- Bellingham, WA
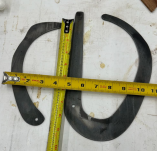
A friend of mine is a wood turner, and wanted to make special calipers to determine the wall thickness of bowls that he turns. The calipers have two legs each about 10 inches in length, and are comprised of sweeping but non-circular curves along their length. He brought Masonite templates to my shop and asked me to help him make calipers out of 1/8 inch steel plate to match the templates.

We did the usual transfer of the templates to the plate via scribing and then cut the contours roughly out of the plate using a vertical bandsaw faring. The convex portions of the curves is relatively straightforward, using my belt grinder in horizontal mode and portions of the slack belt. But faring the inside curves has been less straightforward since one of the two legs is more or less C-shaped and I cannot get into that leg even with small wheel extensions on my belt grinder. So I’ve been using a die grinder with up to 2 inch stones on it as well as flap wheels and files to attempt to get those curves fair with some patience. We’ve got them pretty good, but it is very difficult to get them to be a completely smoothly transitioning curve so that running your fingers over them feels like there are no local irregularities.
It seems like there should be some flexible material that I could use as a sanding block on those inside curves and mark the curves with sharpie or something similar and use that sanding block to find the high spots and actually gradually just sand them down. The problem is that I don’t know of any good material to use as a back up block that would follow those contours. I am considering contact gluing 80 grit Si-C paper to pieces of metal banding hoping this tool would "find" the high spots. Does anyone have experience with a material used in this fashion or a better technique used to provide faring? Obviously, this is somewhat of an aesthetic rather than a totally functional concern, but it is one that comes up from time to time in the shop and I have not really found a good solution for the problem. Help in this regard would be much appreciated.
The two legs will be rivetted together with a neatly hand-peened rivet and domed polished washers to provide just the right amount of friction so they hold position adequately but are easy to adjust.
He is pickling the legs now in anticipation of providing them with a satin finish.
TIA
Denis


