What's new
What's new

Finishing Babbitt Bearings

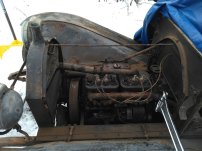
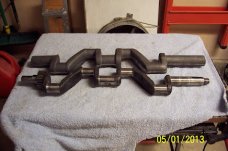
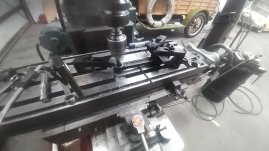
You don't say what engine you are working on but they are not all the same. A few cars are amenable to using inserts...those with very stiff crankshafts like the Franklin (7 main bearings)....most cars had fewer and some had only two. The crankshafts on early cars flex much more than later cranks. Inserts have a very thin coating of Babbitt that will be worn through in very short order if a crank flexes. The top end engine rebuilders I know all bore the bearings very carefully, sometimes taking all day to do a 7-main Pierce Arrow engine. The standard clearance is usually about .001 or .0015 for each inch of diameter. My 1910 Mitchell 4-cylinder has 3 mains and a 2" crank so I'm aiming for about .002 to .0025 clearance. Because I've never bored mains before I'll err on the tight side and use Timesaver to lap them in. That is the only abrasive I think is safe to use. I would not mix the Timesaver with the engine oil ... which isn't necessary with an internal combustion engine if you have it in a stand, upside down. When properly done the crank should turn easily with hand pressure only. This was essential when cars were crank started but is true for cars with electric starters as well.

There is nothing wrong with Babbitt bearings in cars if done correctly. The problem is that many seem to think it's as foolproof as inserts. It isn't. Inserts may work in connecting rods because the flex will have little effect on them but I'd prefer to Babbitt them.

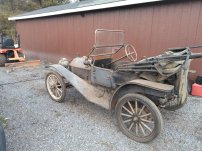
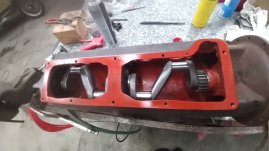
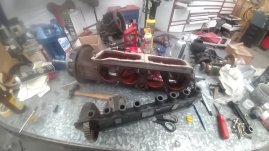
The Mitchell engine was not very well made. The Babbitt was poured directly into the aluminum crankcase with brass pins to keep them in place and is almost 1/4" thick. I'm going to make bronze shells and use a thinner Babbitt layer. Quite a few early cars (pre-WWI) had bronze bearings. I've thought about doing that but I'm not sure I want to experiment.:)
 
Joe and 99 Thanks for the comments.

Joe, my questions weren't for me I know the answers as I've done a few of these I don't know it all by any means I'm always willing to learn. I was being a smartass as I didn't care for tdmigets reply maybe nothing was meant by it but it rubbed me the wrong way.
Those were the questions I would ask a shop if they were going to do the work most shops can't answer or give me a line of crap. There are certainly good shops but sadly there are many bad ones also.

It was great to read what you posted though and I did pick up some food for thought thank you for taking the time the lack of cadmium causing issues was an interesting discovery. A lot of what you mentioned is exactly how I do it the water cooling does make a difference in automotive bearings as well you can tell quite a difference when machining them I have made small copper rings with holes to water or air blast some pours.
This engine uses one-piece sleeve type babbit inserts some of what I was trying to explain to td was exactly what you mentioned about cold working the one-piece bearings I made a tool to swedge them into the housing. The crank flex that 99panhard is talking about further does this to the front main you cannot start at full clearance and be successful. If you want to end up at the specified .0007 - .0012 you need to start out with a couple of tenths of course this does not apply to all engine designs.

The cams are a different setup in these and kind of fun to pour once you figure them out they are held in space and the babbit poured around them its a tricky deal. The water blast is essential in getting the babbitt to shrink the right way away from the cam not tight around it and keep it tight in the housing as you can't peen it when done. The cam will try and bend on you when you pour 700-degree metal around it that's way thicker on one side we learned to dam the pour up higher to keep even heat around the cam then saw off the excess. The front bearing has way more casting around so more shrinkage it requires a wrap of paper around it to maintain even clearance with the rest.

I grit blast the surface and tin it for my rods including the side thrust area we dye check the rods for good bond on the side thrust as they will fail fast if they don't stick well to the tinned surface.
I use a tin, antimony, and copper babbitt.


My objective is to do the best job I can I'm not really tightening up specs just trying to get to them carefully since the bearings are non-adjustable and they do change some in the first few thousand miles. Interestingly the specs for most of these old engines are not much different from today my rods call for .0012 so that's in line with the .001 per inch of the journal as this engine had 1.250 journals.
I do however straighten things up as these have a reputation for breaking cranks due to the main misalignment the factory did not line bore these they just slid in a die-cast bearing and hoped for the best.

Did you ever experience any issues with centrifugal pouring separating the metals in the babbit? Years ago we were getting rods that wouldn't last from a Model T supplier. was told the shop doing them was spinning them too fast and the heavier metals were pulling away from the surface. I know the babbit separates in the pot so I could see this being an issue If you don't have the rpm right.

99Panhard,
Nice project your Mitchell is the same year as this engine its a 1910 Golden Belkanp and Schwartz going in my 1911 Hupmobile Model 20 it is the original engine. I also have a Franklin awaiting restoration. Personally, I don't think much of converting to inserts I'll keep my babbit as I have had great success with it. babbiting bronze shells like you intend to do works great I have done that a few times. Babbit your shell before finishing the od the babbit will shrink it slightly.
I've wondered about bronze bearings as well this hupmobile had some sort of bronze on the front main when I got the car the bronze didn't do the crankshaft any favors but who knows what someone used. I also always wondered what kind of aluminum those small engine rods are made of. Those things take a beating at 3600 rpm for thousands of hours splash lubed no oil filter and they always look great so does the crankshaft.

I spent all day line boring these 4 bearings It was a dyslexic moment that got me having never underbored one my original question was if anyone knew of safe honing practice for babbit. Then this thread kind of went sideways with all other sorts of babbit info and that's fine it's been fun to read.
But as far as pouring babbit I have no problems. I've put about 10k on my model t and checked the rods over the winter they were perfect I didn't pull any shims. They are 86%tin 7%antimony 7%copper babbit poured, chilled, bored and hand scraped in. The car runs strong its a daily driver in the summer I call it my parts truck as it a depot hack.

I'm glad the old motor site is up I tried to visit a while back and it was down I have seen David's write up.

My engine is coming together great its nice to be back at it A year ago I discovered my crankshaft was bad so I started figuring out how to make one that turned into a batch of them and a year later I finally got delivery of them. I just bored the rods for the position pins I'll be using next up I'll babbit those then I'm on the home stretch.

You can see in the pictures ill post the big flywheel they hung off the front of this bent wire crankshaft your comments about flex are spot on you this is NOT a candidate for inserts. And requires some special set up to get the clearances to come in right. Also can see there goofy babbitted in cam housing on the bench. But they run good when done lots of model 20's out there being enjoyed. Louis Chevrolet made a car called the little that used this same engine. Fun Stuff.
 

Attachments

  • KIMG7609.JPG
    KIMG7609.JPG
    182.9 KB · Views: 14
  • KIMG7243.JPG
    KIMG7243.JPG
    262.7 KB · Views: 16
  • Crankshaft 006.jpg
    Crankshaft 006.jpg
    48.2 KB · Views: 15
  • KIMG9863.JPG
    KIMG9863.JPG
    150.5 KB · Views: 15
  • cam.JPG
    cam.JPG
    166.4 KB · Views: 15
  • KIMG9872.JPG
    KIMG9872.JPG
    158.5 KB · Views: 14
The reference to bronze bearings I was thinking of is from a listing of specifications for many American cars in the back of a 2-volume 1909 book...one of the many such manuals in that period. Nearly all the specs say "Parson's Bronze". I've found advertisements for it but I've never been able to find anything that told me exactly what it consisted of. It wasn't Babbitt because that was specified in most cases. You clearly have more experience with this than I do. I do think bronze would work but running clean oil would be critical. I doubt there is a single surviving pre-WWI car that hasn't been run with dirty oil so the crank wear with bronze is almost inevitable.
 
The reference to bronze bearings I was thinking of is from a listing of specifications for many American cars in the back of a 2-volume 1909 book...one of the many such manuals in that period. Nearly all the specs say "Parson's Bronze". I've found advertisements for it but I've never been able to find anything that told me exactly what it consisted of. It wasn't Babbitt because that was specified in most cases. You clearly have more experience with this than I do. I do think bronze would work but running clean oil would be critical. I doubt there is a single surviving pre-WWI car that hasn't been run with dirty oil so the crank wear with bronze is almost inevitable.
So this engine I'm working on had parsons bronze it was a cheap white metal bearing not as good as a traditional babbit I had one of mine tested contained mostly tin and zinc. Perceval Parsons had an interesting career in metallurgy and engineering so parsons bronze may also have referred to more than one alloy he came up with. It's not easy to trace this stuff sometimes but I believe the parsons bronze the manuals refer to is likely the white metal variety.
That's not to say they didn't use bronze as we think of it they did I have some old automotive literature that suggests some manufacturers used a phosphor bronze. Aftermarket companies also supplied bronze replacement bearings for some models. I have some hit-and-miss engines with bronze bearings as well. As far as using it in a rebuild I'm not sure if it's a good or bad idea most folks seem to babbit a bronze shell. Some guys have used a straight bronze bearing and reported good results i'm not sure if they are trailer queens or not a search on the AACA forums might turn up more info.

With a splash-lubed engine the startup wear is also something to consider the softer babbitt might be more forgiving while the oil wells fill up before the oil wedge forms. Some of the stationary engines with the bronze bearings Fairbanks Morris come to mind can be pre lubed and bared over before starting so everything has oil.
Since the oil is the bearing when running the material choice is just for startup and if the oil layer breaks down to a point of material contact or in the case of a lube failure will the crank survive? There is also the embedabilty aspect I doubt bronze is good at that so as you said clean oil would be a must. With these pre-war flexible crankshafts, and splash lube I imagine the breakdown of oil film occurs more than is ideal.

Then there is oil grooving and many ideas on what is best I come back to my small engine experience most of those rods have nothing and run for thousands of hours the mains if plain usually only have a slot lengthwise. Some automotive rods have a figure 8 groove some folks think this only breaks down the oil wedge formation and is of no benefit and possibly increases metal-to-metal contact others think it's the only way to go for rods.

This thread keeps getting back to power plants I read some studies by GE about oil grooving in small turbine and large electric motor bearings and the need to break the hydrodynamic wedge and reform it. The oil wedge travels around the shaft at a slower speed than the shaft and if doing its job lifts the shaft off the journal this can set up a wobble and then match a resonate frequency that becomes destructive so they add a groove to release some pressure from the oil wedge and stop the cycle.

Hears a link to an article that talks a little more about oil films on plain bearings. http://www.epi-eng.com/piston_engin...ant, by virtue of,to support the applied load.
 
if there is a seizure,babbit melts and frees the bearing........bronze seizes hard and ruins the journal ,and often breaks the rod.............back in the day,Micro- babbit was the thing for cars ,and in some aftermarket el-cheapo shells ,micro lead was used.
 
Thanks for all the suggestions. I have also heard of using scotchbrite on bearings it's probably fine but I decided to avoid abrasives. I did something similar to what Joe Michales described above with the parting blade. I had not thought of draw scraping the full length at once I clamped an olfa break-off style knife blade between two parallels blued up the bearing and scraped off the blueing it worked well two rounds of that and it fits the shaft and has very good contact. It's nice to have the crankshaft fitted I'm back to where I was a year ago when I discovered my stock crank was junk and began the long process of having a small batch of them made.
If you told us I don't remember it but what engine is that? It would appear to be a 4 cylinder but if so the rod journals are quite long.Crankshafts are the death knell for many antique/classic engines. Who made it and how big an ordeal was getting it done?
 
If you told us I don't remember it but what engine is that? It would appear to be a 4 cylinder but if so the rod journals are quite long.Crankshafts are the death knell for many antique/classic engines. Who made it and how big an ordeal was getting it done?

This engine is a 4 cylinder 3.375" stroke. And yes the rod journals are long about 1.5" so are the mains at over 3". Although not much different than a model t.

I did the pattern work Dakota Foundry cast the ductile iron crankshafts one should be aware some crankshafts are not easy to pour and there may be lots of scrap. I believe these are something close to 85-55-6 iron Dakota has experience with crankshafts and I took their recommendation. We made 12 raw castings they sold quickly some are already running around in cars as that was the only thing they needed to complete the restoration.
I did my rough machining put the taper, threads, and keyways in then sent it for finish grind I left enough material .060 so they could make the final stroke and index adjustments.
It machined beautifully made chips like steel the grinder said it ground very nice as well.


Of course, billet would be fine overkill actually but the initial cost of the material puts it out of reach for some. I considered making my own billet crank the price for 3' of 7" round 4340 Damn, no wonder scat quoted $5,500 each the material is over half that on its own. Perhaps a more affordable material would be fine?
Then again $5,500 is a drop in the bucket for most restorations I wouldn't let that hold me up if I had to do it. My upholstery will likely cost at least that.

Depending on the application and stresses the crank will see we've used ductile iron, ADI, Scat billet cranks 4340 or 4330 usually, and had two-stroke places build one up it's not their normal thing but it works and is more affordable than billet.

As far as how much an ordeal all I can say Is be prepared with CAD drawings, and be patient, these jobs are not bread and butter for the shops that will take them. Other than a dedicated custom crank shop like Scat this will be a multishop ordeal as well. Casting then rough machine then grind.
 
Last edited:


Back
Top