What's new
What's new

Mold base opinions

Pressman

Plastic
Joined
Feb 4, 2015
Morning everyone!

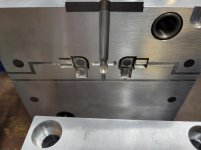
I am trying to get ideas on what to do with an existing mold base I have that has cavities burned directly in the base. This is for my home shop so I am trying to save money as opposed to just buying a whole new mold base.

Is there anything wrong with milling out pockets in the face and making inserts out of D2 so I can just change cavities when I want to make a new injection molded part?

This is for an old vertical injection molder that is a part line injection setup.
 
I'm not a moldmaker but I could see difficulties arising if you can't match the split lines perfectly and you spring a leak. Other than that I don't see why not as long as you can hold things precisely enough to get your alignment correct.
 
I don't have any issues keeping tolerances perfect. (I am made the cavities in the first place) just wanted to see if there is some rule about not doing such things?! I am one of those garage shops that happen to have a sinker too lol :D
 
Can't tell if the top plates separate from the base plates, but if they do and are of reasonable thickness...then it is very acceptable to put the A and B plates together and mill the thru pockets as one unit.
Obviously, you'll need to inspect for taper and adjust. In your case, seems like flipping the plates and skimming the taper away would be worth it.

I've worked on bases that had blind pockets milled in place that lined up very good. But the leader pins and taper locks were put in the same set-up as the pocket...and they were done on very rigid mills.
 
Hi pressman:
There's no reason you can't do what you propose, so long as you can get all the features in that you need for your application without running into what's already there.
The most common obstacles are the position of the cooling lines and the position of the ejector pins.
If you can either clear those or work around them, you can re-use the mold base no problem.

I'd re-think using D-2 for my cavity inserts though.
A-2 is more forgiving to machine, and more stable in heat treat.
It is a commodity grade of tool steel that's readily available.

Cheers

Marcus
Implant Mechanix • Design & Innovation > HOME
Vancouver Wire EDM -- Wire EDM Machining
 
I have done this all the time with old bases, just watch out for water passages and where your ejector pins will be going. I prefer inserting my cavities from the get go. As for getting your cavities to align you can make your inserts .005" over and adjust location when you fit the to the base as the last step. I always liked to fit my inserts before any cavity work though. Leave your inserts proud .0005-.001" at the parting line.
 
Hi again pressman:
More thoughts on the subject having just read what others have to say:
Milling the pockets is pretty simple; as a mold maker growing up in my trade in the 1970's I did it for decades on nothing fancier than a Bridgeport and had no difficulties.

Yeah, you need to work accurately, and the machine cannot help you as much as a modern CNC toy, but it's not the dauntingly impossible task that you might think.

So I wouldn't be intimidated at all.
Even if you have to put the set together and kiss two sides to make them match, you can then just mill the pockets and mike the walls to those outside surfaces you've just match milled, then size the pockets with gauge blocks.
You'll get them accurate enough for anything you are going to take on in your home shop.

So spend a little time on the CAD station to make sure you can do what you want, and have at it.
It'll work brilliantly.

Cheers

Marcus
Implant Mechanix • Design & Innovation > HOME
Vancouver Wire EDM -- Wire EDM Machining
 
Thanks for the pointers!

I have access to cnc knee mills at work which is where I will be doing the milling work.

I have a co-ax indicator which I will sweep the alignment pins with to find the center of my mold base halves. Once I establish the center of the part. I'll pocket it out for my new inserts.

The cavity that is currently in the mold base is garbage at this point. I'll be milling it out so the ejection pins have no involvement at all. That being said. Can I make a window cutout in the ejection side mold base so I won't have Swiss cheese holes everywhere?
 
Can I make a window cutout in the ejection side mold base so I won't have Swiss cheese holes everywhere?
I NEVER have, even though some bases did look like Swiss cheese after their 5th or 6th new cavities, I worked for Mr Burns of South Park fame. You want to make sure you have plenty of support for the clamping and injection pressure. The ejector pin problems normally are when they overlap some making drilling the clearance holes very, very difficult.
 
DME Master Unit Die (MUD) - DME

They actually commercially make mold bases that have interchangeable inserts. I would guess you would be fine, just pick up the same leader/bushing on each side and should be ok. Not sure on details, but the inserts should be 'proud' about .001" or so of pocket for sealing.
 
Hi again pressman:
Remember, in most instances you care less where the pocket is in the set and more whether the pockets line up relative to one another in the A plate and the B plate.
Even that only matters if you have features that must align in the cavity inserts or core/cavity inserts.

If you're confident your machine can put in features within 0.0005" by picking up a datum like a leader pin bore and then just milling to the numbers, all will be well.
But if the mill is marginal as most CNC kneemills are, it's worthwhile to check it, and the easiest way is to mike from a pocket wall to the outside of the block so long as the A plate and the B plate have been match milled or match ground after the pins and bushings and taperlocks (if any) are in.

So be sure your machine can do what it needs to do before you commit to your process...it's really inconvenient to have to work around misaligned pockets.

Cheers

Marcus
Implant Mechanix • Design & Innovation > HOME
Vancouver Wire EDM -- Wire EDM Machining
 
Marcus,

Again- super helpful info. AQM made the mold base. I'm pretty certain it was pinned, milled and then match mark stamped. The base itself is qc-10 material so it will be pretty smooth sailing as for as machining. I like the idea of mic'ing from the pocket to an edge.

I visited your website btw. Very impressive work sir! ��
 
Tooling ball? Aka put a reamed hole in the insert and coordinate off
Mark
( I remember a mate Arthur, he had a toolmaking shop with what appeared to be the cruddiest old machines and made moulds that were fantastic, you couldn’t see the joins, I miss Arthur)
 
I agree with everything implmex has said as far as locating your pockets and machining them. We do it all the time with bases with obsolete parts in them. Depending on the material you will be molding and the number of parts you plan on producing, you might want to consider a pre-hard mold steel instead of D-2 or anything you would have to heat treat. We have had extremely good luck with steels like NAK55,and DH2F. Toolox 44 holds up well but can be a pain if you need to drill and tap in it. They all run in the 40-45 R/C area so you eliminate the heat treat and regrinding part of the project.
 
Found some p20 laying around and made the inserts with that. The pockets. Came out good. Went with .0008 clearance all the way around. Think I need to add some threaded pusher holes behind the inserts.20220307_180246.jpg20220307_191213.jpg
 
The trouble with drilling your corners out like that is if/when the molder flashes it they will fill up with plastic and you have to trim it flush before moving on, all the while the barrel sits degrading what's in it. I have learned all of this the hard way.
 
Good call. I'm the only one running my machines though. Knock on plastic. Never done that yet!


Back
Top