Totcha313:
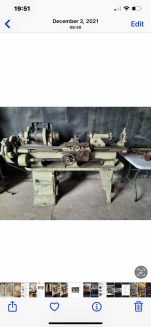
You have a good classic old lathe. In response to your wanting to replace bearings: This lathe has what are known as "plain bearings"- either made of bronze, babbitt, or simply bored into the cast iron. As such there really is no 'replacing'. The headstock spindle bearings should have their clearance checked before dismantling the lathe. If the clearance is good, leave well enough along. If the clearance in the headstock spindle bearings is excessive, then the clearance is adjusted by changing the shims between the bearing caps and the headstock body. I would not dismantle the headstock until you have checked the spindle bearing clearance. This is done as follows:
1. Get the lathe into a building where it is heated (assuming you are in a location where winters are cold), and let it sit for a few days to get up to ambient (room) temperature, at least + 50 degrees F. Cold oil in bearings can play tricks.
2. Lubricate the spindle bearings with ISO 46 oil (tractor hydraulic oil works fine for this). Turn the spindle by hand, grasping the cone pulley or chuck. If the spindle turns freely. That is one hurdle. Try to get the spindle turning as fast as you can by hand with the feed gears disengaged. If the spindle glides to a stop, this is a good sign. If it jerks to a stop, bearings may be set too tight.
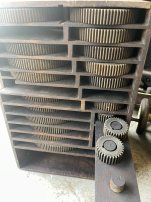
3. Check the bearing clearances. Start by removing the chuck from the spindle. Engaging the back gears with the pin 'in' (bull gear pinned to the cone pulley) will lock the spindle. Put an adjustable wrench on one jaw of the chuck or put a short pinch bar thru the chuck jaws and give a hard downward yank on it. If the chuck does not 'break loose' on the spindle threads, try holding strain on the wrench or bar and giving the wrench or bar a shot with a dead blow hammer (or a 2 lb steel hammer if you do not mind battering your wrench or bar). A light to medium blow should be all that is needed.
4. Disengage the back gear, back off the thrust nuts (on the smaller end of the spindle where the feed gears are located). Older lathes often had a set of thrust nuts on the small end of the spindle to set the end thrust. Back these off if they are on your lathe. Do not remove them.
5. Setup a dial indicator so its tip contacts the spindle nose at the 12:00 position. Put a steel bar or long hardwood hammer handle into the spindle bore so you have a lever arm sticking out maybe 12 to 16 inches. Push down hard on this bar or handle, about 75 lbs of force or a bit more. While holding this, zero the dial indicator. This squeezes any oil out of the bearing and takes out any clearance between the spindle journal and the bearing at 6:00.
7. Pull UP on the bar with about 75 lbs of force or a bit more. You can also put some wood blocking on the lathe bed and use a pinch bar to pry the spindle up, protecting the spindle with a piece of brass, aluminum, or copper. I use about a 16" mechanic's pry bar when I check bearing clearances on plain bearing lathes in this size range.
8. While holding strain on the bar, read the dial indicator. This reading is the bearing clearance. Without knowing Pratt & Whitney's specifications or the diameter of the spindle journals, I am going to say that 0.0015" -0.002" max would seem about right.
9. Repeat the above steps for the 'tail' or small end bearing of the headstock spindle.
10. When you have these readings, you know what the bearing clearances are. I would hold off on adjusting bearing clearances (if needed) until you can put the lathe under power. Reason being that adjusting bearing clearances should be accompanied by a 'bearing heat run' to be sure the bearings do not come up rapidly in temperature when running and run too hot. Just adjusting clearances is usually enough, but a heat run to be sure there are no 'tight spots' is something I do, whether it is a small lathe or a 300 Mw hydro turbine.
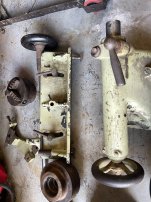
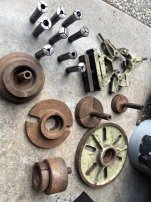
You will find the rest of the lathe has a variety of bronze bushings or simply has steel shafts turning in bored fits in the cast iron parts of the lathe. The beauty of owning a lathe is that it can make many of its own parts. If you find a worn bronze bushing, you can make a replacement on the lathe, as well as turning a bushing driver. If a shaft is worn or scored, you remove it, chuck it in the lathe and polish with emery cloth, or take a skim cut... and make a bushing to fit the new diameter...
I would advise working on one are of your lathe at a time to do the cleanup. I differentiate between "cleanup" and "restoration" as a full-on restoration of a machine tool usually means checking and re-scraping every sliding or bearing surface such as the bedways, saddle, and dovetails to restore the original accuracy. Cleanup means just that: take apart, clean off accumulated grunge and old paint, stone off any raised 'dings' on the bedways or other machined/fitted surfaces, adjust headstock bearing clearances, repaint. Too many old machine tools wind up as "basket cases" when over-zealous owners take them apart and then get sidetracked or discover they have more of a job than they first anticipated. Old machine tools have parts that have "worn into each other" and may run well enough for home shop purposes. Taking things completely apart all at once can open a can of worms. If you do take things apart, match-mark mating parts withy light punch marks and/or scribed lines. Record measurements as-found. The use of a small oil stone ( an India Medium Hard stone) on sliding surfaces such as dovetails, gibs, bedways, to take down any raised burrs or dings is the way to go. No emery cloth or other abrasives on any of those surfaces. A scraper ("putty knife"0 along with steel wool and kerosene or penetrating oil to take off rust and grunge from the sliding surfaces, followed by feeling these surfaces with the heel of your hand or a lightly dragged fingernail if you see gouges or burrs or dings. Stone down any raised metal if you feel it. Old lathes are surprisingly tolerant and in the right hands, a worn old lathe can produce some very fine work without a 'full on' restoration. New paint looks pretty, as do shiny handles, but neither improves how an old lathe performs in terms of accuracy. Much rests with the person operating an old lathe to 'get out the work'. I have no problem getting fine work out of lathes with ridged wear on the bedways or what seems like a lot of backlash in the cross feed & compound rest feed screws. Pratt & Whitney had a reputation for building very fine machine tools. Your lathe looks to have come with a fair amount of tooling. The fact it has a handwheel collet drawtube, and collets points to maybe it being in a school or toolroom rather than being beat on in a production shop.