What's new
What's new

Quick-Tramming Kurt Vises

Covenant MFG

Aluminum
Joined
May 26, 2021
Location
Greater Sacramento
So I do low volume, high mix. Lots of weird sizes and I find myself setting up and removing vises and other setups pretty often. I just really despise taking the time to indicate in a vise, bolt it, bolt the other to match, double checking etc.
I've been intrigued by things like Aluminum subplates, rocklock systems, and other quick change type stuff.

Anyone have a favorite trick for quickly locating and aligning your standard 6" Kurt vises? Are T-slots typically precise enough to make myself some custom blocks to fit the slots on the bottom? I'll be happy with alignment in X within .0005" across the 6" face, but not sure if I like that too much.
I'm decently fast with the traditional bolt down and tap in with an indicator, but those minutes are super annoying.
EDIT: I'm sure there are other threads on this but I couldn't find any in particular and was hoping maybe there's a solution already made out there that doesn't cost an arm and a leg.
 
The old Atlas shaper and milling machine vise had a piece of keystock on the bottom. Drop it in the slot and keep some pressure so it stayed up against the side of the slot while tightening the hold down bolts. Plenty accurate enough for home shop guys. I assume the vise base had a shallow groove milled in to hold the key stock aligned.
Those Atlas vises are still in high demand.
Bill D
 
I'd say you have to start with a test indicator and measuring how straight your table T-slots are. Next: are your Kurts all genuine and are they the same models? The spacing from the keys to the back jaw is different on some models, even within the 6" jaw family.
 
What machine are you asking about????

If a BP or clone just leave the vice on one end of the table and do other setups in the middle or other end.

I have a BP Series II with a 54" long table. I keep three vises on it. A 6" Kurt trimmed in a 5" swivle vise, and a 4" that moves up and down.
 
What machine are you asking about????

If a BP or clone just leave the vice on one end of the table and do other setups in the middle or other end.

I have a BP Series II with a 54" long table. I keep three vises on it. A 6" Kurt trimmed in a 5" swivle vise, and a 4" that moves up and down.
YCM 560, pretty short table. Typically I keep one vise on the left almost permanently and switch up the right side as needed but that still requires switching out both from time to time.
 
I did what Bill mentioned - made a separate plate with a piece of 1/2” stock bolted to the bottom. All pieces were surface ground prior to assembly. I mounted the vise and located square in relation to the fixed jaw vs. the keystock. I can remove the whole lump quickly and go back within .001-.002 across the jaw, if everything is clean. Plenty good enough for 99% of what I do.
 
If you 'need' half a thou on a vise, I think you need new customers.

You need to do keys, so you can get within 5 thou, snug one one bolt etc etc

machine soft jaws if you really need a half a thou, but half a thou to the edge of the part is reworking a part territory.
hell it is hard to get a vise to tighten within half a thou even with machined soft jaws
 
You'd be happy with .0005" across the vise? Jeez...who wouldn't? If you need that much accuracy, resign yourself to a lifetime of indicating.
 
Not directly related to the OP's question but, so much related information that it belongs here.

I have a Chick 50x50mm foundation sub-plate and vises for my Haas. I never installed it because I was never doing production runs to justify it and the vises are expensive to make soft jaws for. Being a metric foundation, the Kurt vises also didn't fit exactly and the foundation is threaded M12 instead of 1/2-13, complicating strap-clamp setups.

About four months ago I decided it was time to install the sub-plate and start getting some use out of this stuff. Part of what I wanted to do was drill and dowel the bottom of my Kurt 3600V vises so they could quickly and repeatably be dropped onto the foundation.

Using a 0.0001" Bestest indicator, I swept the Chick foundation into tram along the 30" front edge. No, not necessarily a datum so I followed this with the Renishaw probe at various dowel locations along the X-axis. The locations varied both + and - along that axis to less than 0.001" so I decided the foundation was as close as I could expect for future reinstallation.This is where this becomes relevant to the OP's problem.

Next step was fastening a block of aluminum in the machine and cutting perfect X-axis faces on both front and back side of the block. The goal was to clamp each Kurt Vise, to this block, face-down, without the jaws. The back face of the block became the master datum. In that position, I could drill and ream the vise base for precision dowels.

Rather than along the X-axis and only getting a 4"-ish span between dowels, I opted to pin it along Y. This gave almost 12" between dowels. Any sub 0.001" position error on the foundation plate would spread along that distance. The reamer turned out to be oversize and butchered the first hole and that's where my science experiment stopped. I'll come back to it in the future but...

With that first vise clamped and ready to drill, I discovered with the Bestest indicator that I could sweep either of the ground vise sides and they were unbelievably straight. I'd call them dead straight but, someone will chime in that no way a Haas did that on linear guides. Mine did, along the whole side of the vise. My mind was blown. I expected those Kurts to be off by some small amount but, man, they were good.

In all of this, I also carefully measured all the hard jaws that live in the Kurts. Most of them were within half a thou of each other in thickness (can't say on flatness--no surface plate). Again: mind blown that they hold those tolerances. The one set that was out was swapped to the knee mill and now all the CNC jaws are the same.

I bore you guys with all of this because the vises are better than we've been led to believe. Check your own to be sure but, don't be surprised to find out that they really are square, parallel and consistent from unit to unit. I could see installing semi-permanent, oversized keys on a Kurt bottom, setting it up like I had done above (face down and clamped to a reference X-surface) and kissing both sides of the keys to fit the t-slots. I'd expect you could dial it all in to repeat under 0.001" if the slot is straight and smooth.
 
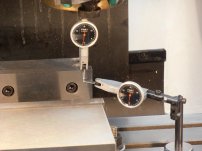
In the Apr-May 2020 edition of Machinist's Workshop I had an article titled, "Easy Mill Vise Alignment". What it explains is a less expensive method that duplicates the two indicator on a bridge devices that are sold.

This method eliminates most or all of the back and forth motion of the table by setting two indicators to read the same when their probes are side-by-side at one end of the vise jaw and then, with one motion of the table brings one of those indicators to the opposite end of the vise jaw. At that point you just tap the vise to bring both indicators to the SAME reading. You don't need both to read zero, just the SAME reading. This, of course, works best with two identical indicators. Here it is in short strokes, in photos.

P01TwoIndicators800x600.JPG
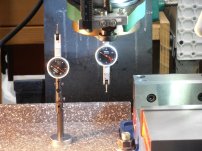
1. One indicator on a magnetic stand and one in the quill.

P05DIsZeroed800x600.JPG
2. The magnetic base is on the mill's table. The two are zeroed at the right end of the fixed jaw.

P06MovedToLeft215Red800x600.JPG
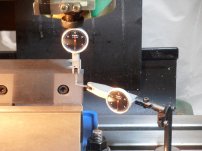
3. The table is moved to bring the quill held indicator to the left side of the fixed jaw. Now it reads the difference (0.004") between the two sides while the table mounted indicator still reads zero.

P07DIReadingsAreSame800x600.JPG
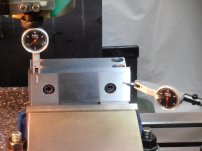
4. The left nut is a bit looser while the right nut is a bit tighter. The vise is tapped until both indicators read the SAME. It does not need to be zero, just the SAME reading. Here it is about 0.0007". The vise is now aligned! And both nuts can be carefully tightened while watching the indicators.

P08FinalCheck800x600.JPG
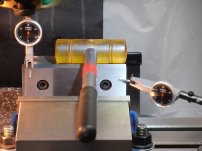
5. There was a little motion of the vise while tightening the nuts. Here you can see a double check when I brought the table back to the original position. They agree within 0.0003" and that is pretty good. But you can do better if you correct the readings as you tighten the nuts. Strictly speaking, this step with a second table movement, is not necessary.

This method duplicates the expensive, commercially sold device and it is both fast and accurate.

Generally speaking you want at least one DTI at your mill, so, with today's prices, it is not a big deal to have a second one, on a magnetic base, there. I had these two in my shop from a purchase that took advantage of a sale some time ago.

If you want the full article and more photos, Village Press does sell back issues and copies of past articles. You can also download the article here from my DropBox:


Edit: The DropBox link apparently was not working, I have replaced it and hope it is OK now.
 
Last edited:
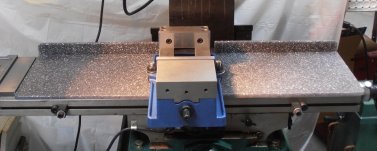
Here is another tip for quick vise alignment. After making these plastic covers for my mill's table, I discovered that I had created a fixture for a fast, rough alignment.

I had filed the edges of the left hand cover to a close fit to keep chips from getting below it. Those edges also align the vise within a few thousandths if the vise is pushed against it while tightening the hold-down nuts. The fact that it rests against the power feed for the table helps (at far left in the photo). Then my final alignment procedure, explained above, can be used for a final alignment.

P06CoversOnTable800x312.JPG
 
Atlas was real proud of their 7" shaper. My father explained they used the machine itself to plane down it's own table. this Made sure it was parallel to itself.
Kind of hard to machine the tee slots full length on a bridgeport by itself. have to send the table out for another machine to do the work.
Bill D
 
Earlier this year, I bought a new Kurt 4" Reverse vise for my Bridgeport, which uses their Sine Fixture Key system to align with the mill table slot. I currently have about .0002" across the fixed jaw. All I did was set the vise in place and bolt down.
 
Not a fan of tightly fitted keys in vice bases. If tight enough to be decently accurate they are so tight that removing the vice can be bit of struggle. Not keen on the prospects of damage to the slots from that little bit of swarf that got missed either.

On my Bridgeport I use the simple pull back system where the vice is lightly fitted and pulled back so the T nuts are hard against one side of the table T slot and the screws hard up against the opposite side of the vice slots before snugging down. Repeatable to a thou or two across my Vertex 4" wide opening vices. Providing I don't swop the bolts over when putting the vice back on the table! I leave the rotating base on for all normal work so no great issue really.

Was going to do an improved version with shop made, more precise, T-nuts and bolts carefully fitted to the vice slots via T washers going down into the vice slots to take up the slack after they had been machined true to the vice jaws. Didn't seem worth the effort as the simple way worked well enough. I'd expected the more precise version to halve the errors.

Issue with any pull back system is forgetting to pull the vice back before tightening up. I wonder if the T washers could be made with some sort of taper arrangement engaging in the vice slots to lightly force everything into alignment as the bolts are tightened down. Obviously the washer part needs to sit hard on notes vice slot surrounds long before any serious force is generated. Conceptually this sort of deal would work fine with a key on the vice base made narrower than the table slots.

As ever with this sort of thing dealing with pesky small swarf is essential.

My feeling is that any practical system that isn't too tight to work with is going to need clearances large enough to give at least a thou or two per foot of wobble. So the precision you are seeking will need something to take up that bit of slack. Fitting on the long axis of the vice as Donkey Hotey suggests would give you a longer lever arm and reduce the effects of wobble.

Clive
 
I made a set of keys for my vises, and when they're on the table, they're within about .001", bringing them closer is a minute or so at most.
Eventually, a nice sub table will make this moot.
 
Most guys I see zero the indicator on one end of the jaw, traverse to the other end, bump that end, then traverse back only to find the first end has moved. They try to limit this movement by snugging one side.

Try this instead. Leave both nuts loose and traverse the vise, the whole while bumping the vise while watching the indicator movement. Once or twice gets the vise straight. Repeat while snugging the nuts down. Zero the indicator, move to the second vise and repeat to this zero.

The vises still aren't keyed but it's quicker to indicate anything straight this way.
 
About 10 years a member demonstrated indicating in 3 vices one mill in just a few minutes. He was pretty good except the throwing the wrenches down on the table. it would have only added 30 seconds to have been more careful. If you want to look for that thread it was in the CNC section.
 
I had tried the keys in the table slot before. Here's two observations.

Some apparently think that you should have keys that fit so closely that they can just place the vise on the table with the key in the slot and tighten it down. I found that there was always some play between the keys and the slot and that would not work if you wanted the best accuracy. When I was trying this I always held the vise against the rear surface of the slot.

The second observation was that even if I was extra careful to clean the keys and the slot before mounting the vise, the best I was ever able to get with the keys was about +/-0.001". I don't think the makers of the mills intended the surfaces of the slots to be precision references. Or at least, not all of them. I would bet that the tee slots are cut with milling machines in one pass so precision is not the intent there. If you want better accuracy than that, you need to use indicator(s) and tap the vise into place.


Back
Top