What's new
What's new

Stuck Taper Pin Removal Tool

dazz

Stainless
Joined
Aug 20, 2006
Location
New Zealand
Hi
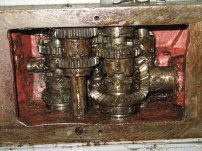
I am doing deep maintenance on my Milling machine that is held together with lots of tapered pins.
Most of the tapered pins are in tight spaces where I can't get to the far side to backup with a heavy chunk of metal.
I read a post that included a comment from someone ( sorry, I don't remember the exact post or the person) about using a press type tool to remove taper pins.

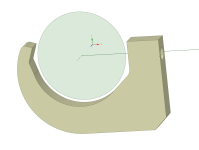
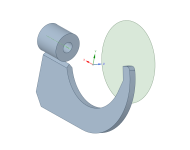
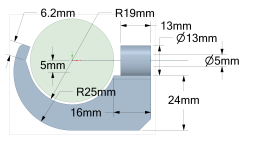
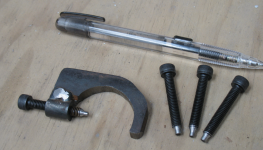
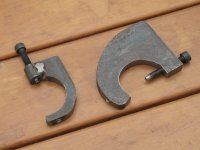
Taking that comment, I designed and made a tool to remove taper pins on my milling machine. The tool is sized for my mill.
The screw is an M6.

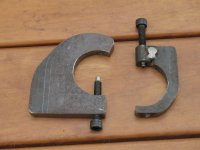
I designed two versions. One is made of steel thick enough to drill and tap (one piece)
The other version for tight spots is made of thinner steel with a threaded bush welded on.
The screws are turned for different sized pins.

If a pin protrudes from the fat end, use washers to create a space to release into.
 

Attachments

  • One Piece Taper Pin Press.png
    One Piece Taper Pin Press.png
    53 KB · Views: 52
  • Two Piece Taper Pin Press GA.png
    Two Piece Taper Pin Press GA.png
    31.4 KB · Views: 37
  • Two Piece Taper Pin Press dims.png
    Two Piece Taper Pin Press dims.png
    96.1 KB · Views: 53
  • Taper Pin Press tool.png
    Taper Pin Press tool.png
    1,014.8 KB · Views: 50
6E681CFD-67EB-4704-BCEA-AAE712C03410.jpeg
I modified a C clamp to do this.
What I found works better and is quicker is to use Starter Punches.
D35A6F40-7991-4DFC-952D-A44673C57F7B.jpeg
The Starrett punch on the left is a Starter Punch. The one on right is a standard pin punch. Starter punches have concaved tips that keep them from drifting, so are ideal to tapping out tapered pins.
 
Quick tip: next time you put things back together use a tapered pin with a threaded hole in the big end. Then the only tools you need to remove it are a stack of washers and a bolt or SHCS (and a suitable wrench).
On my Monarch 10ee, most are too small for that. Using the correct tappered reemer to clean up the joke and then using Anti-seize seems to work well for smaller pins.
 
On the bigger pins we had to stamp H D at the head end of the pin. One stamp on either side of the pin head. At least that way you know where the head end is.

Regards Tyrone.
new guy was hammering on a taper pin trying to remove it for a while before I came over to see what the problem was, sure enough he was hammering on the big diameter end lol
 
That's another reason I like the threaded hole. I have put them in down to #4 thread and they work just fine. The hole doesn't need to be deep and as long as the pin still has a little meat left it will work fine - the ODs of the pin are generally fully supported in the mating part so it doesn't need much remaining wall thickness to work just fine.
 
The Starrett punch on the left is a Starter Punch. The one on right is a standard pin punch. Starter punches have concaved tips that keep them from drifting, so are ideal to tapping out tapered pins.

Carpenters would call the one on the left a nail set - used to put the head of a finishing nail just below the surface so you can fill over it.
 
Sometimes it’s not easy to tell. Especially if some fool has filed and polished the ends right down.

Regards Tyrone.
agreed, the one's on the machines we deal with can't be any more obvious however. big ol head on one end sticking up above surface and a thinner tail protruding out the other side
 
I have owned several things where the taper pins were very damn stuck and I wound up scrapping them. I have a friend whose lathe needed spindle bearings. He bought them but couldn't install them because of all the taper pins he couldn't get at.

OTOH, when my father in law was volunteering at Boeing Museum of Flight, they had toy planes kids could play on. One had pedals and oh boy did those kids stomp on them. He brought me mechanisms to fix and they came back several times. Finally I drilled and reamed for taper pins and banged those in and the thing never came apart again.
 
I made the number 2 version today.
Two major changes.
I drilled a hole so the small end of the taper pin has somewhere to go. Much easier than fiddling with washers.
I version 2 has a lot more metal to make it stronger. The first version is too wimpy. It only just fits where it needs to go.

I have made this for my mill. It is sized for that. If it didn't fit something, I would just make another version to suit.

The taper pin I want to remove is now a rivet because of what I did earlier with a hammer and punch. I am going to drill a 2.5mm hole down the centre of a M6 screw. When the tool is clamped in place, I can use it as a drilling jig to weaken the pin.
 

Attachments

  • IMG_1695 sml.jpg
    IMG_1695 sml.jpg
    91.8 KB · Views: 20
  • IMG_1699 sml.jpg
    IMG_1699 sml.jpg
    90.2 KB · Views: 21
Hi
It has been a while since the last post but I failed to remove the taper pin.
As a consequence, I will need to use a sabre saw to cut the threaded shaft. That would be no loss because that is the part I would be aiming to replace.
With the shaft cut, I will be able to remove the gear and taper pin. This will give me a lot more options for getting the taper pin out.
The taper pin connects the lower right vertical shaft with the lower right bevel gear.
 

Attachments

  • IMG_1637.JPG
    IMG_1637.JPG
    2.9 MB · Views: 28
I'D first butchard it up drilling out the tapered pin. We all know what happens when you do that.:( The end results would be, you wouldn't have cut the shaft to remove the pin. Just a bunch of pieces and a new hole. Just ream it out for the next larger size. Even after that, you still have to remove the pin.
 
I have to deal with tp's quite often. The best approach is not tapping on them. They are soft and that is what makes them grip so good. Best is to use the heaviest beater that will fit in the area you have to work in.On shafts hung out from its support use the heaviest backer that will fit. A bar length wise , parallel to the pin,has the most inertia. Make the first blow count! Any succedding blows will just peen the end and then you must break out the drill.

Correctly installed pins should have both ends protruding enough to tell which end is big or mark it.

Modifing pins is easy just drill and ream some scrap round stock short enough for the pin go through. Then it is easy to thread male or female of the large end and also shorten to the correct length in the lathe. They don't need to be pressed in very hard hold while machining.
I deal mostly in metric so I keep just the longest available in each size since I have to mod them anyway. Metrics are measured by the small end and are 50/1 American are 48/1.
 
The taper pin was made in the Eastern Bloc. It is hard enough that I could not drill out the TP with a new good quality bit purchased for the job.
The reason I want to remove the TP is to replace a worn threaded shaft and bronze nut. Not urgent but something I will need to do in the next few years.
The plan is to cut the shaft in situ and to then remove the gear with TP. I can then put the assembly on the lathe and bore out the shaft and TP.
 
I have used a home made press to remove stuck taper pins.
This example was on an open ended shaft, easy to make a press for a closed end shaft. It is a simple "O" drilled for a bolt to press the pin out, simple. If more threads needed a piece of steel could be welded on.


Back
Top