What's new
What's new

Air America DeVilbiss air compressor rebuild

ctag

Plastic
Joined
May 27, 2023
Hi all,

If this is the wrong place to post a rebuild log please let me know. I see most air compressor threads in Manufacturing Today > General, but Machine Reconditioning sounded more appropriate to me.

I recently bought my first air compressor, it's a 1995 6.5HP job. The guy I bought it from had an awesome garage shop, and said it worked fine but he wanted something more portable that could roll around. Fair enough, I'm wondering if that's the route I should have gone too.

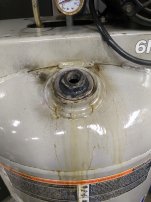
I'm kicking myself a little, the decal on the tank was in perfect condition before I scraped it up while loading/unloading from the truck.

PXL_20230522_223022740.resized.jpg

First thing I did when I got home was check the oil, and found some opaque slime that appeared to be about half the amount I'd have guessed the compressor should be filled to. Luckily I already wanted to do some tinkering, so I started pulling things apart.

PXL_20230523_201847556.resized.jpg

PXL_20230523_202454879.resized.jpg

PXL_20230523_203007274.resized.jpg

The bearing material looks OK to me, but there's definitely some wear lines:

PXL_20230523_203017854.resized.jpg

My understanding is that the crud on the valves can be caused by using automotive oil?

PXL_20230523_220129860.resized.jpg
 
The tank comes with a "rust=explosion" warning sticker on it. Advise from a friend was that rusty tanks tend to just leak air instead of detonate, but I wanted to know what was up with this.. 28 year old one.

I started by trying to remove the large reducer thing-a-majig with an electric 1/2" impact and a 23mm socket. Then I soaked it overnight in penetrating oil. And then I hit it with a torch along with the impact and then a breaker+cheater bar. No joy. I guess it's staying put.

PXL_20230527_172603480.resized.jpg

But once the gear on top was all removed, I could shine a flashlight down the top, and then look through the reducer to see inside.

PXL_20230527_154845035.resized.jpg

PXL_20230527_172610574.resized.jpg

That.. doesn't look like rust to me. Instead it just looks like old gummy oil and junk. Is there a chance this tank isn't rusty? The drain spigot on the bottom was covered in cobwebs, I don't think it's been opened in a minute.

One of the compressor cylinder walls has a small groove in it, and it appears that the compressor was pumping a good bit of oil downstream, maybe that wound up being a preventative?
 

Attachments

  • PXL_20230525_204340015.resized.jpg
    PXL_20230525_204340015.resized.jpg
    2.5 MB · Views: 5
I had some diluted Purple Power already hot in the ultrasonic cleaner, so I poured that into the tank:

PXL_20230527_210641205.jpg

And then rocked the tank back and forth on the pallet to swish the solution around. it drained out looking a lot like it had going in, I don't think much dissolved into it, but a lot of rusty flakes came out too.

PXL_20230528_080853454.jpg.min.jpg

I'm going to try again with a vinegar solution today, from a tip I read online.
 
Don't dick around. Dump in a quart of varsol or laquer thinner in there and slosh it around a bit while letting it sit for an hour or 2, then drain. With a little luck, you will have a good tank to either remount your pump, or upgrade to a real industrial compressor pump and motor!
 
Don't dick around. Dump in a quart of varsol or laquer thinner in there and slosh it around a bit while letting it sit for an hour or 2, then drain. With a little luck, you will have a good tank to either remount your pump, or upgrade to a real industrial compressor pump and motor!
I couldn't find varsol anywhere, but did pick up some laquer thinner and ran that through.

The vinegar was a bad idea... It cleaned up the bottom area nicely, but it rusted the entire rest of the tank! After reading more around online I'm learning that the best course of action was probably to leave the tank well enough alone.

PXL_20230531_212909977.jpg.min.jpg
 
I am by no means air compressor expert just a user. However, I have some experience using phosphoric acid based rust converter’s. I have found that applying them to a rusty surface converts the rust into a very stable compound that resists further rusting. If there is some vinegar induced rust in your tank now, and probably some other rust, that might’ve been there, I think putting in some. Phosphoric acid containing paint prep would be a good idea. They are very common. Here is one: Paint prep

I use a similar prep on steel foundry flasks used in cast iron casting. That environment is very rust-inducing as acids, moisture, and heat are involved and the flasks rust vigorously. But once they have a nice rust surface I brush on some phosphoric acid paint prep. That stops further rusting nearly completely. I was surprised it worked so well.

Denis
 
I like these rather ordinary air compressors. For a home shop they work fine, run all day on 20 amp 110v, and I’ve bought 3 of the 20 gal models for about $20 ea. Back before my garage was upgraded to multiple 220 outlets, a bigger commercial air compressor wasn’t an option - now that it is an option I’m quite happy with my triple setup. For blowing of dust or airing up a tire only one pump is plugged in and for running automotive type HVLP .011” cup gun all three keep up just fine.

Edit: These inexpensive tanks will eventually develop rust holes and leak at the low points where water and oil collect. Flush out the oil once in a while and keep it dry. I’m adding a 3/4” ball valve above the tank and another 3/4” ball valve for the drain so when it isn’t being used the two open valves allow enough air flow to dry out any moisture that was produced. Just draining the tank is good, but it still leaves a lot of humidity in the tank.

FF3485C4-ED0D-44DA-937D-C52D84A32026.jpeg
 
Last edited:
I just fought a similar battle with a plumbing fixture on the side of an air tank. That one was a 2" pipe plug. Eventually an industrial engineer told me I should use a torque multiplier to get it out. That one had a male square head 1-5/16" though and I didn't want to spring for the socket. Since you already have a socket that fits, you should be able to rent a torque multiplier and crank that thing out of there. It's something to think about anyway.
 
The flash rusting on the side of the tank caused by the vinegar is not a concern provided you can neutralize the acid and get something in there to passivate the iron.

Now regarding Ospho or straight phosphoric acid. The problem is it doesnt penetrate the rust and lift it off the surface. It converts the iron oxide to iron phosphate on the surface, trapping the iron oxide under it. You have to scrub it and supply more acid, repeatedly, to get to the bottom of the rust pits. I dont trust it and a paint job, to keep oxygen out. But its better than nothing.

Over the past year and a half ive had 10 pieces of 3" channel iron 5 feet long that i scrubbed down to the bottom of all the rust pits with ospho, and flame straightened them for use as a welding table.. due to moving and buying a house they have been left outside in the wet cold pacific northwest for over a year and they have no signs of rust yet. The ospho did its job to passivate the surface. The frame that the bars sit on was painted with red self etching metal primer and a coat of paint, it also didnt rust.

I have other pieces of metal i treated with ospho in years past, such as my grandpa's steel sawhorses.. but didnt scrub them . Just a few coats of ospho and mystery oil paint. They continued to rust under the paint, lifting the paint off the surface.

I do not trust ospho to work unless you scrub all the rust off the surface while applying it, continuing until the black sludge left behind is gone and stops forming.

I would consider dumping a quart of BB's inside the tank and agitate the tank continuously with a quart of ospho inside the tank for 6 hours or so. Repeat the process as needed until the bottom of the tank is a uniform grey but bright metal color.

The black crap produced by the ospho is the carbon in the iron oxide (formerly carbon in the metal) liberated by the acid. Water wont dissolve it, but more ospho will.

My grandpa's 500 pound anvil soaked up a quart of ospho and i then wiped it down with synthetic motor oil and it has not rusted in open weather this winter except where something was sitting on it.

It might be less work to fill an aircompressor tank with water and use electrolysis.
 
I appreciate all of the suggestions.

Unfortunately I spent most of July traveling for work, and when I checked on the tank again, the rust had developed noticeably. Now the inside of the tank looks much rougher, and there are rusty blobs protruding from the vertical walls(?).

I like the BBs idea. Will try to hunt down some Por15 or Ospho and give this a shot.
 
Well, this project has been an exercise in "should have left well enough alone" alright. I found some rust reformer, and gave the tank two coats by sloshing it around with an engine hoist:
PXL_20230903_180927831.jpg

It didn't look much better afterward:
PXL_20230903_181520281.jpg

But I needed the air compressor up and running, so I decided to "ship it." I finished a quick hone on the compressor cylinders, replaced the reed valves and piston rings, and threw it back together:
PXL_20230903_152403745.jpg

PXL_20230903_165316110.jpg

I ran the compressor unloaded for 30 minutes as a break-in period, and then shut the tank valve and let it fill to ~100psi. Then immediately changed the oil, which was water-clear when it went in and had already turned quite dark.
PXL_20230903_224458080.jpg

PXL_20230903_225245692.jpg

So the compressor works, but now I'm at a loss for how to install a regulator and the drying radiator. How do people determine what fittings are what type on these things?!

1693963626754.png
I think the pipe from the compressor to the tank is 1/2 inch, and the compression fittings for it are.. 1/2 NPT? The radiator has "AN-8" male terminals on it.
 
This is the kind of thing I mean. I bought an air compressor air gauge. Simple, right? Nope, wrong size threads.

PXL_20230906_014928153.jpg
 
There's an reducer for that at your local plumbing supply or decent hardware store.
1/8" F x 1/4" F and an additional 1/4" close nipple (or longer nipple)

Verify, though: pictures are hard to scale and it is just faintly possible that the small one is 1/4" and the larger 3/8"
However my guess is based on 1/8" NPT is about the only pipe thread that looks fine threaded (27tpi)

smt
 
Thanks Stephen. I wound up just taking all of the gauges and fittings in to the local hardware store and manually checking them against the adapters they had.

New gauge installed:
PXL_20230906_231635857.jpg

I found some L-type copper pipe and routed it to an oil cooler radiator:
PXL_20230907_005052928.jpg

Flared the end and used a flare nut to secure it:
PXL_20230907_005541652.jpg

And added a water separator and regulator.
vlcsnap-2023-09-06-21h10m54s375.png

It's not pretty, but it should help keep the air dryer in the meantime.
 

Attachments

  • PXL_20230907_005052928.jpg
    PXL_20230907_005052928.jpg
    1.4 MB · Views: 0


Back
Top